Working with Presets
A preset is a record of the position of all controllable axes for a camera system (pan, tilt, focus, zoom, and iris). It also includes a name, a run duration, a category, and an External ID (optional).
This section describes how to work with presets, including creating, editing, and recalling them. It includes the following major topics:
About Preset Modes
The PT Head Control interface has two operation modes, also known as Preset Modes , which define the behavior of the Presets page:
- Panel mode — In this mode, you tap a preset to select it, and then tap an action button (Cut , Run , Clone , Update , Edit , or Delete ) at the bottom of the Presets page. When you select a preset, the border of the preset button turns purple.
- Shotbox mode — In this mode, you tap an action button at the bottom of the Presets page to enter an action mode (Cut , Run , Alt , Clone , Update , Edit , or Delete ), and then tap the preset to which you want to apply the action.
If the row of action buttons includes the Alt button, the interface is in Shotbox mode.
For information about switching between operation modes, see “Interface Area”.
Working with Presets in Panel Mode
This section describes how to work with presets in Panel mode. Information presented here applies only when the PT Head Control interface is in Panel mode (as opposed to Shotbox mode).
Unless stated otherwise, tasks described in this section are to be performed from the Presets page.
To access the Presets page, tap the Presets button.
Before you attempt these procedures, we suggest you review the various controls available on the Presets page. For a description of these controls, see “Presets Page (in Panel Mode)”.
This section includes information about performing the following tasks in panel mode:
- “Switch Between Categories of Presets (Panel mode)”
- “Add a New Preset (Panel mode)”
- “Clone a Preset (Panel mode)”
- “Update a Preset Position (Panel mode)”
- “Recall a Preset (Panel Mode)”
- “Edit a Preset (Panel mode)”
- “Edit Default Preset Options (Panel mode)”
- “Delete a Preset (Panel mode)”
Switch Between Categories of Presets (Panel mode)
Presets are arranged in categories, represented by category buttons near the top of the Presets page. The background of the category button representing the current category is always purple.
To switch to a different category:
-
Tap the category button representing the desired category.
The category button turns purple, and the presets in that category are accessible.
Add a New Preset (Panel mode)
A preset is a record of the position of all controllable axes for a camera system (pan, tilt, focus, zoom, and iris). It also includes a name, a run duration, a category, and an External ID (optional).
When a preset is stored, it includes a set of Preset Options (preset Name and preset Duration ). Depending on the current Store Mode , you may be required to review the Preset Options when you add a new preset. For more information, see “Interface Area”.
To add a new preset:
-
Adjust the camera position and lens settings to prepare the shot.
-
Tap the New button.
Depending the Store Mode setting, the Add New Preset dialog box may appear (Figure ??). For more information about the Store Mode setting, see “Interface Area”.
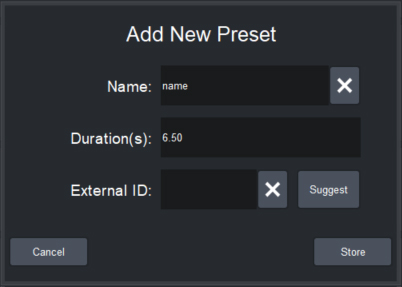
Figure 1 - Add New Preset dialog box
-
If the Add New Preset dialog box appears, review and/or modify the Preset Options as required:
-
In the Name box, type a name for the preset. The name appears on the preset button.
-
Tap the Duration box, specify the recall duration (in seconds) on the number pad, and then tap ENTR .
-
In the External ID box, do one of the following to specify an External ID, if required:
-
If an External ID number has already been assigned and you do not need to change it, skip the rest of this step, and proceed to Step 4.
-
Tap the Suggest button to automatically assign an External ID.
tipYou can configure the system to automatically assign an External ID each time you add or clone a preset. For more information, see “Edit Default Preset Options (Panel mode)”.
-
Tap the External ID box, specify the External ID number in the number pad, and then tap ENTR .
tipAlternatively, if you want to delete the External ID, tap the X button beside the External ID box.
noteEach External ID must be unique within a certain scope — either unique within the preset category, or unique among all External IDs for the device. The scope within which External IDs must be unique depends on the External ID Uniqueness setting. For more information, see “Interface Area”.
tipAn External ID is an identification number assigned to a preset. External IDs enable automation control systems to address and run presets. Not all automation control systems require External IDs. You can also use External IDs to reference presets if you are creating your own custom panel to recall presets.
-
-
-
Tap Store .
Clone a Preset (Panel mode)
You can create a copy of a preset.
When you clone a preset, you can modify the cloned preset’s Name , Duration (in seconds), and External ID .
To clone a preset:
-
Select the preset you want to copy.
tipTo select or deselect a preset, tap its button. A preset is selected when the border of its button is purple.
-
Tap the Clone button.
Depending the Store Mode setting, the Clone Preset dialog box may appear (Figure ??). For more information about the Store Mode setting, see “Interface Area”.
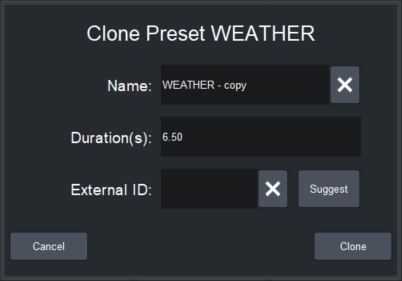
Figure 2 - Clone Preset dialog box
-
If the Clone Preset dialog box appears, review and/or modify the Preset Options as required:
-
In the Name box, type a name for the preset. The name appears on the preset button.
-
Tap the Duration box, specify the recall duration (in seconds) on the number pad, and then tap ENTR .
-
In the External ID box, do one of the following to specify an External ID, if required:
-
If an External ID number is already assigned and you do not need to change it, skip the rest of this step, and proceed to Step 4.
-
Tap the Suggest button to automatically assign an External ID.
tipYou can configure the system to automatically assign an External ID each time you add or clone a preset. For more information, see “Edit Default Preset Options (Panel mode)”.
-
Tap the External ID box, specify the External ID number in the number pad, and then tap ENTR .
tipAlternatively, if you want to delete the External ID, tap the X button beside the External ID box.
noteEach External ID must be unique within a certain scope — either unique within the preset category, or unique among all External IDs for the device. The scope within which External IDs must be unique depends on the External ID Uniqueness setting. For more information, see “Interface Area”.
tipAn External ID is an identification number assigned to a preset. External IDs enable automation control systems to address and run presets. Not all automation control systems require External IDs. You can also use External IDs to reference presets if you are creating your own custom panel to recall presets.
-
-
-
Tap Clone .
Update a Preset Position (Panel mode)
You can update the selected preset by storing the current position of the PT head (pan and tilt) and the camera lens (zoom, focus, and iris).
Alternatively, you can edit a preset to update its position and preset options. For more information, see “Edit a Preset (Panel mode)”.
If a preset has been locked by SmartShell or another controller, it can not be updated from DashBoard. If you try to update such a preset, a message appears, to inform you that the preset is locked. Presets can not be locked or unlocked from the PT Head Control Plugin .
To update a preset:
-
Select the preset you want to update.
tipTo select or deselect a preset, tap its button. A preset is selected when the border of its button is purple.
-
Tap the Update button.
-
If the CONFIRM UPDATE dialog box appears, tap Update .
Recall a Preset (Panel Mode)
There are two ways to recall a preset:
- Cut — All axes move towards their destinations as quickly as possible.
- Run — The axes all reach their destinations at the same time. A preset runs over a specified duration. You can run a preset using the default duration, or specify an alternative duration for one-time use.
If recalling a preset requires movement of one or more axes that are disabled, the preset is not recalled and a WARNING message appears stating the Reason as NOTENABLED . For information about enabling and disabling axes, see “Configure Axis Behavior”.
To cut a preset:
-
Select the preset you want to cut.
tipTo select or deselect a preset, tap its button. A preset is selected when the border of its button is purple.
-
Tap the Cut button.
To run a preset:
-
Select the preset you want to run.
tipTo select or deselect a preset, tap its button. A preset is selected when the border of its button is purple.
-
Do one of the following:
- To run the preset using the default duration, tap the Run button.
- To run the preset using an alternative duration, tap the Run Duration box, specify the duration (in seconds) on the number pad, tap the ENTR button, and then tap the Run button.
While a preset is being recalled, you can do any of the following:
- Use manual controls to adjust the position of any controllable axes. Manual control is available only if manual control is enabled (via the Joystick Control > Enabled button).
- Use time control to adjust the duration of the preset. This feature is not available on some heads.
- Recall a different preset, causing the head to move to the new preset position instead of the original preset.
- Halt the head, stopping all axes as quickly as possible.
Edit a Preset (Panel mode)
When a preset is stored, it includes a set of Preset Options consisting of a name, a run duration, a category, and an External ID (optional).
You can edit a preset to modify the preset options and the preset position.
When you edit a preset, you can customize the acceleration and deceleration rate of the axes. You can configure all axes to have the same rates, or customize the rates for individual axes. If you want the axes to accelerate in sync, set identical rates for each axis. The same applies to deceleration rates. For example, if acceleration rates differ between two axes, the axis with the higher acceleration rate may appear to start moving before the other axis, and may reach its constant velocity sooner.
If a preset has been locked by SmartShell or another controller, it can not be edited from DashBoard. If you try to edit such a preset, a message appears, to inform you that the preset is locked. Presets can not be locked or unlocked from the PT Head Control Plugin .
To edit a preset:
-
Select the preset you want to edit.
tipTo select or deselect a preset, tap its button. A preset is selected when the border of its button is purple.
-
Tap the Edit button.
The Edit Preset dialog box appears (Figure ??).
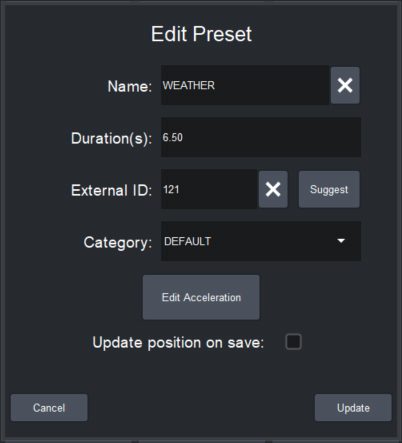
Figure 3 - Edit Preset dialog box
-
In the Name box, type a name for the preset. The name appears on the preset button.
-
Tap the Duration box, specify the recall duration (in seconds) on the number pad, and then tap ENTR .
-
In the External ID box, do one of the following to specify an External ID, if required:
- If an External ID number is already assigned and you do not need to change it, skip the rest of this step, and proceed to Step 6.
- Tap the Suggest button to automatically assign an External ID.
- Tap the External ID box, specify the External ID number in the number pad, and then tap ENTR .
tipAlternatively, to delete the External ID, tap the X button beside the External ID box.
noteEach External ID must be unique within a certain scope — either unique within the preset category, or unique among all External IDs for the device. The scope within which External IDs must be unique depends on the External ID Uniqueness setting. For more information, see “Interface Area”.
tipAn External ID is an identification number assigned to a preset. External IDs enable automation control systems to address and run presets. Not all automation control systems require External IDs. You can also use External IDs to reference presets if you are creating your own custom panel to recall presets.
-
In the Category box, select the category to which you want the preset to belong.
-
If you want to customize the acceleration and deceleration rates for the preset, tap the Edit Acceleration button (if present — not available on some PT heads), and then:
-
Tap the All Axes button, and then specify the default acceleration rate (Accel ) and the default deceleration rate (Decel ) for all axes (pan, tilt, zoom, and focus). See Figure ??.
tipFor Furio heads running v5.x firmware, and X-series heads, we recommend setting acceleration and deceleration rates to 25 for optimal performance.
tipThis step sets the rates for all axes to the same values. You can keep them all the same, or customize the rates for individual axes in the next step.
-
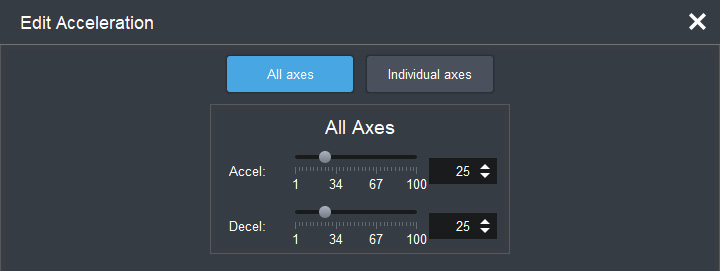
Figure 4 - Edit Acceleration dialog box (all axes)
- If you want to customize the acceleration rate and/or deceleration rate for individual axes, tap the Individual axes button and then specify the rates for each axis as required. See Figure ??.

Figure 5 - Edit Acceleration dialog box (individual axes)
-
When you are finished setting acceleration and deceleration rates, tap the X button to close the Edit Acceleration dialog box.
- If you want to update the preset to record the current positions of all controllable axes, select the Update position on save check box.
- Tap Update .
Edit Default Preset Options (Panel mode)
You can edit the default values for the Preset Options , which are the values presented for review or automatically applied each time you store a preset.
When you store a preset, Preset Options are also stored. Depending on the Store Mode , you may or may not have an opportunity to review and edit the Preset Options before they are stored with the preset. For more information about the Store Mode setting, see “Interface Area”.
Preset Options can also be changed after a preset is added or cloned. For more information, see “Edit a Preset (Panel mode)”.
To define the default Preset Options:
-
Tap the Edit Defaults button.
The Edit Default Preset Options dialog box appears (Figure ??).
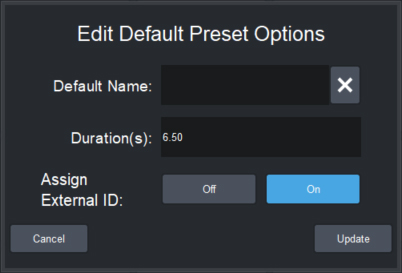
Figure 6 - Edit Default Preset Options dialog box
-
Review and/or modify the default Preset Options as follows:
-
In the Default Name box, type a default name for new presets. The name, plus a timestamp showing when the preset was created, are displayed on the preset button.
-
In the Duration box, specify the default run duration, in seconds.
-
If you want an External ID to be automatically assigned whenever a new preset is added, beside Assign External ID tap the On button. Otherwise, tap the Off button.
tipAn External ID is an identification number assigned to a preset. External IDs enable automation control systems to address and run presets. Not all automation control systems require External IDs. You can also use External IDs to reference presets if you are creating your own custom panel to recall presets.
Each External ID must be unique within a certain scope — either unique within the preset category, or unique among all External IDs for the device. The scope within which External IDs must be unique depends on the External ID Uniqueness setting. For more information, see “Interface Area”.
-
Tap Update .
-
Delete a Preset (Panel mode)
After you delete a preset, it is permanently deleted from the head and can no longer be recalled.
If a preset has been locked by SmartShell or another controller, it can not be deleted from DashBoard. If you try to delete such a preset, a message appears, to inform you that the preset is locked. Presets can not be locked or unlocked from the PT Head Control Plugin .
To delete a preset:
-
Select the preset you want to delete.
tipTo select or deselect a preset, tap its button. A preset is selected when the border of its button is purple.
-
Tap the Delete button.
The CONFIRM DELETE dialog box appears.
-
Tap Delete .
Working with Presets in Shotbox Mode
This section describes how to work with presets in Shotbox mode. Information presented here applies only when the PT Head Control interface is in Shotbox mode (as opposed to Panel mode).
Unless stated otherwise, tasks described in this section are to be performed from the Presets page.
To access the Presets page, tap the Presets button.
Before you attempt these procedures, we suggest you review the various controls available on the Presets page. For a description of these controls, see “Presets Page (in Shotbox Mode)”.
This section includes information about performing the following tasks in Shotbox mode:
- “Switch Between Categories of Presets (Shotbox mode)”
- “Add a New Preset (Shotbox mode)”
- “Clone a Preset (Shotbox mode)”
- “Update a Preset Position (Shotbox mode)”
- “Recall a Preset (Shotbox mode)”
- “Edit a Preset (Shotbox mode)”
- “Edit Default Preset Options (Shotbox mode)”
- “Delete a Preset (Shotbox mode)”
Switch Between Categories of Presets (Shotbox mode)
Presets are arranged in categories, represented by category buttons near the top of the Presets page. The background of the category button representing the current category is always purple.
To switch to a different category:
-
Tap the category button representing the desired category.
The category button turns purple, and the presets in that category are accessible.
Add a New Preset (Shotbox mode)
A preset is a record of the position of all controllable axes for a camera system (pan, tilt, focus, zoom, and iris). It also includes a name, a run duration, a category, and an External ID (optional).
When a preset is stored, it includes a set of Preset Options (preset Name and preset Duration ). Depending on the current Store Mode , you may be required to review the Preset Options when you add a new preset. For more information, see “Interface Area”.
To add a new preset:
-
Adjust the camera position and lens settings to prepare the shot.
-
Tap the New button.
Depending the Store Mode setting, the Add New Preset dialog box may appear (Figure ??). For more information about the Store Mode setting, see “Interface Area”.
Figure 7 - Edit Default Preset Options dialog box
Figure 26 - Add New Preset dialog box
-
If the Add New Preset dialog box appears, review and/or modify the Preset Options as follows:
-
In the Name box, type a name for the preset. The name appears on the preset button.
-
Tap the Duration box, specify the recall duration (in seconds) on the number pad, and then tap ENTR .
-
In the External ID box, do one of the following to specify an External ID, if required:
-
If an External ID number is already assigned and you do not need to change it, skip the rest of this step, and proceed to Step 4.
-
Tap the Suggest button to automatically assign an External ID.
tipYou can configure the system to automatically assign an External ID each time you add or clone a preset. For more information, see “Edit Default Preset Options (Shotbox mode)”.
-
Tap the External ID box, specify the External ID number in the number pad, and then tap ENTR .
tipAlternatively, if you want to delete the External ID, tap the X button beside the External ID box.
noteEach External ID must be unique within a certain scope — either unique within the preset category, or unique among all External IDs for the device. The scope within which External IDs must be unique depends on the External ID Uniqueness setting. For more information, see “Interface Area”.
tipAn External ID is an identification number assigned to a preset. External IDs enable automation control systems to address and run presets. Not all automation control systems require External IDs. You can also use External IDs to reference presets if you are creating your own custom panel to recall presets.
-
-
-
Tap Store .
Clone a Preset (Shotbox mode)
You can create a copy of a preset.
When you clone a preset, you can modify the cloned preset’s Name , Duration (in seconds), and External ID .
To clone a preset:
-
If the Clone button is not pink, tap it to place the interface in Clone mode.
All assigned preset buttons turn pink.
-
Tap the preset you want to copy.
Depending the Store Mode setting, the Clone Preset dialog box may appear (Figure ??). For more information about the Store Mode setting, see “Interface Area”.
Figure 8
Figure 27 - Clone Preset dialog box
-
If the Clone Preset dialog box appears, review and/or modify the Preset Options as required:
-
In the Name box, type a name for the preset. The name appears on the preset button.
-
Tap the Duration box, specify the recall duration (in seconds) on the number pad, and then tap ENTR .
-
In the External ID box, do one of the following to specify an External ID, if required:
-
If an ID number is already assigned and you do not need to change it, skip the rest of this step, and proceed to Step 4.
-
Tap the Suggest button to automatically assign an External ID.
tipYou can configure the system to automatically assign an External ID each time you add or clone a preset. For more information, see “Edit Default Preset Options (Shotbox mode)”.
-
Tap the External ID box, specify the External ID number in the number pad, and then tap ENTR .
tipAlternatively, if you want to delete the External ID, tap the X button beside the External ID box.
noteEach External ID must be unique within a certain scope — either unique within the preset category, or unique among all External IDs for the device. The scope within which External IDs must be unique depends on the External ID Uniqueness setting. For more information, see “Interface Area”.
tipAn External ID is an identification number assigned to a preset. External IDs enable automation control systems to address and run presets. Not all automation control systems require External IDs. You can also use External IDs to reference presets if you are creating your own custom panel to recall presets.
-
-
-
Tap Clone .
Update a Preset Position (Shotbox mode)
You can update the selected preset by storing the current position of the PT head (pan and tilt) and the camera lens (zoom, focus, and iris).
Alternatively, you can edit a preset to update its position and preset options. For more information, see “Edit a Preset (Shotbox mode)”.
If a preset has been locked by SmartShell or another controller, it can not be updated from DashBoard. If you try to update such a preset, a message appears, to inform you that the preset is locked. Presets can not be locked or unlocked from the PT Head Control Plugin .
To update a preset:
-
If the Update button is not orange, tap it to place the interface in Update mode.
All assigned preset buttons turn orange.
-
Tap the preset you want to update.
-
Tap the Update button.
-
If the CONFIRM UPDATE dialog box appears, tap Update .
Recall a Preset (Shotbox mode)
There are two ways to recall a preset:
- Cut — All axes move towards their destinations as quickly as possible.
- Run — The axes all reach their destinations at the same time. A preset runs over a specified duration. You can run a preset using the default duration, or specify an alternative duration for one-time use.
If recalling a preset requires movement of one or more axes that are disabled, the preset is not recalled and a WARNING message appears stating the Reason as NOTENABLED . For information about enabling and disabling axes, see “Configure Axis Behavior”.
To cut a preset:
-
If the Cut button is not purple, tap it to place the interface in Cut mode.
All assigned preset buttons turn purple.
-
Tap the preset button that represents the preset you want to cut.
To run a preset using the default duration:
-
If the Run button is not blue, tap it to place the interface in Run mode.
All assigned preset buttons turn blue.
-
Tap the preset button that represents the preset you want to run.
To run a preset using an alternative duration:
-
If the Alt button is not pale green, tap it to place the interface in Alternative Duration (Alt) mode.
All assigned preset buttons turn pale green.
-
Tap the Run Duration box, specify the duration (in seconds) on the number pad, and then tap the ENTR button.
-
Tap the preset button that represents the preset you want to run.
While a preset is being recalled, you can do any of the following:
- Use manual controls to adjust the position of any controllable axes. Manual control is available only if manual control is enabled (via the Joystick Control > Enabled button).
- Use time control to adjust the duration of the preset. This feature is not available on some heads.
- Recall a different preset, causing the head to move to the new preset position instead of the original preset.
- Halt the head, stopping all axes as quickly as possible.
Edit a Preset (Shotbox mode)
When a preset is stored, it includes a set of Preset Options consisting of a name, a run duration, a category, and an External ID (optional).
You can edit a preset to modify the preset options and the preset position.
When you edit a preset, you can customize the acceleration and deceleration rate of the axes. You can configure all axes to have the same rates, or customize the rates for individual axes. If you want the axes to accelerate in sync, set identical rates for each axis. The same applies to deceleration rates. For example, if acceleration rates differ between two axes, the axis with the higher acceleration rate may appear to start moving before the other axis, and may reach its constant velocity sooner.
If a preset has been locked by SmartShell or another controller, it can not be edited from DashBoard. If you try to edit such a preset, a message appears, to inform you that the preset is locked. Presets can not be locked or unlocked from the PT Head Control Plugin .
To edit a preset:
-
If the Edit button is not bright green, tap it to place the interface in Edit mode.
All assigned preset buttons turn bright green.
-
Tap the preset button for the preset you want to edit.
-
Tap the Edit button.
The Edit Preset dialog box appears (Figure ??).
Figure 9
Figure 28 - Edit Preset dialog box
-
In the Name box, type a name for the preset. The name appears on the preset button.
-
Tap the Duration box, specify the recall duration (in seconds) on the number pad, and then tap ENTR .
-
In the External ID box, do one of the following to specify an External ID, if required:
- If an External ID number is already assigned and you do not need to change it, skip the rest of this step, and proceed to Step 7.
- Tap the Suggest button to automatically assign an External ID.
- Tap the External ID box, specify the External ID number in the number pad, and then tap ENTR .
tipAlternatively, to delete the External ID, tap the X button beside the External ID box.
noteEach External ID must be unique within a certain scope — either unique within the preset category, or unique among all External IDs for the device. The scope within which External IDs must be unique depends on the External ID Uniqueness setting. For more information, see “Interface Area”.
tipAn External ID is an identification number assigned to a preset. External IDs enable automation control systems to address and run presets. Not all automation control systems require External IDs. You can also use External IDs to reference presets if you are creating your own custom panel to recall presets.
-
In the Category box, select the category to which you want the preset to belong.
-
If you want to customize the acceleration and deceleration rates for the preset, tap the Edit Acceleration button (if present — not available on some PT heads), and then:
-
Tap the All Axes button, and then specify the default acceleration rate (Accel ) and the default deceleration rate (Decel ) for all axes (pan, tilt, zoom, and focus). See Figure ??.
tipFor Furio heads running v5.x firmware, and X-series heads, we recommend setting acceleration and deceleration rates to 25 for optimal performance.
tipThis step sets the rates for all axes to the same values. You can keep them all the same, or customize the rates for individual axes in the next step.
-
Figure 10
Figure 29 - Edit Acceleration dialog box (all axes)
- If you want to customize the acceleration rate and/or deceleration rate for individual axes, tap the Individual axes button and then specify the rates for each axis as required. See Figure ??.
Figure 11
Figure 30 - Edit Acceleration dialog box (individual axes)
-
When you are finished setting acceleration and deceleration rates, tap the X button to close the Edit Acceleration dialog box.
- If you want to update the preset to record the current positions of all controllable axes, select the Update position on save check box.
- Tap Update .
Edit Default Preset Options (Shotbox mode)
You can edit the default values for the Preset Options , which are the values presented for review or automatically applied each time you store a preset.
When you store a preset, Preset Options are also stored. Depending on the Store Mode , you may or may not have an opportunity to review and edit the Preset Options before they are stored with the preset. For more information about the Store Mode setting, see “Interface Area”.
Preset Options can also be changed after a preset is added or cloned. For more information, see “Edit a Preset (Shotbox mode)”.
To define the default Preset Options:
-
Tap the Edit Defaults button.
The Edit Default Preset Options dialog box appears (Figure 6).
Figure 12
-
Review and/or modify the default Preset Options as follows:
-
In the Default Name box, type a default name for new presets. The name, plus a timestamp showing when the preset was created, are displayed on the preset button.
-
In the Duration box, specify the default run duration, in seconds.
-
If you want an External ID to be automatically assigned whenever a new preset is added, beside Assign External ID tap the On button. Otherwise, tap the Off button.
tipAn External ID is an identification number assigned to a preset. External IDs enable automation control systems to address and run presets. Not all automation control systems require External IDs. You can also use External IDs to reference presets if you are creating your own custom panel to recall presets.
Each External ID must be unique within a certain scope — either unique within the preset category, or unique among all External IDs for the device. The scope within which External IDs must be unique depends on the External ID Uniqueness setting. For more information, see “Interface Area”.
-
-
Tap Update .
Delete a Preset (Shotbox mode)
After you delete a preset, it is permanently deleted from the head and can no longer be recalled.
If a preset has been locked by SmartShell or another controller, it can not be deleted from DashBoard. If you try to delete such a preset, a message appears, to inform you that the preset is locked. Presets can not be locked or unlocked from the PT Head Control Plugin .
To delete a preset:
-
If the Delete button is not red, tap it to place the interface in Delete mode.
All assigned preset buttons turn red.
-
Tap the preset button that represents the preset you want to delete.
-
Tap the Delete button.
The CONFIRM DELETE dialog box appears.
-
Tap Delete .