Presets Page
A preset is a record of the position of all controllable axes for a camera system (pan, tilt, focus, zoom, and iris). It also includes a name, a run duration, a category, and an External ID (optional). Presets are stored on the PT head.
On the Presets page, each preset is represented by a preset button. Each preset belongs to a category. Categories and presets are stored on the PT head, and can also be accessed and modified via other controllers such as a SmartShell workstation or another computer running the DashBoard PT head control plugin.
If you are using multiple devices to control a head, be sure to co-ordinate your activities with other users to avoid accidentally modifying each other’s categories and presets.
Not all axes may be controllable on all models of PT head.
To access the Presets page, tap the Presets button.
This section of the User Manual describes features available on the Presets page, and includes the following topics:
-
“Presets Page (in Shotbox Mode)”
For more information about performing tasks related to presets, see “Working with Presets”.
About Preset Modes
The PT Head Control interface has two operation modes, also known as Preset Modes , which define the behavior of the Presets page:
- Panel mode — In this mode, you tap a preset to select it, and then tap an action button (Cut , Run , Clone , Update , Edit , or Delete ) at the bottom of the Presets page. When you select a preset, the border of the preset button turns purple.
- Shotbox mode — In this mode, you tap an action button at the bottom of the Presets page to enter an action mode (Cut , Run , Alt , Clone , Update , Edit , or Delete ), and then tap the preset to which you want to apply the action.
If the row of action buttons includes the Alt button, the interface is in Shotbox mode.
Tip : If one of the action buttons is colored (purple, blue, pale green, pink, orange, bright green, or red), the interface is in Shotbox mode.
For information about switching between operation modes, see “Interface Area”.
Presets Page (in Panel Mode)
This section describes features of the Presets page. Information presented here applies only when the PT Head Control interface is in Panel mode (as opposed to Shotbox mode).
Figure ?? shows the Presets page in Panel mode. The yellow circles identify buttons and areas of the user interface that are described in the sections that follow. If you are reading this document on a computer, tap the numbered buttons or areas of the diagram to jump to the descriptions.
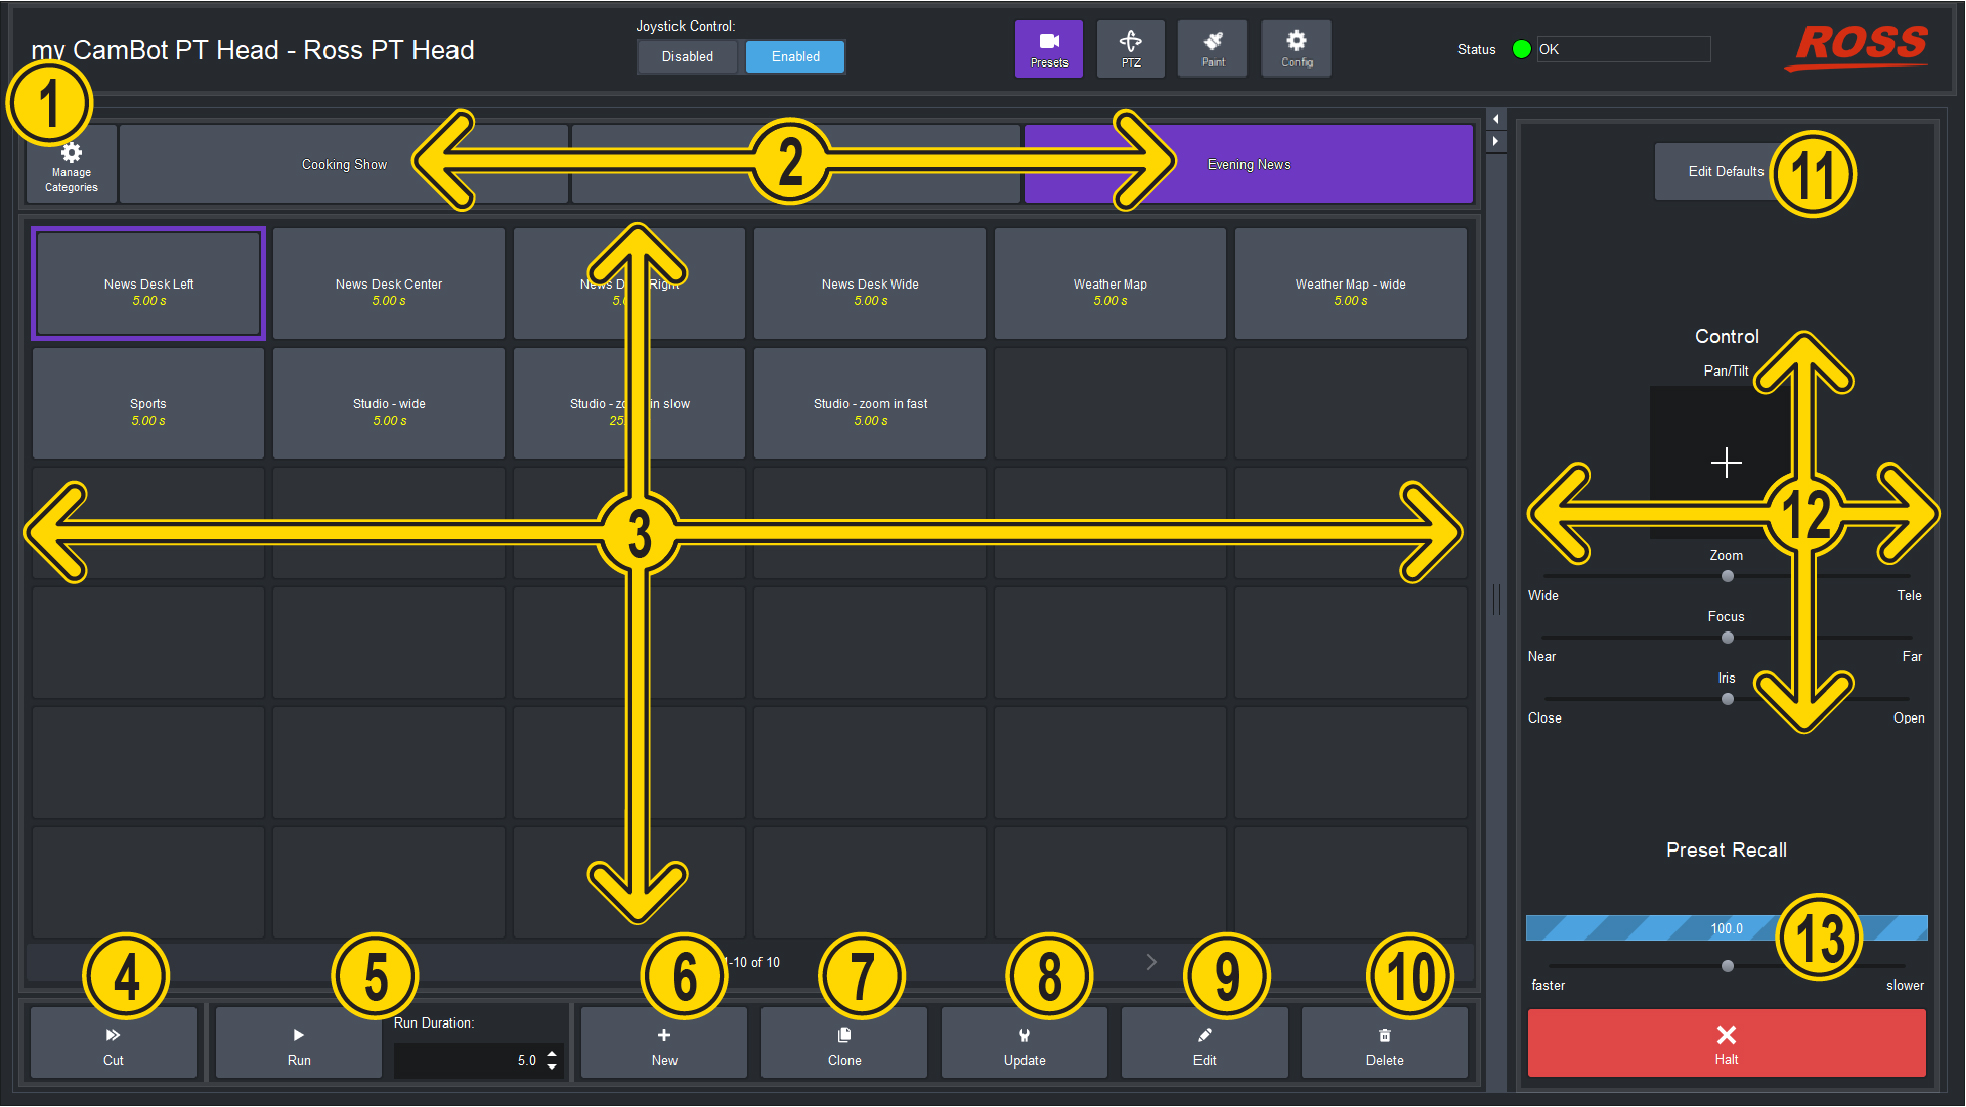
Figure 1 - Presets Page (in Panel mode)
 Manage Categories Button
Opens the Manage Categories page, which enables you to add, rename, and delete categories of presets.
For more information, see “Managing Categories”.
Tap Figure 1 to return to the Presets page diagram.
 Category Tabs
Tap a category tab to switch to that category of presets. The category tab turns purple.
If a category contains more presets than can be displayed in the Presets page, tap the left and right arrows (<** and **> ) below the preset buttons to navigate between pages of preset buttons.
For information about adding, renaming, or deleting categories, see “Managing Categories”.
Tap Figure 1 to return to the Presets page diagram.
 Preset Buttons
The Presets page displays categories of preset buttons.
A preset is a record of the position of all controllable axes for a camera system (pan, tilt, focus, zoom, iris, etc.). It also stores the preset name, run duration, category, and External ID (ID).
Each preset button displays the preset’s ID and/or name in white text, and the run duration (in seconds) in yellow text.
To work with a preset, tap its button to select the preset, and then tap an action button. When you select a preset, the border of its button turns purple. To de-select a preset, tap its button to turn the button border gray. Selecting a different preset also de-selects the current one.
For more information, see “Working with Presets in Panel Mode”.
Tap Figure 1 to return to the Presets page diagram.
 Cut Button
Recalls the selected preset, moving all controllable axes as quickly as possible.
For more information about recalling presets in Panel mode, see “Recall a Preset (Panel Mode)”.
Tap Figure 1 to return to the Presets page diagram.
 Run Button and Run Duration Box
The Run button and Run Duration box work together to enable you to recall the selected preset using either its stored duration or a one-time custom duration. Duration values are shown in seconds (s).
For more information about recalling presets in Panel mode, see “Recall a Preset (Panel Mode)”.
Tap Figure 1 to return to the Presets page diagram.
 New Button
Adds a new preset based on the current position of the PT head (pan and tilt) and the camera lens (zoom, focus, and iris).
When you add a new preset, you can specify the preset Name , Duration (in seconds), and External ID .
For more information about adding presets in Panel mode, see “Add a New Preset (Panel mode)”.
Tap Figure 1 to return to the Presets page diagram.
 Clone Button
Creates a copy of the selected preset.
When you clone a preset, you can modify the cloned preset’s Name , Duration (in seconds), and External ID .
For more information about cloning presets in Panel mode, see “Clone a Preset (Panel mode)”.
Tap Figure 1 to return to the Presets page diagram.
 Update Button
Updates the selected preset by storing the current position of the PT head (pan and tilt) and the camera lens (zoom, focus, and iris).
For more information about updating presets in Panel mode, see “Update a Preset Position (Panel mode)”.
Tap Figure 1 to return to the Presets page diagram.
 Edit Button
Opens the Edit Preset dialog box, which enables you to modify the selected preset’s settings (Name , Duration (in seconds), External ID , and Category ), and/or position. You can also Edit Acceleration values for the preset on an axis-by-axis basis.
For more information about editing presets in Panel mode, see “Edit a Preset (Panel mode)”.
Tap Figure 1 to return to the Presets page diagram.
 Delete Button
Permanently deletes the selected preset.
For more information about deleting presets in Panel mode, see “Delete a Preset (Panel mode)”.
Tap Figure 1 to return to the Presets page diagram.
 Edit Defaults Button
Opens a dialog box where you can specify default Preset Options (Name , Duration , and automatically-assigned E xternal ID ). When an operator adds a new preset, the default Preset Options are either presented for review and approval or automatically applied, depending on the current Store mode.
For more information, see “Edit Default Preset Options (Panel mode)”.
Tap Figure 1 to return to the Presets page diagram.
 Control Area (Pan/Tilt, Zoom, Focus, and Iris)
The Control area enables you to manually pan, tilt, zoom, focus, and iris.
To pan and/or tilt the head, tap and drag the cross-hairs away from the center of the Pan/Tilt area. Dragging the cross-hairs farther from center results in faster movement. Horizontal displacement of the cross-hairs pans the head. Vertical displacement tilts the head.
To adjust lens settings, tap and drag the Zoom slider to zoom, the Focus slider to focus, or the Iris slider to adjust the aperture.
For more information about manually controlling the head and lens, see “Manual Controls (PTZ Page)”.
Tap Figure 1 to return to the Presets page diagram.
 Preset Recall Area
The Preset Recall area displays the progress of the selected preset as it runs. It also enables you to increase or decrease the speed of the preset in progress. Tap and drag the speed slider to make the head move slower or faster .
The Halt button stops movement of the head.
For more information about recalling presets in Panel mode, see “Recall a Preset (Panel Mode)”.
Tap Figure 1 to return to the Presets page diagram.
Presets Page (in Shotbox Mode)
This section describes features of the Presets page. Information presented here applies only when the PT Head Control interface is in Shotbox mode (as opposed to Panel mode).
Figure ?? shows the Presets page in Shotbox mode. The yellow circles identify buttons and areas of the user interface that are described in the sections that follow. If you are reading this document on a computer, tap the lettered buttons or areas of the diagram to jump to the descriptions.
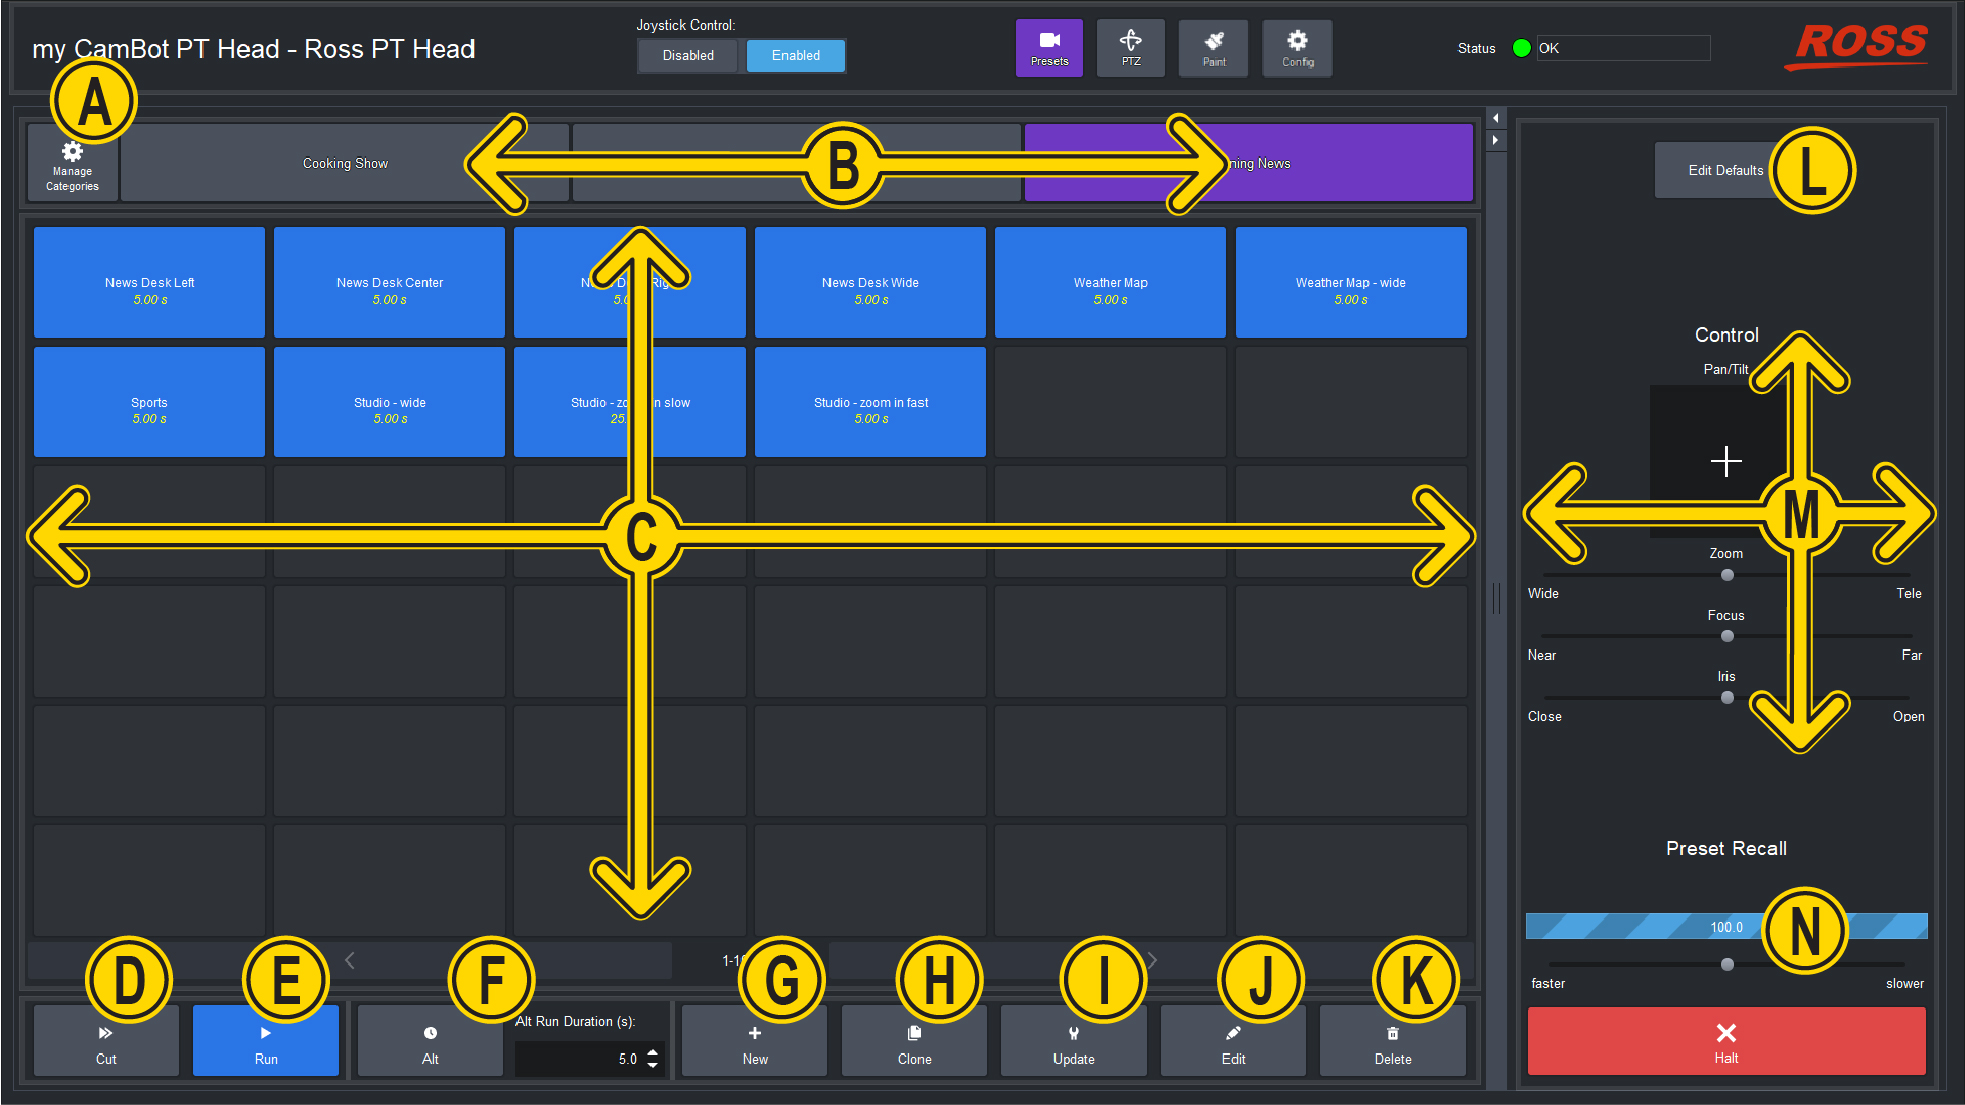
Figure 2 - Presets Page (in Shotbox mode, with Run mode enabled)
 Manage Categories Button
Opens the Manage Categories page, which enables you to add, rename, and delete categories of presets.
For more information, see “Managing Categories”.
Tap Figure 2 to return to the Presets page diagram.
 Category Tabs
Tap a category tab to switch to that category of presets. The category tab turns purple.
If a category contains more presets than can be displayed in the Presets page, tap the left and right arrows (<** and **> ) below the preset buttons to navigate between pages of preset buttons.
For information about adding, renaming, or deleting categories, see “Managing Categories”.
Tap Figure 2 to return to the Presets page diagram.
 Preset Buttons
The Presets page displays categories of preset buttons.
A preset is a record of the position of all controllable axes for a camera system (pan, tilt, focus, zoom, iris, etc.). It also stores the preset name, run duration, category, and External ID (ID).
Each preset button displays the preset’s ID and/or name in white text, and the run duration (in seconds) in yellow text.
To work with presets, select an action button at the bottom of the Presets page to enter an action mode (Cut , Run , Alt , Clone , Update , Edit , or Delete ), and then tap the preset to which you want to apply the action.
Action buttons are colored when selected, and gray when not selected. You can tap the currently-selected action button to de-select it and exit that action mode. This may help prevent an unintended action, should you accidentally tap a preset button.
Depending on the current action mode, preset buttons are colored as follows:
-
Dark Gray — No action mode is active.
-
Purple — Cut mode. Tap a preset button to recall the preset as quickly as possible.
-
Blue — Run mode. Tap a preset button to run the preset using its default duration.
-
Pale Green — Alternative Duration (Alt) mode. Specify a duration (in seconds) in the Alt Run Duration box, and then tap a preset button to recall the preset using that duration.
-
Pink — Clone mode. Tap a preset button to create a copy of the preset on a new button. You can assign the cloned preset a new Name , Duration , and External ID .
-
Orange — Update mode. Tap a preset button to update the preset with the current position of the PT head (pan and tilt) and the camera lens (zoom, focus, and iris).
-
Bright Green — Edit mode. Tap a preset button to edit the preset’s Name , Duration , External ID , and position values (pan, tilt, zoom, focus, and iris). You can also Edit Acceleration values for the preset on an axis-by-axis basis.
-
Red — Delete mode. Tap a preset button to delete that preset.
For more information, see “Working with Presets in Shotbox Mode”.
Tap Figure 2 to return to the Presets page diagram.
 Cut Button
The Cut button places the Presets page into Cut mode. When the interface is in Cut mode, assigned preset buttons are purple.
Tap a preset button to recall that preset as quickly as possible.
For more information about recalling presets in Shotbox mode, see “Recall a Preset (Shotbox mode)”.
Tap Figure 2 to return to the Presets page diagram.
 Run Button
The Run button places the Presets page into Run mode, which enables you to run presets using the duration stored in the preset.
When the interface is in Run mode, assigned preset buttons are blue.
For more information about recalling presets in Shotbox mode, see “Recall a Preset (Panel Mode)”.
Tap Figure 2 to return to the Presets page diagram.
 Alt Button and Alt Run Duration Box
The Alt button places the Presets page into Alternative Duration (Alt ) mode.
When the interface is in Alt mode, assigned preset buttons are pale green.
The Alt button and the Alt Run Duration box work together to enable you to recall presets using a custom duration.
In Alt mode, specify the desired duration (in seconds) in the Alt Run Duration box, and then tap the preset you want to run.
For more information about recalling presets in Shotbox mode, see “Recall a Preset (Panel Mode)”.
Tap Figure 2 to return to the Presets page diagram.
 New Button
Adds a new preset based on the current position of the PT head (pan and tilt) and the camera lens (zoom, focus, and iris).
When you add a new preset, you can specify the preset Name , Duration , and External ID .
For more information about adding new presets in Shotbox mode, see “Add a New Preset (Shotbox mode)”.
Tap Figure 2 to return to the Presets page diagram.
 Clone Button
The Clone button places the Presets page into Clone mode, which enables you to make a copies of existing presets.
When the interface is in Clone mode, assigned preset buttons are pink.
Tap a preset button to clone that preset. When you clone a preset, you can specify the new preset’s Name , Run Duration , and External ID .
For more information about cloning presets in Shotbox mode, see “Clone a Preset (Shotbox mode)”.
Tap Figure 2 to return to the Presets page diagram.
 Update Button
The Update button places the Presets page into Update mode, which enables you to update the position data stored in existing presets (pan, tilt, zoom, focus, and iris).
When the interface is in Update mode, assigned preset buttons are orange. Tap a preset button to update that preset.
For more information about updating presets in Shotbox mode, see “Update a Preset Position (Shotbox mode)”.
Tap Figure 2 to return to the Presets page diagram.
 Edit Button
The Edit button places the Presets page into Edit mode, which enables you to modify a preset’s settings (Name , Run Duration , External ID , and Category ), and/or position. You can also Edit Acceleration values for the preset on an axis-by-axis basis.
When the interface is in Edit mode, assigned preset buttons are bright green. Tap a preset button to edit that preset.
For more information about editing presets in Shotbox mode, see “Edit a Preset (Shotbox mode)”.
Tap Figure 2 to return to the Presets page diagram.
 Delete Button
The Delete button places the Presets page into Delete mode, which enables you to permanently delete presets.
When the interface is in Delete mode, assigned preset buttons are red.
Tap the preset you want to delete, and then confirm that you want to delete it.
For more information about deleting presets in Shotbox mode, see “Delete a Preset (Shotbox mode)”.
Tap Figure 2 to return to the Presets page diagram.
 Edit Defaults Button
Opens a dialog box where you can specify default Preset Options (Name , Duration , and automatically-assigned E xternal ID ). When an operator adds a new preset, the default Preset Options are either presented for review and approval or automatically applied, depending on the current Store mode.
For more information, see “Edit Default Preset Options (Shotbox mode)”.
Tap Figure 2 to return to the Presets page diagram.
 Control Area (Pan/Tilt, Zoom, Focus, and Iris)
The Control area enables you to manually adjust pan, tilt, zoom, focus, and iris.
To pan and/or tilt the head, tap and drag the cross-hairs away from the center of the Pan/Tilt area. Dragging the cross-hairs farther from center results in faster movement. Horizontal displacement of the cross-hairs pans the head. Vertical displacement tilts the head.
To adjust lens settings, tap and drag the Zoom slider to zoom, the Focus slider to focus, or the Iris slider to adjust the aperture.
For more information about manually controlling the head and lens, see “Manual Controls (PTZ Page)”.
Tap Figure 2 to return to the Presets page diagram.
 Preset Recall Area
The Preset Recall area displays the progress of a running preset.
It also enables you to increase or decrease the speed of the preset in progress. Tap and drag the speed slider to make the head move slower or faster .
The Halt button stops movement of the head.
For more information about recalling presets in Shotbox mode, see “Recall a Preset (Shotbox mode)”.
Tap Figure 2 to return to the Presets page diagram.