System Setup
This section describes how to set up a PT Head Control system.
Complete the following setup tasks, in the order presented:
- “Install and Configure Ross Video PT Heads”
- “Install and Configure Cameras”
- “Install DashBoard Software”
- “Add Ross Video PT Heads to DashBoard”
- “Link Camera Controls to the PT Head Control interface”
Install and Configure Ross Video PT Heads
Before you can use the PT Head Control Plugin to control Ross Video pan & tilt heads and cameras mounted to them, the heads must be mounted, cabled, configured, and turned on.
Configure each PT head to have a unique IP addresses. All PT heads must be accessible by the PT Head Control computer over the IP network.
For information about how to install and configure Ross Video PT heads, contact Technical Support.
While Furio and X-series heads can communicate with Dashboard directly, CamBot heads require the CamBot Translation service, which typically runs on a Robotics Server, to communicate with Dashboard. For more information, contact Technical Support.
Install and Configure Cameras
In addition to controlling head movements (pan and tilt), the PT Head Control Plugin can control lens functions (focus, zoom, and iris). Connect lens control cables directly to the PT head.
If a camera can be controlled by DashBoard, the PT Head Control interface can control camera functions such as paint and on-screen menu settings, as an alternative to using the default DashBoard interface for the camera. DashBoard connects to the camera over the IP network.
This section includes instructions about how to install and configure your DashBoard-controllable camera system for integration with the PT Head Control interface.
Topics in this section include:
- “Install and Configure Ross Video ACID Cameras”
- “Install and Configure Panasonic Cameras”
- “Install and Configure Sony Cameras”
Install and Configure Ross Video ACID Cameras
This section applies only if your system includes Ross Video ACID cameras.
If you plan to control ACID cameras from a different workstation, or from multiple workstations, you must access them through a DashBoard proxy server. For more information about configuring a proxy server in DashBoard, see the DashBoard User Guide (8351DR-004-xx) . The User Guide is available through the DashBoard Help system. In DashBoard, navigate to Help > Help Contents , and then use the Search box to find the term, “ proxy server ”.
To install and configure each ACID camera:
-
Mount the camera on a Ross Video Pan & Tilt head.
-
Cable and configure the camera:
-
Connect the power cable.
-
Connect an Ethernet cable between the Remote 2 port on the camera and the IP network.
DashBoard controls all camera functions over the IP network. Cameras must be on the same network as the control computer(s).
-
Carefully dress all cables running to the camera and to the Pan & Tilt head. Ensure that there is enough slack to allow full robotic pan and tilt motion.
-
Configure the camera to have a unique IP address, using the remote control device that came with the camera. Note the new IP address for future reference.
tipFor detailed information about how to perform the tasks in this step, see the User Guide for your cameras:
- ACIDCam AC-H200-UCHR User Guide (5000DR-100-xx)
- ACIDCam AC-Z50-UCHR User Guide (5000DR-200-xx)
These documents are available for free download from the Ross Video website, at https://www.rossvideo.com/support/product-documentation/acidcam/.
-
Install and Configure Panasonic Cameras
This section applies only if your system includes supported Panasonic box cameras, such as model AK-HC-1500. For information about which Panasonic cameras are supported, contact Ross Video Technical Support.
Install the Panasonic cameras and then configure each of the control computers as a DashBoard Panasonic paint control workstation. After the cameras and workstations have been set up for paint control, all camera functions, including paint settings are available to the DashBoard PT Head Control Plugin.
To install and configure Panasonic cameras, follow the instructions in the Panasonic Paint Control Installation Guide (8351DR-008-xx) , which is available for free download from the Ross Video website, at https://www.rossvideo.com/support/product-documentation/ross-robotics/.
DashBoard control of Panasonic box cameras requires a license from Ross Video. You must purchase the license before you can configure the control workstations. One license is required per control workstation. For more information, contact Ross Video.
Install and Configure Sony Cameras
This section applies only if your system includes supported Sony box cameras, such as Sony System 700 series. For information about which Sony cameras are supported, contact Ross Video Technical Support.
Install the Sony cameras and then configure each of the control computers as a DashBoard Sony paint control workstation. After the cameras and workstations have been set up for paint control, all camera functions, including paint settings are available to the DashBoard PT Head Control Plugin.
To install and configure Sony cameras, follow the instructions in the Sony Paint Control Installation Guide (8351DR-012-xx) , which is available for free download from the Ross Video website, at https://www.rossvideo.com/support/product-documentation/ross-robotics/.
DashBoard control of Sony box cameras requires a license from Ross Video. You must purchase the license before you can configure the control workstations. One license is required per control workstation. For more information, contact Ross Video.
Install DashBoard Software
Install the latest version of the DashBoard Control System application on each control workstation computer. The PT Head Control Plugin is automatically installed as part of DashBoard.
If your system includes supported Panasonic and/or Sony cameras, you have already installed DashBoard on all workstation computers. Proceed to the next task, “Add Ross Video PT Heads to DashBoard”.
DashBoard and the DashBoard User Guide are available as free downloads from Ross Video. The DashBoard User Guide contains instructions for installing DashBoard. Both are available from the following location:
http://www.rossvideo.com/control-systems/dashboard/index.html.
Add Ross Video PT Heads to DashBoard
Add each Ross PT head as a device in DashBoard.
DashBoard control of Ross PT heads through the PT Head Control Plugin is free and does not require a software license.
To set up multiple DashBoard computers to control the same PT head, follow the instructions in this section to establish separate direct connections between each computer and the head. Use of the DashBoard proxy server to share devices is not supported.
To add a Ross PT head:
-
On the PT Head Control computer, open DashBoard.
-
From the File menu, tap New , and then tap Other .
The New dialog box appears.
-
Expand the Robots node, tap Ross PT Head , and then tap Next .
The New Ross Robotics Connection dialog box appears (Figure ??).
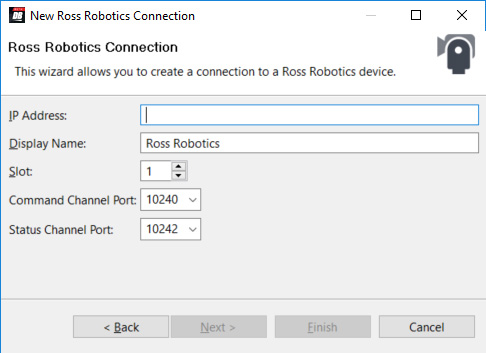
Figure 1 - The New Ross Robotics Connection dialog box
-
In the IP Address box, type the IP address required to access the PT head:
- For Furio a nd X-series heads, and CamBot XY Pedestals running Furio firmware — Type the IP address of the head.
- For CamBot heads — Type the IP address of the computer running the CamBot Translation service (typically a Robotics Server).
-
In the Display Name box, type the name of the PT head, as you want it to appear in DashBoard.
-
In the Slot box, select or type a slot number (1 or higher) to specify the order in which the PT head is to be listed in the DashBoard tree.
tipIf you do not specify a slot number, or if you specify one that is already in use, the PT head is assigned the lowest available slot number.
-
If you are adding a CamBot head, set the Command Channel Port and the Status Channel Port to those assigned to the robot by the CamBot Translation service, which typically runs on a Robotics Server.
-
Tap Finish .
The PT head should appear in the DashBoard tree, within the Ross Robotics node (Figure ??).
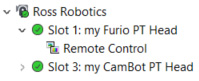
Figure 2 - The Ross Robotics node of the DashBoard tree
-
If the PT head fails to appear in the DashBoard tree, or appears with a red dot, try the following:
-
Ensure that power is connected to the head, and that the head is turned ON .
-
Check that the IP address you typed in Step 4 matches the IP address of the PT head (for a Furio or X-series head), or of the computer running the CamBot Translation service, typically a Robotics Server (for a CamBot head).
If the IP address is not correct, you must add the robot again, using the correct IP address.
tipTo view the IP address, hover the cursor over the Slot node for the robot in the DashBoard tree.
-
Check for a status message near the top of the PT Head Control interface.
-
-
In the DashBoard tree, expand the Ross Robotics > Slot node for the PT head you just added, and then double-tap Remote Control .
The PT Head Control interface appears.
Link Camera Controls to the PT Head Control interface
If the camera mounted to the PT head can be controlled by DashBoard, the PT Head Control interface can control camera functions such as paint and on-screen menu settings.
In the PT Head Control interface, you must specify which camera is to be controlled. Both the camera and the PT head can then be controlled from within the same interface.
To select the camera to be controlled
-
In the PT Head Control interface, tap the Config button
 .
.The Configuration page appears.
-
Tap the Device tab.
Device configuration controls appear, including the Camera Paint Page area (Figure ??).
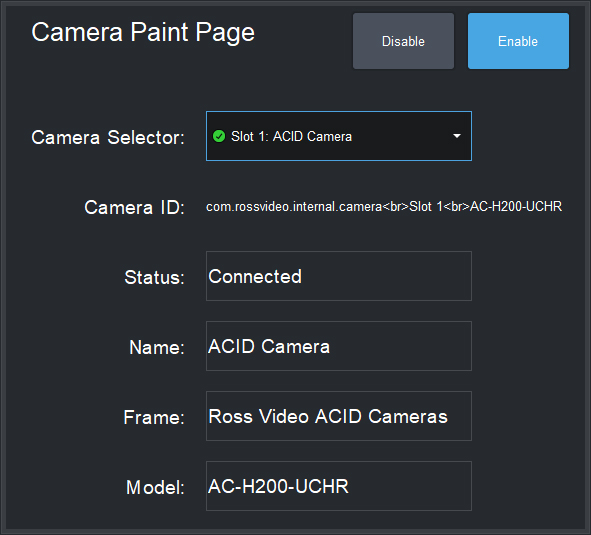
Figure 3 - Camera Paint Page Area
-
In the Camera Paint Page area, in the Camera Selector list, select the camera that is mounted to the PT head you are controlling.
noteIf the list does not include the required camera, ensure that the camera is represented by a node in the DashBoard tree, and that it is operational.
-
Tap the Enable button.
The interface switches to the Presets page. The Paint icon appears.
-
If you want to access the Paint page, tap the Paint icon.
Shading and paint controls appear.