System Setup
This section describes how to set up a PTZ Camera Control system.
Complete the following major tasks, in the order presented:
-
“Specify Where Presets are Stored, and from Where they are Recalled”
After you complete the tasks listed above, you can customize the configuration for each camera. For information about configuration settings, see “Configuration Settings and On-Screen Menu”.
Install Cameras
Before you can use the PTZ Camera Control plugin to control your cameras, they must be securely mounted, cabled, and turned on.
Configure each camera to have a unique IP addresses. All PTZ cameras must be accessible by the PTZ Camera Control computer over the IP network. For more information about configuring IP addresses for the cameras, refer to the documentation that came with them.
DashBoard supported PTZ Cameras include:
- Ross Video PTZ-12G+ , PTZ-12G , and PTZ-NDI
- PIVOTCam-SE
- Sony BRC-H900 , BRC-X1000 , ILME-FR7 , and BRC-AM7
- Panasonic AW-UE150. AW-UE160, and AW-HR140
- Lumens VC-A71P and VC-A71PN
- Canon CR-N300 , CR-N500 , and CR-X300
The Sony ILME-FR7 and B RC-AM7 both feature a physical Setup switch that must be turned ON to enable remote VISCA control via DashBoard. Refer to the camera’s user manual for the exact switch location and configuration procedure.
Install DashBoard Software
Install the latest version of the DashBoard Control System application on the PTZ Camera Control computer. The PTZ Camera Control plugin is automatically installed as part of DashBoard.
DashBoard and the DashBoard User Guide are available as free downloads from Ross Video. The DashBoard User Guide contains instructions for installing DashBoard. Both are available at the following location:
Add Cameras to DashBoard
Add each camera as a device in DashBoard.
Control of Ross Video PTZ cameras is free and requires no software license. If you are using one or more third-party cameras, such as Sony BRC cameras or Panasonic PTZ cameras, you will require a license key code from Ross Video. Because the key code is a response to a prompt that appears while you are adding the first camera, the key code cannot be obtained in advance. Be prepared to contact Ross Video Technical Support when you add the first camera. For third-party Software Based Licensing or Ross Key Based Licensing , refer to “To add a camera:”.
PTZ-12G+, PTZ-12G, and PTZ-NDI cameras , PIVOTCam-SE cameras, Sony PTZ cameras, Canon PTZ cameras, and Lumens PTZ cameras communicate with DashBoard via UDP through port 52381 on the DashBoard computer. If you are using these types of cameras, ensure that port 52381 is accessible and is not blocked by a firewall application.
When adding a Panasonic PTZ camera with user authentication enabled, it is recommended to disable authentication on the camera before adding it to DashBoard. Once the camera has been successfully added, you can configure the username and password in DashBoard, then re-enable aut hentication on the camera. Refer to Configuring Authentication (Panasonic Cameras Only) .
To add a camera:
-
On the PTZ Camera Control computer, open DashBoard.
-
From the File menu, tap New , and then tap Other .
The New dialog box appears.
-
Expand the Cameras node, tap PTZ Camera , and then tap Next .
The New PTZ Cameras Connection dialog box appears (Figure ??).
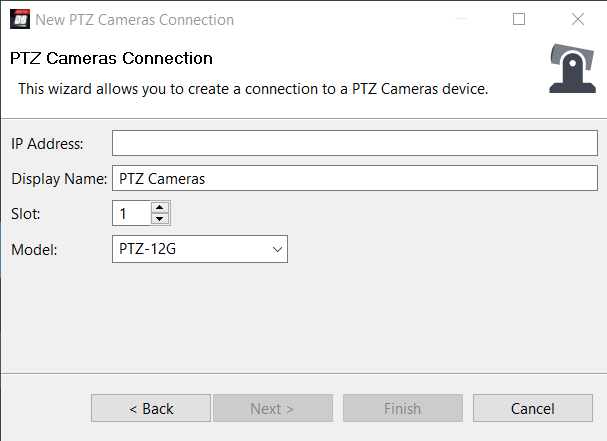
Figure 1 - The New PTZ Cameras Connection dialog box
-
In the IP Address box, type the IP address of the camera.
-
In the Display Name box, type the name of the camera, as you want it to appear in DashBoard.
-
In the Model list, select the model of the camera.
noteFor P anasonic PTZ cameras with user authentication enabled, it is recommended to disable authentication on the camera before adding it to DashBoard. Once added, you can enter the required credentials in DashBoard and then re-enable authentication on the camera.
-
In the Slot box, select or type a slot number (1 or higher) to specify the order in which the camera is to be listed in the DashBoard tree.
tipIf you do not specify a slot number, or if you specify one that is already in use, the camera is assigned the lowest available slot number.
When adding a Panasonic AW-UE150 , AW-UE160 , or AW-HR140 PTZ camera, for DashBoard v9.8 or higher, a Port box appears. The default port is 80. Refer to (Figure ??).

Figure 2 - Connecting a Panasonic AW-UE150 PTZ camera in DashBoard
The port value should be set to match the value configured on the camera. DashBoard connects to the provided port when selecting Finish .
-
Tap Finish .
The camera should appear in the DashBoard tree, within the PTZ Cameras node (Figure ??).

Figure 3 - The PTZ Cameras node in the DashBoard tree
-
If the camera fails to appear in the DashBoard tree, or appears with a red dot, do the following:
-
Ensure that power is connected to the camera, and that the cameras is turned ON .
-
Check the IP address you typed in Step 4 and ensure that it matches the IP address of the camera.
-
Ensure that no other application on the computer is already connected to, or trying to connect to, the camera (for example, another instance of DashBoard).
tipIf an instance of DashBoard is already connected to the camera, the following error message may appear:
Error - unable to bind to UDP port for camera
-
-
Integrating a third-party camera with DashBoard necessitates license activation. DashBoard supports two licensing options: Software-Based Licensing and Ross Key Based Licensing .
Software-based licensing involves connection of DashBoard to the Ross activation server either directly or via a Ross Product Manager licensing server on prem. To use software-based licensing, you will need a product key provided by Ross.
Ross Key Based Licensing is a fixed license tied to your hardware. During the licensing process you will need to send a key code to Ross technical support who will return a license key for you to enter into DashBoard.
For more information, refer to the DashBoard User Guide 8351DR-004-XX .
Note: Product key packs do not require a hardware request code but does require an RPM sever or access to the Activation server.
For activating DashBoard licensed features, refer to the following procedures:
To update DashBoard licensed features (Software Based Licensing method)
- From the main toolbar, select Window > Preferences . Refer to Figure ??.
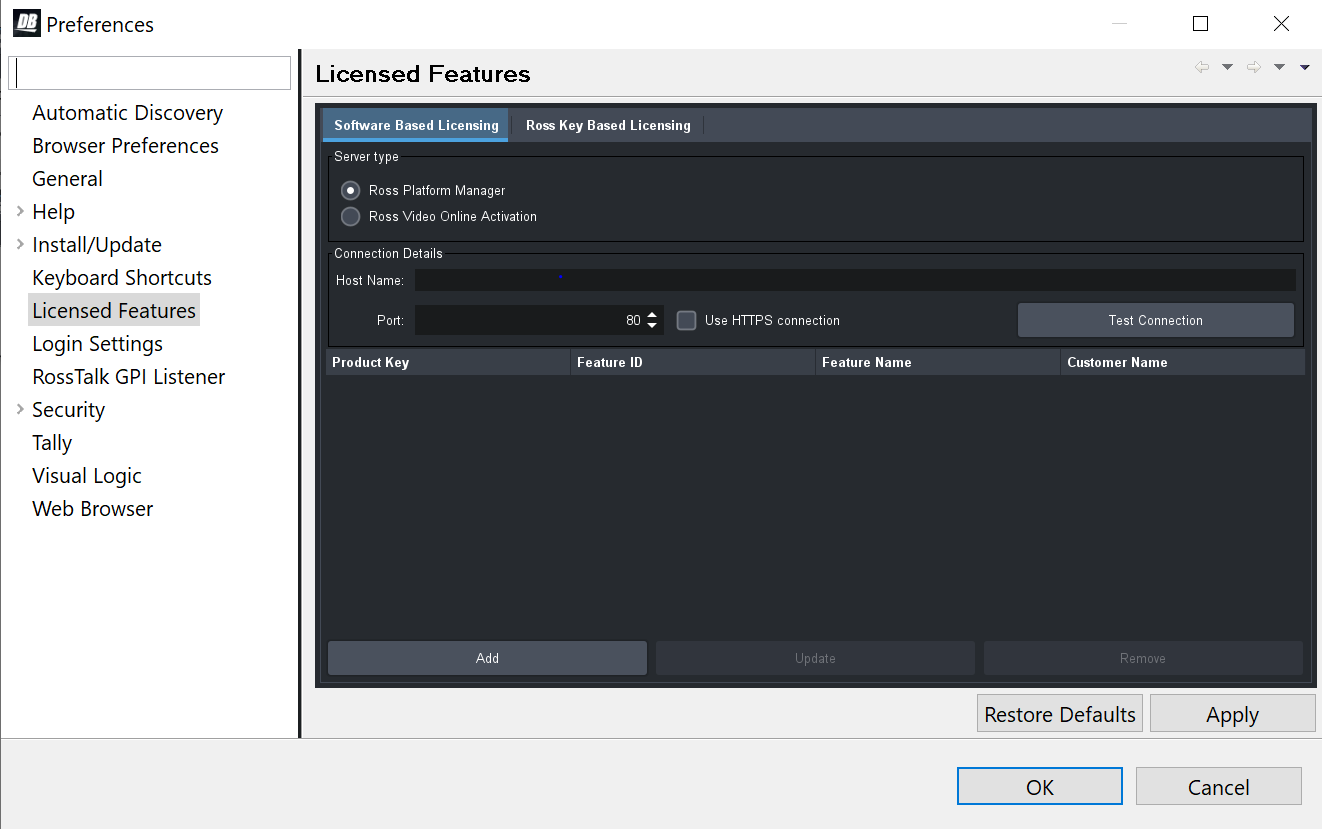
Figure 4 - DashBoard Licensed Features - Software Based Licensing tab
-
The Preferences dialog box opens.
-
From the Preferences dialog box, select Licensed Features .
-
In the Licensed Features dialog box, ensure the Software Based License tab is selected.
-
Select the Server type that you are using to provide licensing.
-
If you are using the Ross Platform Manager server type, enter the Host Name and Port of the server and whether to Use HTTPS connection .
Note: Select Apply to save your server settings.
Note: Use the Test Connection button to confirm a successful connection if necessary. -
Once connection to the server is established, select Add and enter the product key provided to you.
If successful, the feature you added will appear in the Licensed Features table.
Note: Select Apply to confirm your changes.To update DashBoard licensed features (Ross Keys Based Licensing method) For obtaining and entering a Ross licensing key code, complete the following:
-
From the main toolbar, select Window > Preferences . Refer to Figure ??.
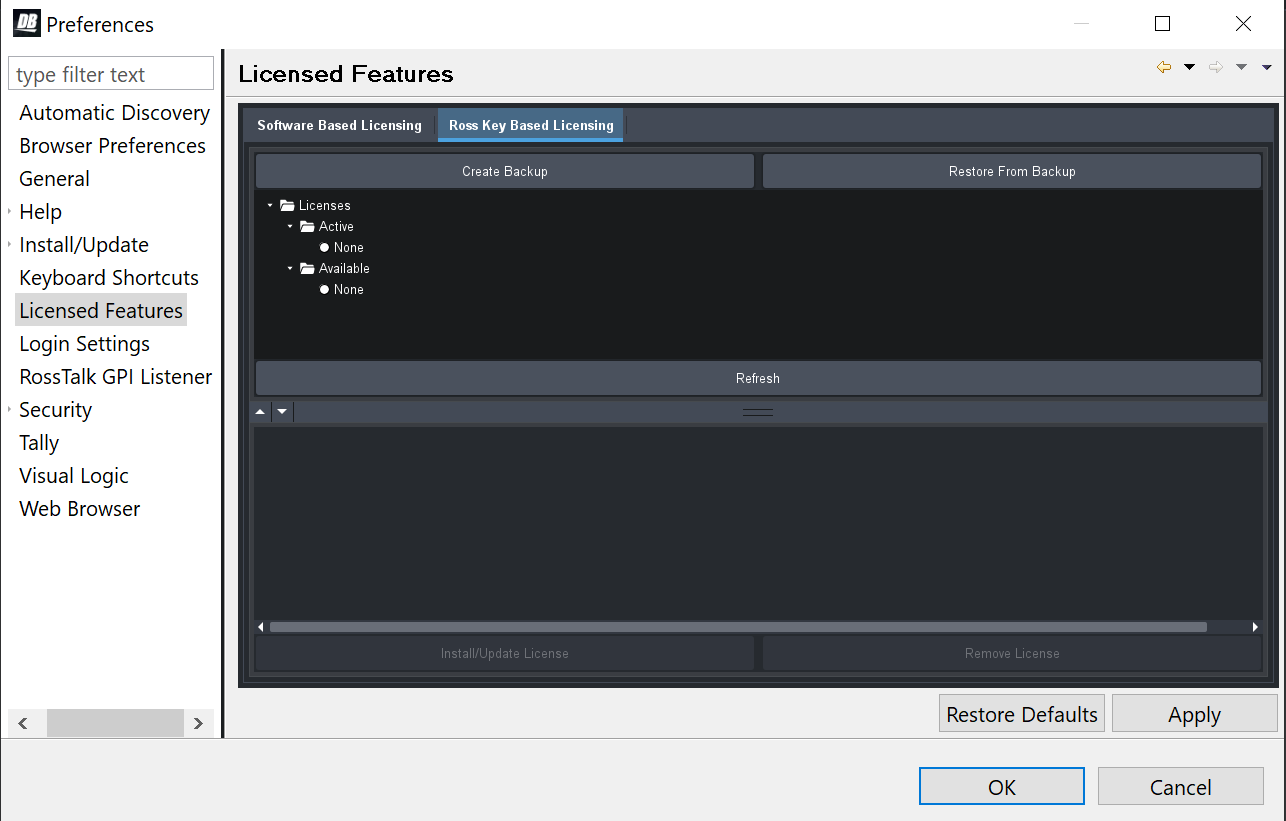
Figure 5 - DashBoard Licensed Features - Ross Key Based Licensing tab
-
The Preferences dialog box opens.
-
From the Preferences dialog box, select Licensed Features .
-
In the Licensed Features dialog box, ensure the Ross Key Based License tab is selected.
-
From either the Active or Available subfolder, select the feature you want to update.
-
To obtain a Ross License Key by completing the following:
Click Install/Update License .
ii. The Enter License Key dialog box opens. Refer to Figure ??.
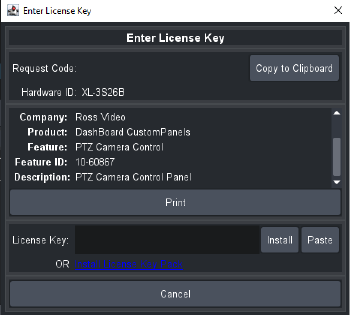
Figure 6 - DashBoard Licensed Features - Enter License Key
-
iii. Select Copy to Clipboard to copy your request code.
iv. Paste the request code into an e-mail to Ross Video (techsupport@rossvideo.com), requesting a corresponding license key. Be sure to include the original Ross Video sales order number.
cautionDo not close the Enter License Key dialog box until you receive and apply an activation code from Ross Video. If you leave the Enter License Key dialog box, the activation code you receive will not work. It is valid only for the session during which it was generated.
When you receive the license key via email, copy and paste it into the License Key box, and then tap Install.
vi. The selected feature updates and the most current data is displayed in the License Details .
-
If the camera is ceiling-mounted (inverted), we recommend you turn On the Image Flip and Image Mirror options (also known as Ceiling Mount for some cameras) before you create any presets. Changing these settings after presets exist renders the presets useless.
The Image Flip and Image Mirror options are available in the PTZ Camera Control plugin at Config > Camera > Camera Options .For more information, see “Image Flip and Image Mirror”.
-
Establish Bank Structure (Rebuild Banks)
A bank is a grid of preset buttons, each of which represents a camera preset. The PTZ Camera Control plugin can store multiple banks of preset buttons. You can configure the banks to suit your requirements.
For each camera, it is important to establish the structure of its banks (rebuild banks) BEFORE you start storing presets, because rebuilding banks requires all presets to be permanently discarded.
For information about establishing the bank structure for a camera, see “Rebuild Banks”.
If you intend to configure a camera by importing a camera settings (.camera) file, rebuilding banks does not apply. The bank structure is imported as part of the camera settings file. For more information about importing camera settings, see “Load (Import) Banks, Presets, and Camera Settings (.camera file)”.
Specify Where Presets are Stored, and from Where they are Recalled
You can specify whether presets stored by the PTZ Camera Control plugin are stored in local memory AND in the camera’s memory, or only in local memory. You can also specify whether the PTZ Camera Control plugin recalls presets from local memory or from the camera’s memory.
By default, the PTZ Camera Control plugin does not store presets on the camera, and recalls them from local memory only.
For Canon PTZ cameras, presets can only be stored in the camera's memory. The DashBoard computer does not support local memory storage.
We recommend you configure these settings before creating presets:
-
The setting to specify whether presets are stored locally is in the Interface area of the Config page (Config > Operation > Interface > Store P resets on Camera ).
-
The setting to specify whether presets are recalled from local memory or from the camera’s memory is in the Interface area of the Config page (Config > Operation > Interface > Recall Presets From ).
-
The setting to specify whether DashBoard will recall presets from camera memory even when no preset is stored locally (Blind Recall ).
For more information, see “Operation Settings Page”.