Managing Banks and Files
A bank is a grid of preset buttons, each of which represents a camera preset. The PTZ Camera Control plugin can store multiple banks of preset buttons. You can configure the banks to suit your requirements. For more information, see “Managing Banks”.
A camera settings file (.camera file) contains data about camera settings, banks, and presets. You can import or export .camera files. For more information, see “Managing Files”.
Managing Banks
This section includes the following topics:
- “View Edit Bank Properties and Edit Bank Settings (ALL BANKS)”
- “Add a New Bank”
- “Remove a Bank”
- “Rebuild Banks”
- “Discard All Presets on a Bank, or Discard All Presets”
- “View and Edit Preset Options for All Presets on a Bank”
All procedures in this section are performed from the Manage Bank s page.
To access the Manage Banks page:
-
Tap the Presets button.

The Presets page opens.
-
Tap the Manage Banks button.

The Manage Banks page appears (Figure ??).
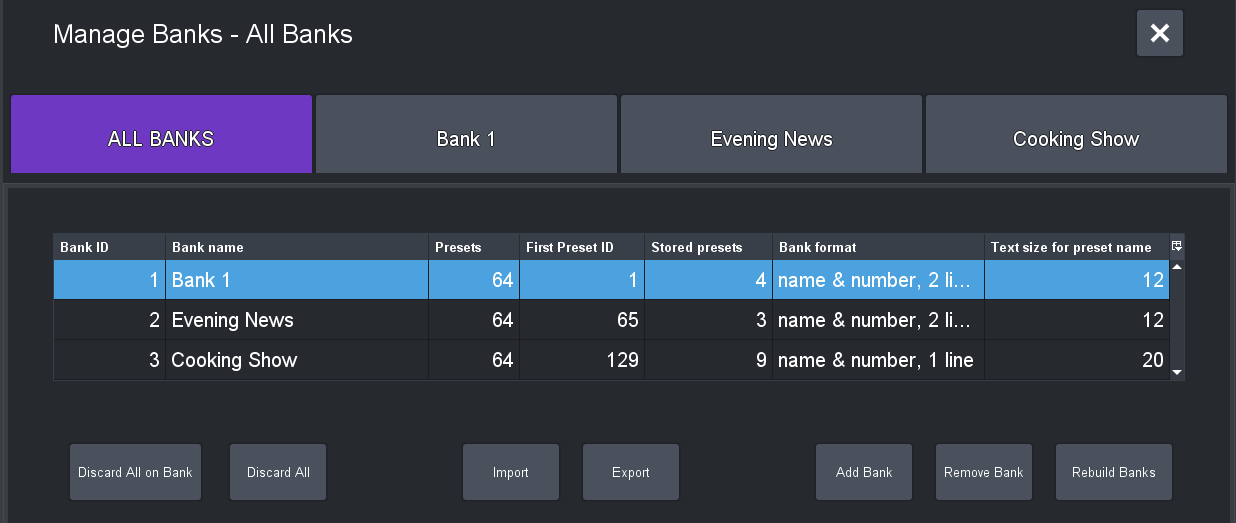
Figure 1 - Manage Banks page, showing the ALL BANKS tab
To close the Manage Banks page:
- Tap the X button.

View Edit Bank Properties and Edit Bank Settings (ALL BANKS)
To view bank properties and edit their settings:
-
On the Manage Banks page, tap the All BANKS button.
A table of bank properties and settings appears.
-
View and edit the following properties and settings as required:
-
Bank ID — Unique identifier for the bank identifier (not editable).
On the Presets page, banks appear in the order of their Bank ID s. If you create a new bank, it is assigned the lowest available Bank ID .
-
Bank Name — The name of the bank (editable). Bank name appear on bank tabs on the Presets page.
-
Presets — The number of presets the bank can store (not editable).
-
First Preset ID — The Preset ID number of the lowest-numbered preset on the bank (not editable). Each preset has a unique Preset ID , regardless of which bank it’s on. A preset retains its Preset ID , even if lower numbered banks are removed.
-
Stored Presets — The number of stored (recallable) presets on the bank (not editable). This number does not include deleted or empty presets.
-
Bank Format — The display format for text that appears on preset buttons.
Available formats are as follows:
- number only — Preset ID number only
- name only — Preset Name only
- name & number, 1 line — Preset ID and Preset Name , all on one line
- name & number, 2 lines — Preset ID on one line and Preset Name on another
-
Text size for preset name — Font size for text that appears on preset buttons. (editable).
The size range is 4 to 20 .
-
Add a New Bank
For Canon PTZ cameras, only 100 presets are supported. If you try to add a bank which will take you over that 100 preset limit, you will get a warning and the add bank will fail.
To add a new bank:
-
On the Manage Banks page, tap the All BANKS button.
A table of bank properties and settings appears, with a row of buttons beneath it.
-
Tap the Add Bank button.
The Add Bank dialog box appears.
-
Specify the following:
-
Bank Name — The name of the bank, as you want it to appear on its Bank tab on the Presets page.
-
Bank Format — The display format for text that appears on preset buttons.
Available formats are as follows:
- number only — Preset ID number only
- name only — Preset Name only
- name & number, 1 line — Preset ID and Preset Name , all on one line
- name & number, 2 lines — Preset ID on one line and Preset Name on another
-
Text Size — Font size for text that appears on preset buttons. The size range is 4 to 20 .
-
-
Tap OK .
The Manage Banks page closes, and on the Presets page, a new tab for the bank appears.
Remove a Bank
When you remove a bank, the bank tab and all presets on it are permanently discarded.
To remove a bank:
-
On the Manage Banks page, tap the All BANKS button.
A table of bank properties and settings appears, with a row of buttons beneath it.
-
In the table, tap the row representing the bank you want to remove.
-
A WARNING message appears.
The message indicates how many presets are stored on the bank. All presets will be permanently discarded if you remove the bank.
-
In the WARNING message box, tap Discard to permanently discard the bank and its presets.
Rebuild Banks
A bank is a grid of preset buttons, each of which represents a camera preset. The PTZ Camera Control plugin can store multiple banks of preset buttons.
When you rebuild banks, you specify how many banks there are and how many rows and columns of preset buttons are on each bank. When rebuilt, all banks are identical.
When you rebuild banks, all existing banks and presets are permanently discarded. If you want to retain the current banks and presets for future use, save them in a camera settings (.camera) file. For more information, see “Save (Export) Banks, Presets, and Camera Settings (.camera file)”.
Before you can rebuild banks, all existing banks must be empty. You can discard all presets at once. For more information, see “Discard All Presets on a Bank, or Discard All Presets”.
For Canon PTZ cameras, only 100 presets are supported. If you try to configure the bank rows, columns or number of banks so that the total number of presets would exceed 100, your change will be rejected and a warning message shown.
To rebuild banks:
-
Tap the Presets button.
The Presets page opens.
-
Tap the Manage Banks button.
-
Tap the Rebuild Banks button.
-
If a WARNING message appears, one or more banks are not empty. Delete or discard all presets, and then start this procedure again.
For information about discarding all presets at once, see “Discard All Presets on a Bank, or Discard All Presets”.
-
In the Rebuild Banks dialog box, specify the following properties for the new banks:
-
Number of Banks : The number of bank tabs (banks) to create.
tipYou can add more banks later. For more information, see “Add a New Bank”.
-
Bank rows and Bank columns : These two settings define the size of the preset banks (grids), expressed as the number of buttons tall (Bank rows ) and the number of buttons wide (Bank columns ) the rectangular grid is.
-
Bank Format : The display format for text that appears on preset buttons.
Available formats are as follows:
- number only — Preset ID number only
- name only — Preset Name only
- name & number, 1 line — Preset ID and Preset Name , all on one line
- name & number, 2 lines — Preset ID on one line and Preset Name on another
-
Text Size — Font size for text that appears on preset buttons. The size range is 4 to 20 .
-
Preset Number Display Offset — Specify whether the lowest-numbered Preset ID should be 0 or 1 . This is an aesthetic choice; changing between 0 and 1 does not change how presets are stored in DashBoard or on the camera. For more information, see “Preset Number Display Offset”, which is within the section, “Operation Settings Page”.
-
-
Tap OK .
The existing preset banks are permanently removed, and a new set of preset banks is created.
Discard All Presets on a Bank, or Discard All Presets
You can discard all presets on a bank at once.
Alternatively, you can discard all presets on all banks at once.
After you discard presets, they cannot be restored.
Presets are discarded locally only. If the presets are stored on the camera, they are not deleted from the camera.
To discard all presets on a bank:
-
On the Manage Banks page, tap the All BANKS button.
A table of bank properties and settings appears, with a row of buttons beneath it.
-
In the table, tap the row representing the bank that contains the presets you want to discard.
-
Tap the Discard All button.
A WARNING message appears. The message indicates how many presets are stored on the bank. If you proceed, all presets on the bank will be permanently discarded.
-
In the WARNING message box, if you want to retain the Preset Options settings on the preset buttons, select the Preserve preset options box.
-
Tap Discard .
To discard all presets on all banks:
-
On the Manage Banks page, tap the All BANKS button.
A table of bank properties and settings appears, with a row of buttons beneath it.
-
Tap the Discard All on Camera button.
A WARNING message appears. If you proceed, all presets on all banks will be permanently discarded.
-
In the WARNING message box, if you want to retain the Preset Options settings on the preset buttons, select the Preserve preset options box.
-
Tap Discard .
View and Edit Preset Options for All Presets on a Bank
You can view the Preset Options for all the presets on a bank at once. You can also edit them.
To view and edit Preset Options:
-
On the Manage Banks page, tap a bank button.
A table listing the bank’s presets appears, listing the Preset Options for each (Figure ??).
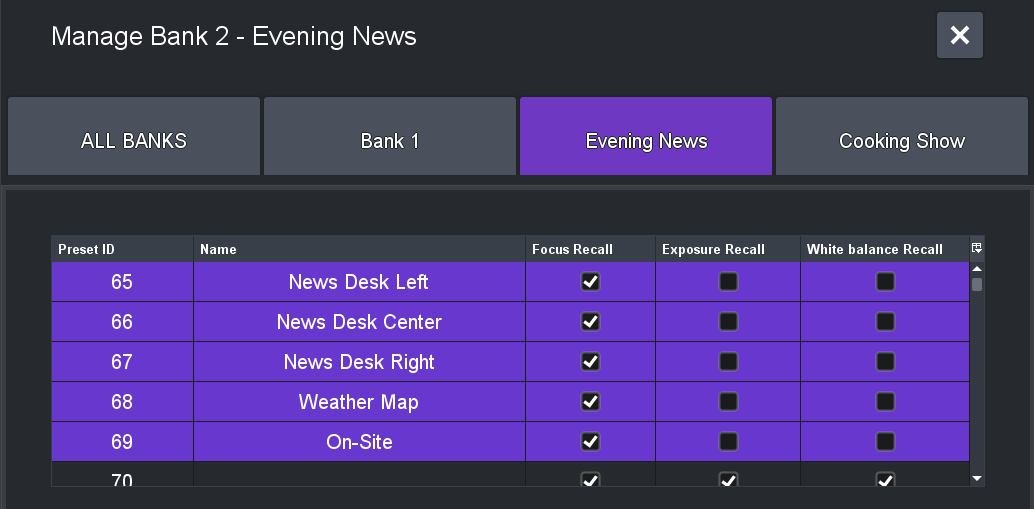
Figure 2 - Manage Banks page, showing recall settings for individual presets
-
In the table, tap the row representing the preset you want to edit.
-
Edit the Preset Options as required:
-
In the Preset Name box, type a name for the preset. The name appears on the preset button.
-
Specify whether the Focus , Exposure , and White Balance values stored with the preset can be applied when the preset is recalled.
noteThe final decision to Allow or Ignore these defaults is made when the preset is recalled.
-
Managing Files
The PTZ Camera Control plugin can save (export) and load (import) camera settings files (.camera files). These files contain data about preset banks, camera settings, and presets.
This section describes how to import and export data from and to camera settings files. It includes the following topics:
- “Load (Import) Banks, Presets, and Camera Settings (.camera file)”
- “Save (Export) Banks, Presets, and Camera Settings (.camera file)”
Load (Import) Banks, Presets, and Camera Settings (.camera file)
When you load a camera settings (.camera ) file, current camera settings, banks, and presets are permanently discarded and replaced.
The .camera file you load must contain data for the same model of camera. If you load a .camera file that contains data for a different model of camera, the import fails.
To load (import) a camera settings (.camera) file:
-
On the Manage Banks page, tap the All BANKS button.
A table of bank properties and settings appears, with a row of buttons beneath it.
-
Tap the Import button.
The Import Camera Settings dialog box appears.
-
Tap the Browse button.
The Open File dialog box appears.
-
Navigate to the .camera file you want to load, select it, and then tap Open .
The name of the file appears in the yellow box on the Import Camera Settings dialog box.
-
Tap Import .
If the file is valid, it is imported.
Save (Export) Banks, Presets, and Camera Settings (.camera file)
When you save (export) a camera settings (.camera ) file, current camera settings, banks, and presets are copied to the file. You can later load (import) the file when configuring any camera of the same model.
To save (export) a camera settings (.camera) file:
-
On the Manage Banks page, tap the All BANKS button.
A table of bank properties and settings appears, with a row of buttons beneath it.
-
Tap the Export button.
The Export Camera Settings dialog box appears.
-
Tap the Save button.
The Save File dialog box appears.
-
Navigate to the folder where you want to save the file, and then do one of the following:
- If you are replacing an existing file, select it.
- If you are saving the file with a new name, in the File Name box, type the file name.
-
Tap Save .
-
If a Replace File dialog box appears, asking you whether you want to replace an existing file, tap Yes .
The Confirm File Replace dialog box appears. Tap Yes .