Presets Page
The Presets page consists of banks of preset buttons, each of which can store a preset for future recall.
A preset is a record of all controllable axis positions and selected settings for a camera, including pan, tilt, focus, zoom, iris, exposure, white balance, etc.
To access the panel, tap the Presets button.
This section of the User Manual includes the following topics:
- “Interface Overview”
- “About Preset Modes”
- “Presets Page (in Panel Mode)”
- “Presets Page (in Shotbox Mode)”
Interface Overview
Navigation between pages, camera refresh, and tally indication are all available along the top of the Dashboard UI, as shown in Figure ??.

Figure 1 - Buttons at the top of the DashBoard UI
- Refresh Camera — Retrieves updated status information from the camera.
- Presets Page — Opens the Presets page, which can be set to either Panel Mode or Shotbox Mode , depending on the configuration settings.
- PTZ Page — Opens the PTZ page to allow pan, tilt, and zoom control.
- Paint Page — Opens the Paint page to allow customized Paint setting configuration.
- Config Page — Opens the Configuration page, which allows modification of the Camera , Operation , and Gateway settings.
- ON/OFF-AIR — Displays the tally indicator, which responds in accordance with the tally state.
- Status — Indicates the connection status.
A bout Preset Modes
The PTZ Camera Control interface has two operation modes, also known as Preset Modes , which define the behavior of the Presets page:
- Panel mode — In this mode, you tap a preset to select it, and then tap an action button (Recall , Store , Edit Preset Options , or Delete ) at the bottom of the Presets page. When you select a preset, the border of the preset button turns purple.
- Shotbox mode — In this mode, you tap an action button at the bottom of the Presets page to enter an action mode (Recall , Store , Edit Preset Options , or Delete ), and then tap the preset to which you want to apply the action.
If one of the action buttons is colored (purple, yellow, green, or red), the interface is in Shotbox mode.
For information about switching between operation modes, see “Preset Mode”.
Presets Page (in Panel Mode)
This section describes features of the Presets page. Information presented here applies only when the PTZ Camera Control interface is in Panel mode (as opposed to Shotbox mode). For more information about the Presets page as it appears in Shotbox mode, refer to “Presets Page (in Shotbox Mode)”.
Figure ?? shows the Presets page in Panel mode. The yellow circles identify buttons and areas of the user interface that are described in the sections that follow. If you are reading this document on a computer, tap the numbered buttons or areas of the diagram to jump to the descriptions.

Figure 2 - Presets page (in Panel mode)
 Manage Banks Button
Opens the Manage Banks page, which enables you to configure banks, import and export saved presets, and edit names and Recall Options for presets.
For more information, see “Managing Banks and Files”.
Tap Figure 2 to return to the Presets page diagram.
 Bank Tabs
Tap a bank tab to switch to that bank of presets. The bank tab turns purple.
Tap Figure 2 to return to the Presets page diagram.
 Preset Buttons
The Presets page displays banks of preset buttons:
-
Blue preset buttons represent presets than can be run.
-
Gray preset buttons are either empty, or contain data about deleted presets which can be edited, restored, or discarded.
-
Shaded preset buttons indicate that presets will be stored and/or recalled from the camera. Depending on the Operation configuration, the following will result:
-
If Store Presets on Camera is enabled, storing data to one of these presets will also push data to the camera.
-
If Blind Recall is enabled, you can attempt to recall these presets from the camera, even though no data is stored locally.
To work with presets, tap a preset button to select a preset, and then tap an action button. When you select a preset, the border of its button turns purple.
For more information, see “Working with Presets in Panel Mode”.
Tap Figure 2 to return to the Presets page diagram.
-
 Recall Button
Recalls the selected preset.
Before you recall the preset, you can set Recall Options . For more information about recalling a preset in Panel mode, see “Recall a Preset from Camera”.
Tap Figure 2 to return to the Presets page diagram.
The Recall button displays “ Recall From Camera ” when a preset will be recalled from camera storage. If no data is stored in the matching slot on the camera, recall will fail silently.
When presets are recalled from, or stored on, the camera, slots that are mapped to the camera but have no data stored locally appear faded blue. If Blind Recall is enabled when these slots are selected, the Recall button displays Recall from Camera and will attempt to recall the preset on the camera. When no preset is stored on the matching slot on the camera, recall will fail silently.
 Store Button
Stores the current camera position as a preset on the selected preset button.
Depending on the current Store mode, you may be able to review and modify the Preset Option s that are stored as part of the preset.
For more information about storing presets in Panel mode, see “Store a Preset”.
Tap Figure 2 to return to the Presets page diagram.
When storing to a preset causes data to be stored in the matching preset slot on the camera and in local DashBoard storage, the Store button label changes to Store on Camera.
 Edit Preset Options Button
Opens the Edit Options dialog box, which enables you to specify Preset Options for the selected preset.
For more information, see “Edit Preset Options”.
Tap Figure 2 to return to the Presets page diagram.
 Delete Button
Deletes the local copy of the selected preset.
A deleted preset cannot be recalled, but its data persists. The deleted preset can later be edited, restored, or discarded. For more information, see “Manage Deleted Presets (Restore or Discard)”.
The Delete button deletes the local copy of the preset, but does not delete presets stored on the camera. This note is relevant only if your system is configured to store presets locally and on the camera (Manage Presets on Camera setting is Enabled ).
Tap Figure 2 to return to the Presets page diagram.
 Store Options > Edit Defaults Button
Opens a dialog box where you can specify default Preset Options . When an operator stores a preset, the default Preset Options are either presented for review and approval or automatically applied, depending on the current Store mode.
For more information, see “Edit Default Preset Options”.
Tap Figure 2 to return to the Presets page diagram.
 Recall Options Area
Recall Options determine whether Preset Options specified in the preset are to be applied during recall.
The Recall Options settings enable you to Allow or Ignore the Preset Options for Focus , Exposure , and White Balance .
If Allow and Ignore buttons are not available for an option, it is because the mode/setting listed directly below it overrides that option.
For more information about recalling presets, see “Recall a Preset from Camera”.
Tap Figure 2 to return to the Presets page diagram.
 Delete Options > Manage Deleted Presets Button
Opens the Manage Deleted Presets page, which enables you to restore or discard deleted presets.
For more information, see “Manage Deleted Presets (Restore or Discard)”
Tap Figure 2 to return to the Presets page diagram.
Presets Page (in Shotbox Mode)
This section describes Preset panel features and how to use them. It applies only when the PTZ Camera Control interface is in Shotbox mode (as opposed to Panel mode). For more information about the Presets page as it appears in Panel mode, refer to “Presets Page (in Panel Mode)”.
Figure ?? shows the Presets page in Shotbox mode. The red circles identify buttons and areas of the user interface that are described in the sections that follow. If you are reading this document on a computer, tap the numbered buttons or areas of the diagram to jump to the descriptions.

Figure 3 - Presets page (in Shotbox mode, wit h Recall mode enabled)
 Manage Banks Button
Opens the Manage Banks page, which enables you to configure banks, import and export saved presets, and edit names and Recall Options for presets.
For more information, see “Managing Banks and Files”.
Tap Figure 3 to return to the Presets page diagram.
 Bank Tabs
Tap a bank tab to switch to that bank of presets. The bank tab turns purple.
Tap Figure 3 to return to the Presets page diagram.
 Preset Buttons
The Presets page displays banks of preset buttons:
Colored buttons represent presets that have not been deleted. The color of all such buttons is the same at any given time, and represents the current action mode:
-
Purple — Recall mode. Tap a preset button to recall its preset.

Figure 4
-
Yellow — Store mode. Tap a preset button to store a preset on it.

Figure 5
-
Green — Edit Preset Options mode. Tap a button to edit Preset Options for the preset.

-
Red — Delete mode. Tap a preset button to delete its preset.

Figure 6
-
Gray — empty, or contain Preset Options data about deleted presets, which can be restored or discarded.
-
Shaded — preset locations that will be recalled from camera and pushed to camera when saved.
To work with presets, tap an action button at the bottom of the Presets page to enter an action mode (Recall , Store , Edit Preset Options , or Delete ), and then tap the preset to which you want to apply the action.
For more information, see “Working with Presets in Shotbox Mode”.
Tap Figure 3 to return to the Presets page diagram.
 Recall Button (Recall Mode)
The Recall button places the Presets page into Recall mode. Preset buttons containing presets that can be recalled turn purple. Tap a purple preset button to recall its preset.
Faded purple slots indicate mapped slots have no locally stored data, but can be recalled from camera storage when Blind Shot Recall is enabled. If no data is stored on the camera, the recall will fail silently.
When the Presets page is in Recall mode, the Recall Options area is available (Figure ??).

Figure 7 - The Recall Options area
Recall Options determine whether Preset Options specified in the preset are to be applied during recall.
The Recall Options settings enable you to Allow or Ignore the Preset Options for Focus , Exposure , and White Balance .
If Allow and Ignore buttons are not available for an option, it is because the mode/setting listed directly below it overrides that option.
Recall options only apply when presets are stored locally on the DashBoard computer. For Canon PTZ cameras where local storage is not supported, recall options are not shown.
For more information about recalling presets, see “Recall a Preset”.
Tap Figure 3 to return to the Presets page diagram.
 Store Button (Store Mode)
Places the Presets page into Store mode. Preset buttons containing presets that can be recalled turn yellow. Tap any preset button to store the current camera position as a preset.4
Faded yellow mapped slots indicate locations mapped to camera storage but have no data stored locally when Store Presets on Camera is enabled. Storing to a shaded slot causes data to be stored to both local and camera storage on the matching slot.
Store Options Area
When the Presets page is in Store mode, the Store Options area is available (Figure ??).
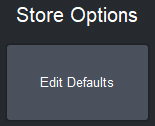
Figure 8 - Store Options area
The Edit Defaults button opens the Edit Default Preset Options dialog box (Figure ??).
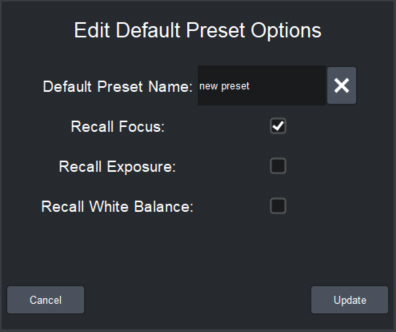
Figure 9 - Edit Default Preset Options dialog box
In this dialog box, you can define the default Preset Options , which are presented and/or applied each time you create a preset.
Preset recall options only apply when presets are stored locally on the DashBoard computer. For Canon PTZ cameras where local storage is not supported, preset recall options are not shown.
For more information, see “Edit Default Preset Options”.
Camera Control Area
When the Presets page is in Store mode, the Camera Control area is available (Figure ??).
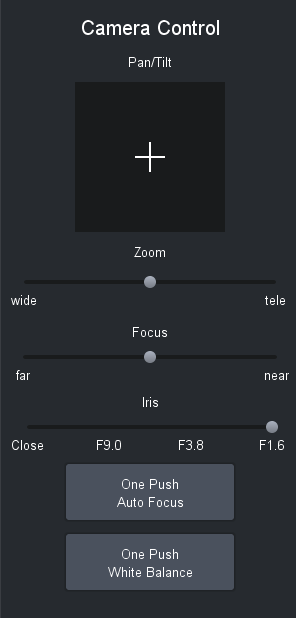
Figure 10 - Cam era Control area
The Camera Control area includes the following controls:
-
Pan/Tilt — Tap and drag the cross-hairs away from center. The farther the cross-hairs are from center, the faster the camera moves.
-
Zoom — Tap and drag the Zoom slider handle to the right to zoom in (telephoto), or to the left to zoom out (wide). The farther the Zoom slider handle is from center, the faster the lens zooms.
-
Focus — Tap and drag the Focus slider handle to the right (near), or to the left (far). The farther the Focus slider handle is from center, the faster the lens focuses.
noteThe Focus slider handle is available only if Auto Focus is Off . For more information, see “PTZ, Iris, and Focus Controls”.
-
Iris — Tap and drag the Iris slider handle to the right to open the iris, or to the left to close it.
noteThe Iris slider handle is available only if Auto Iris is Off . For more information, see “PTZ, Iris, and Focus Controls”.
-
One Push Auto Focus — Tap this button to perform a one-time auto focus.
noteThe One Push Auto Focus button is available only if Auto Focus is Off . For more information, see “PTZ, Iris, and Focus Controls”.
-
One Push White Balance — Tap this button to perform a one-time white balance. Applies to Ross Video PTZ cameras and Sony BRC cameras.
noteThe One Push White Balance button is available only if the White Balance Mode is set to One Push . For more information, see “Paint Controls”.
-
Trigger AWB — Tap this button to perform a one-time white balance. Applies to Panasonic cameras.
noteThe Trigger AWB button is available only if the White Balance Mode is set to AWB A or AWB A . For more information, see “Paint Controls”.
Tap Figure 3 to return to the Presets page diagram.
For more information about storing presets in Shotbox mode, see “Store a Preset”.
 Edit Preset Options Button (Edit Preset Options Mode)
Places the Presets page into Edit Preset Options mode. Preset buttons containing presets that can be recalled turn green. Tap any preset button to update the name and preset options for that preset.
For more information, see “Edit Preset Options”.
Tap Figure 3 to return to the Presets page diagram.
 Delete Button (Delete Mode)
Places the Presets page into Delete mode. Preset buttons containing presets that can be deleted turn red.
Tap any red preset button to delete its preset. The preset button turns gray. A deleted preset cannot be recalled, but its data persists. It can later be edited, restored, or discarded.
To manage deleted presets, in the Delete Options area, tap the Manage Deleted Presets button. The Manage Deleted Presets page appears. For more information, see “Manage Deleted Presets (Restore or Discard)”
Tap Figure 3 to return to the Presets page diagram.
When you delete a preset, only the local copy is deleted. If your system is configured to store presets locally and on the camera (Manage Presets on Camera setting is Enabled ), the camera still retains the preset in its memory.
 Options Area
The Options area contains options that are specific to the current action mode:
-
Recall mode — Recall Options . For more information, see “Recall Button (Recall Mode)”.
-
Store mode — Store Options and Camera Controls . For more information, see “Store Button (Store Mode)”.
-
Edit Preset Options mode — No options are presented for this mode.
-
Delete mode — Delete Options . For more information, see “Delete Button (Delete Mode)”.
Tap Figure 3 to return to the Presets page diagram.