Remote Control
This section describes the buttons on the remote control unit and settings that can be accessed through the On-Screen Display menu.
Buttons on the remote control unit are as follows:
Table 1
| Button | Description | |
|---|---|---|
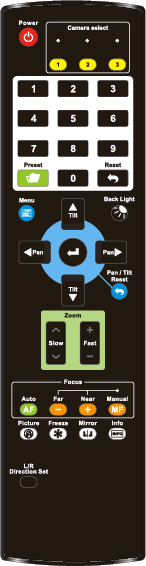 | | Pan left and right. When the On-Screen Menu is active, these button navigate up and down through the menu. |
| | Tilt up and down. When the On-Screen Menu is active, these buttons change the current setting. | |
| Back Light | Turns backlight compensation On / Off | |
| Focus-Manual / Far / Near | The Manual button turns on manual focus. When manual focus is on, the Far and Near buttons adjust the focus. | |
| Auto AF | Turn on auto focus | |
| Freeze | Freeze / unfreeze video | |
| Home-Enter | Returns the camera to its home position. When the On-Screen Menu is active, this button selects the current menu item. | |
| Info | Shows camera status information. | |
| L/R Direction Set | Reverses the direction that the camera moves when you pan. Use this feature if the camera is inverted. | |
| Menu | Shows the On-Screen Display menu. If the menu is already shown, pressing the Menu button steps up a level in the menu hierarchy or hides the menu. | |
| Mirror | Flips and rotates the image. | |
| Pan/Tilt Reset | Recalibrates the pan and tilt axes, to correct any positional error. The camera moves to a home position, and then returns. Positional error may be caused by accidental bumping of the camera. NEVER pan or tilt the camera by hand! Handle the camera by the base only. | |
| Picture | Switch image effect (OFF / Neg / B&W) | |
| Power | Power On / Standby | |
| Preset | To record a preset, hold the Preset button and press the preset number (0-9). Tip: You can use the Web UI or another control application to save up to 256 presets on the camera (preset numbers 0-255) | |
| Reset | To clear a preset, hold the Reset button and press the preset number (0-9). | |
| Zoom-Fast | Zooms quickly. | |
| Zoom-Slow | Zooms slowly. |
On-Screen Display Menu Settings
The following table describes settings that can be accessed through the On-Screen Display menu. Default values appear as bold italicized text.
To access the menu, press the Menu button on the remote control unit.
Alternatively, you can access the On-Screen Display menu from the DashBoard PTZ Camera Control plugin. For more information, see User Manual for PTZ Camera Control Plugin (8351DR-015) .
Table 2
| 1st Menu Level | 2nd Menu Level | 3rd Menu Level (values) | Description | |
|---|---|---|---|---|
| Exposure | Mode | Full Auto Shutter Pri Iris Pri Manual | Exposure mode setting | |
| Exposure Comp. | On / Off | AE Level | ||
| Exposure Comp. Level | -5 - 0 - 5 | This setting can be adjusted only when Exposure Compensation is On. | ||
| Spot Light | On / Off | Turns spot light On / Off. | ||
| Spot Light Position | X(0-6), Y(0-4) | Defines what area of the video frame is analyzed for auto exposure. Press the up, down, left, and right arrows to position the spot light on the screen. This setting can be adjusted only when Spot Light is On. | ||
| Shutter Pri | 60/30 mode: | 50/25 mode: | This setting can be adjusted only when Exposure mode is set to Shutter Priority. | |
| 1/10000 | 1/10000 | |||
| 1/5000 | 1/5000 | |||
| 1/3000 | 1/3000 | |||
| 1/2500 | 1/2500 | |||
| 1/2000 | 1/1750 | |||
| 1/1500 | 1/1250 | |||
| 1/1000 | 1/1000 | |||
| 1/725 | 1/600 | |||
| 1/500 | 1/425 | |||
| 1/350 | 1/300 | |||
| 1/250 | 1/215 | |||
| 1/180 | 1/150 | |||
| 1/120 | 1/120 | |||
| 1/100 | 1/100 | |||
| 1/90 | 1/75 | |||
| 1/60 | 1/50 | |||
| 1/30 | 1/25 | |||
| 1/15 | 1/12 | |||
| Exposure | 1/8 | 1/6 | ||
| 1/4 | 1/3 | |||
| 1/2 | 1/2 | |||
| 1/1 | 1/1 | |||
| Iris Pri | F1.6 | This setting can be adjusted only when Exposure mode is set to Iris Priority. | ||
| F2 | ||||
| F2.2 | ||||
| F2.7 | ||||
| F3.2 | ||||
| F3.8 | ||||
| F4.5 | ||||
| F5.4 | ||||
| F6.3 | ||||
| F7.8 | ||||
| F9 | ||||
| F11 | ||||
| F13 | ||||
| F16 | ||||
| F18 | ||||
| Close | ||||
| Manual Gain | 0 dB | Manually set the gain. This setting can be adjusted only when Exposure mode is set to Manual. | ||
| 3 dB | ||||
| 6 dB | ||||
| 9 dB | ||||
| 12 dB | ||||
| 15 dB | ||||
| 18 dB | ||||
| 21 dB | ||||
| 24 dB | ||||
| 27 dB | ||||
| 30 dB | ||||
| 33 dB | ||||
| 36 dB | ||||
| 39 dB | ||||
| 42 dB | ||||
| 45 dB | ||||
| Exposure | Manual Speed | 60/30 mode: | 50/25 mode: | Manually sets the shutter speed. This setting can be adjusted only when Exposure mode is set to Manual. |
| 1/10000 | 1/10000 | |||
| 1/5000 | 1/5000 | |||
| Manual Speed | 1/3000 | 1/3000 | Manually sets the shutter speed. This setting can be adjusted only when Exposure mode is set to Manual. | |
| 1/2500 | 1/2500 | |||
| 1/2000 | 1/1750 | |||
| 1/1500 | 1/1250 | |||
| 1/1000 | 1/1000 | |||
| 1/725 | 1/600 | |||
| 1/500 | 1/425 | |||
| 1/350 | 1/300 | |||
| 1/250 | 1/215 | |||
| 1/180 | 1/150 | |||
| 1/120 | 1/120 | |||
| 1/100 | 1/100 | |||
| 1/90 | 1/75 | |||
| 1/60 | 1/50 | |||
| 1/30 | 1/25 | |||
| 1/15 | 1/12 | |||
| 1/8 | 1/6 | |||
| 1/4 | 1/3 | |||
| 1/2 | 1/2 | |||
| 1/1 | 1/1 | |||
| Manual Iris | F1.6 | Manually sets the iris. This setting can be adjusted only when Exposure mode is set to Manual. | ||
| F2 | ||||
| F2.2 | ||||
| F2.7 | ||||
| F3.2 | ||||
| F3.8 | ||||
| F4.5 | ||||
| F5.4 | ||||
| F6.3 | ||||
| F7.8 | ||||
| F9 | ||||
| Exposure | F11 | |||
| F13 | ||||
| F16 | ||||
| F18 | ||||
| Manual Iris | Close | Manually sets the iris. This setting can be adjusted only when Exposure mode is set to Manual. | ||
| Gain Limit | 9 dB | Maximum limit of electron gain. This setting can be adjusted only when Exposure mode is set to Iris Priority, Shutter Priority, or Full Auto. | ||
| 12 dB | ||||
| 15 dB | ||||
| 18 dB | ||||
| 21 dB | ||||
| 24 dB | ||||
| 27 dB | ||||
| 30 dB | ||||
| 33 dB | ||||
| 36 dB | ||||
| 39 dB | ||||
| 42 dB | ||||
| 45 dB | ||||
| Iris Limit | F3.2 | Maximum limit of iris. This setting can be adjusted only when Exposure mode is set to Shutter Priority or Full Auto. | ||
| F3.8 | ||||
| F4.5 | ||||
| F5.4 | ||||
| F6.3 | ||||
| F7.8 | ||||
| F9 | ||||
| F11 | ||||
| D-WDR | Off / Normal | Digital Wide Dynamic Range Enhances the image quality by adjusting the gamma value to brighten dark areas. Set the level of Digital Wide Dynamic Range (D-WDR) in order to obtain better images. Note: Set to Normal for Black Level Adjustment. | ||
| 1 | ||||
| 2 | ||||
| 3 | ||||
| Smart AE | On/Off | Smart AF must be turned on. Smart AE (auto exposure) is disabled when camera is set to manual exposure. | ||
| White Balance | Mode | Auto | Select the color temperature mode:
| |
| Indoor |
| |||
| Outdoor |
| |||
| One Push WB |
| |||
| ATW |
| |||
| Manual |
| |||
| Sodium Lamp |
| |||
| Preset Values 3000 K 4300 K 5000 K 6500 K 8000 K | Preset White Balance options in degrees Kelvin | |||
| One-Push Trigger | Press the Home-Enter button | Performs one-time white balance. This option is available only when White Balance mode is set to One Push Trigger. | ||
| Manual Red | 0 - 128 | This option is available only when White Balance mode is set to Manual. | ||
| Manual Blue | 0 - 128 | This option is available only when White Balance mode is set to Manual. | ||
| Picture | Picture Effect | Off Neg B&W | ||
| Black Level Mode | Auto / Manual | Set to Manual to expose Black Level values, which is the menu option below Black Level Mode. Note: Black Level Mode works independently of Image Mode on the On Screen Display. In Image Mode, the Default setting hides Image Mode Load, Brightness, Hue, Saturation, and Gamma. | ||
| Black Level Values | 0 - 10 | Each increment raises the black level. Use a waveform monitor to view black levels in the video and adjust accordingly. | ||
| Sharpness | 0 - 14 | |||
| 2D NR | Off 1 2 3 | 2D digital noise reduction | ||
| 3D NR | Off 1 2 3 | 3D digital noise reduction | ||
| Image Mode | Default Custom | The user can customize the desired image mode. | ||
| Image Mode Load | Press the Home-Enter button | Adjustable when the Image mode is set to Custom. After selected, the corresponding Image mode parameters are read and applied to Custom | ||
| Brightness | 0 - 15 | Adjustable when the Image mode is set to Custom. | ||
| Hue | 0 - 15 | Adjustable when the Image mode is set to Custom. | ||
| Saturation | 0 - 15 | Adjustable when the Image mode is set to Custom. | ||
| Gamma | 0 - 3 | Adjustable when the Image mode is set to Custom. | ||
| Pan Tilt Zoom | Pan/Tilt Limit | On / Off | When On, pan and tilt limits apply. | |
| Pan Right Limit | 0 - 170 | Sets the right Pan limit. Adjustable only when Pan/Tilt Limit is On. | ||
| Pan Left Limit | -170 - 0 | Sets the left Pan limit. Adjustable only when Pan/Tilt Limit is On. | ||
| Tilt Up Limit | 0 - 90 | Sets the upper Tilt limit. Adjustable only when Pan/Tilt Limit is On. | ||
| Tilt Down Limit | -30 - 0 | Sets the lower Tilt limit. Adjustable only when Pan/Tilt Limit is On. | ||
| Pan Flip | On / Off | Reverses the Pan axis direction. | ||
| Tilt Flip | On / Off | Reverses the Tilt axis direction. | ||
| Preset Speed | 5 deg/sec 25 deg/sec 50 deg/sec 80 deg/sec 120 deg/sec 160 deg/sec 200 deg/sec 300 deg/sec | Sets the rotation speed of the cradle head when a Preset is recalled. | ||
| PTZ Speed Comp | On / Off | When On, the Pan and Tilt speed varies based on the Zoom position. When Zoom is TELE, the Pan and Tilt axes move more slowly. When Zoom is WIDE, the Pan and Tilt axes move more quickly. | ||
| D-Zoom Limit | x1 - x12 | Sets the digital zoom limit. Note: Digital zoom is not available when resolution is set to 2160p 59.94/ 50. | ||
| PTZ Motion Sync | On | / Off | This feature allows smoother movement between camera presets by synchronizing pan, tilt, and zoom speeds. | |
| Dig-Effect | Mirror | Off Mirror Flip Mirror + Flip | Sets the orientation of the video image. Mirroring reverses the image horizontally. Flipping reverses the image vertically. | |
| Auto Focus | AF Sensitivity | Low Middle High | For AF triggering speed, the higher the speed is, the faster AF is triggered. | |
| AF Frame | Center Full Auto | Auto Focus frame setting. When set to Center, Auto Focus is based on the center of the screen. When set to Full, Auto Focus is calculated based on the full screen. | ||
| PTZ Assist | On / Off | When focus is set to manual and PTZ Assist is enabled, a One-Push auto focus is performed after PTZ axis adjustment stops. The camera remains in manual focus mode afterward. | ||
| Smart AF | On / Off | Turns Smart Auto FocusOn or Off. When On, AF detects and focuses on a face in the image. Note: When you change this setting, the video feed is temporarily interrupted. | ||
| Zoom Tracking | On / Off | Turns Zoom TrackingOn or Off. When On, AF maintains focus as the camera zooms in/out. When Off, the camera enables curve tracking, where the focus is automatically corrected based on a calibration curve when the camera zooms. Note: When you change this setting, the video feed is temporarily interrupted. | ||
| One Push Focus | On/Off | Triggers one-time focus, which uses the same frame settings as Auto Focus. When On, it initiates Auto Focus corresponding to the AF Frame and Sensitivity settings in AF Mode. Once established, AF turns off. | ||
| Ethernet | DHCP | On / Off | Enables/Disables DHCP (On or Off). | |
| IP Address | 192.168.100.100 | Sets the IP Address of the camera. This setting can be adjusted only when DHCP is set to Off. | ||
| Subnet Mask | 255.255.255.0 | Sets the Subnet Mask of the camera. This setting can be adjusted only when DHCP is set to Off. | ||
| Gateway | 192.168.100.254 | Sets the Gateway of the camera. This setting can be adjusted only when DHCP is set to Off. | ||
| Audio | Audio In | Line In/Mic In | Selects audio input type. | |
| Audio Enable | On / Off | Turns audio output On or Off. | ||
| Audio Volume | 0 - 10 | Volume setting | ||
| Audio Delay | On / Off | When audio and video are out of sync, enable this feature to set the audio delay time. This setting is only available with NDI|HX disabled. | ||
| Audio Delay Time (ms) | -1 to -500ms | Sets audio delay time, in milliseconds (ms). This setting can be adjusted only when Audio Delay is On. This setting is only available with NDI|HX disabled. | ||
| Encode Type | AAC G.711 | Set encode type. This setting is only available with NDI|HX disabled. | ||
| Encode Sample Rate | 48 kHz (AAC) 44.1 kHz (AAC) 16 kHz (AAC) 16 kHz (G.711) 8 kHz (G.711) | Sets the encode type and sample rate. Note: For SDI video, only 48 kHz output is supported. This setting is only available with NDI|HX disabled. | ||
| System | Prompt | On / Off | Turns On/Off the prompt information on the display. | |
| IR Receive | On / Off | When Off, the camera does not respond to commands from the remote control unit. To turn IR ReceiveOn, do one of the following:
| ||
| Tally Lamp | On / Off | Select to enable or disable Tally Lamp function.
| ||
| Tally CMMD Mode | Normal / Link | Impacts how the camera handles tally commands from a VISCA controller. Use normal operation when connecting DashBoard to the camera, and for other controllers unless otherwise specified by the controller software manufacturer. | ||
| Language | English / Chinese | |||
| Initial Position | Last MEM / 1st Preset | Sets whether the camera returns to the last operated position (Last MEM) or to the first preset position (1st Preset) when the camera powers on. The first preset is preset 0. | ||
| Control Device | Encoder / Controller | Control Device setting for external non-Ross controllers. | ||
| Motionless Preset | On / Off | When On, video freezes while a preset is being recalled. Video resumes when the camera reaches the preset position. | ||
| Control Port | RS-232/RS-422 | Choose whether the serial control interface used is RS-232 or RS-422 | ||
| System | Protocol | VISCA / PELCO D | Control signal protocol. Note: To control PTZ-12G+ Cameras using the DashBoard PTZ Camera Control Plugin, Protocol must be set to VISCA. | |
| Baud Rate | 9600/38400 | Choose the correct transmission speed for the control signal. VISCA typically uses 9600 baud. | ||
| VISCA Address | 0 - 7 | Sets the VISCA address of the camera when the camera is controlled over serial RS-232 or RS-422. This setting is available only when Protocol is set to VISCA. | ||
| PELCO D Address | 1 - 255 | Sets the Pelco D address of the camera. This setting is available only when Protocol is set to PELCO D. | ||
| Genlock - Hor. Phase | 0 — 100 | Adjusts the video output horizontal timing when a genlock signal is input to the unit | ||
| Genlock - Ver. Phase | -16 — +16 | Adjusts the video output vertical line timing when a genlock signal is input to the unit | ||
| Output Mode | 2160p/59.94 2160p/50 2160p/29.97 2160p/25 1080p/59.94 1080i/59.94 1080p/50 1080i/50 1080p/29.97 1080p/25 720p/59.94 720p/50 | Sets the video output resolution, overriding the value set by the Output Switch on the camera. If the Output Switch on the camera moves, the Output Mode also changes. Note: If HDMI/SDI output is set to 1080i mode, NDI|HX2 output is 1080p. | ||
| Factory Reset | On / Off | When turned On, the camera resets picture settings to factory defaults, and restarts. Network settings, presets, and User Names/Passwords are unaffected. To perform a hard reset and reset passwords, refer to “Hard Reset” in the Troubleshooting section. | ||
| Status | Displays the current setting status. | |||