
1. User Buttons
The default user button assignments differ between Carbonite and Acuity®. All the user buttons can be assigned to different functions.
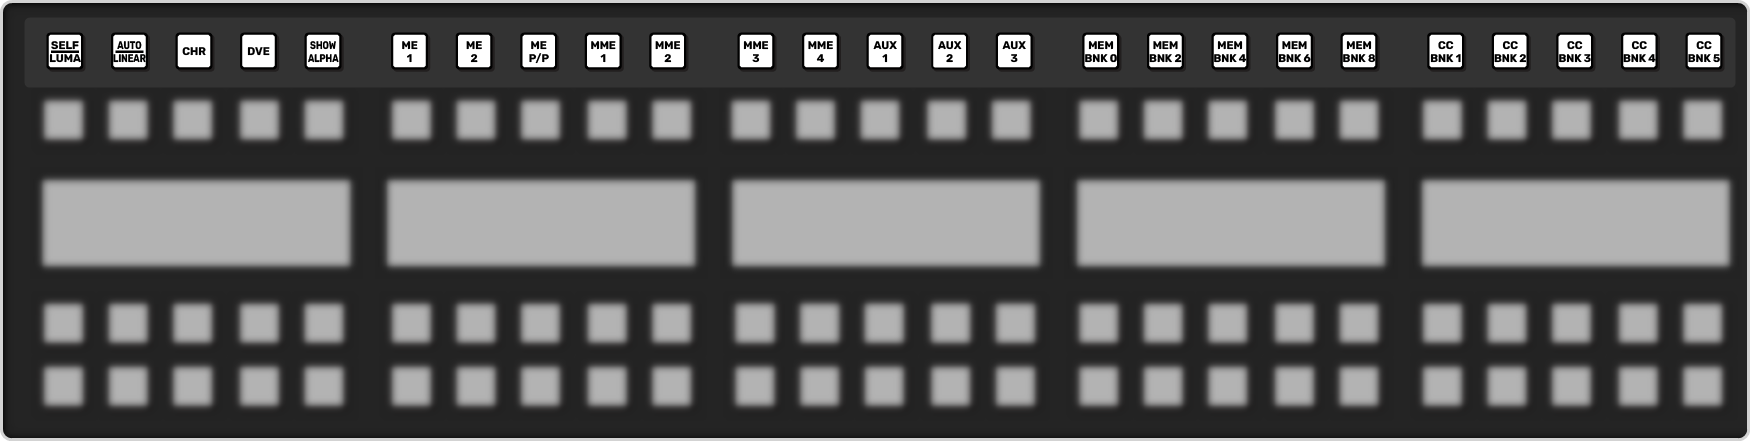
Carbonite Configuration
These buttons can be assigned to various functions or buses on the switcher. The default assignments are labelled on the buttons.
Note:
The exact buttons assignments and placement vary depending on the size of your control panel.
| Button | Function |
|---|---|
| SELF/LUMA | Assign Self as the key type for the selected key. |
| AUTO/LINEAR | Assign Auto Select as the key type for the selected key. |
| CHR | Assign the key bus to chroma key 1. Press and hold the button to select a different chroma key. |
| DVE | Assign DVE as the key type for the selected key. |
| SHOW ALPHA | View the black and white alpha signal for the selected keyer. This alpha signal is routed to the preview output of the selected ME. Press and hold to turn on the show alpha feature. Double-press the button to latch the show alpha state until the button is pressed again. |
| ME X | Assign the panel row to ME X. Press and hold the button to select a different ME. |
| MME X | Assign the panel row to MiniME™ X. Press and hold the button to select a different MiniME™ |
| AUX x | Assign the key bus to aux bus X. Press and hold the AUX button and use the source buttons on the keyer row to select the aux you want to use. |
| MEM BNK X | Recall a memory using the source buttons on the key bus. Press the MEM BNK button for the memory bank you want to recall a memory from and then press the button on the key bus for the memory you want to recall. Press and hold the MEM BNK button to select a different bank using the source buttons on the key bus. |
| CC BNK X | Run a custom control using the source buttons on the key bus. Press the CC BNK button for the bank you want to run a CC from and then press the button on the key bus for the CC you want to run. Press and hold the CC BNK button to select a different bank using the source buttons on the key bus. |
Tip:
Press and hold the ME, MiniME™, AUX, MEM BNK, or CC BNK button and use the buttons on the key bus to assign the row to a
different target.
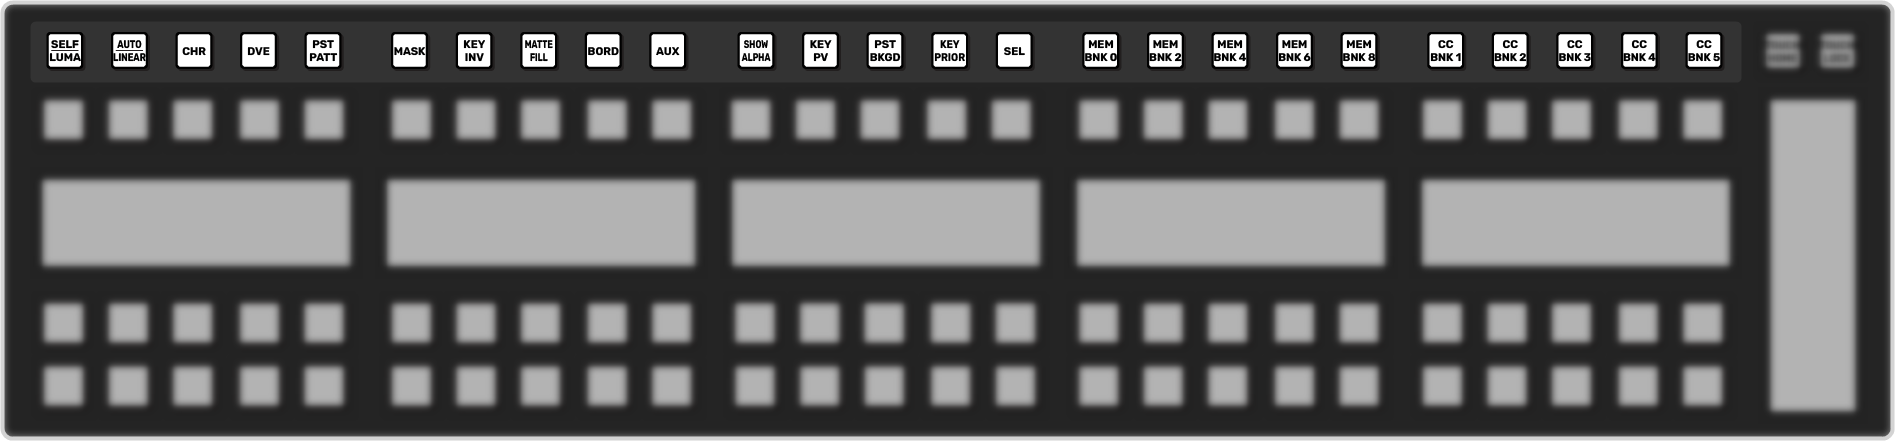
Acuity® Configuration
These buttons can be assigned to various functions or buses on the switcher. The default assignments are labelled on the buttons.
Note:
The exact buttons assignments and placement vary depending on the size of your control panel.
| Button | Function |
|---|---|
| SELF/LUMA | Assign Self as the key type for the selected key. |
| AUTO/LINEAR | Assign Auto Select as the key type for the selected key. |
| CHR | Assign Chroma Key as the key type for the selected key. |
| DVE | Assign 2D DVE as the key type for the selected key. |
| PST PATT | Assign a Preset Pattern as the key type for the selected key. |
| MASK | Turn on the Mask function. |
| KEY INV | Reverses the polarity of the key alpha. For example, if a self key, such as a title camera, has white letters on a black background, the white letters will normally cut the key hole. When the key invert feature is used, the polarity of the key is inverted so that black lettering is used to cut the hole. |
| MATTE FILL | Fill the selected keyer with a matte color. |
| BORD | Apply a border to the selected keyer. When pressed, the border menu is displayed, and the last selected border is applied. Press the button again to turn the border off. |
| AUX | Press and hold the AUX button and use the source buttons on the keyer row to select the aux you want to use. |
| SHOW ALPHA | View the black and white alpha signal for the selected keyer. This alpha signal can either be routed to the main preview output of the switcher, or to the preview output of the selected ME. Press and hold the SHOW ALPHA button, for the selected keyer and ME, to show the alpha for that keyer on the preview output of the switcher, or double-press the SHOW ALPHA button to lock it on until the button is pressed again. This allows you to record the alpha signal for a selected keyer independent of the fill. |
| KEY PV | Temporarily force the program output of the selected keyer to the preview output of the switcher. The ME remains in the key preview state for as long as you hold the KEY PV button, and returns to normal as soon as you release the button. You can also double-press the KEY PV button to latch the ME in the key preview state until the button is double-pressed again. |
| PST BKGD | Insert a transition to black as the next transition without losing what is currently selected as the next transition. |
| KEY PRIOR | Change the priority of the keyers on the ME. |
| SEL | Quickly navigate to the ME Selection menu. Press and hold the SEL button and use the source buttons on the Key and Background buses to select what the panel row is assigned to. |
| MEM BNK X | Recall a memory using the source buttons on the key bus. Press the MEM BNK button for the memory bank you want to recall a memory from and then press the button on the key bus for the memory you want to recall. Press and hold the MEM BNK button to select a different bank using the source buttons on the key bus. |
| CC BNK X | Run a custom control using the source buttons on the key bus. Press the CC BNK button for the bank you want to run a CC from and then press the button on the key bus for the CC you want to run. Press and hold the CC BNK button to select a different bank using the source buttons on the key bus. |
Tip:
Press and hold the ME, MiniME™, AUX, MEM BNK, or CC BNK button and use the buttons on the key bus to assign the row to a
different target.