4. Memory Area
The function of the buttons on the Memory area differ between Carbonite and Acuity®.
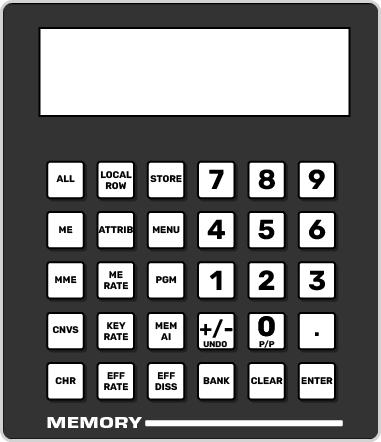
Carbonite Configuration
The memory area is used to store and recall memories, and to enter the various transition rates used by the switcher. The buttons in the left column assign the memory area to the various ME, MiniME™, , or chroma key resources of the switcher.

Tip: Toggle the STORE button on to store a memory or off to recall.
| Button | Function |
|---|---|
| ALL | Select all ME, MiniME™, , and chroma key inclusions for with the memory action. Press ALL to include all the elements with the memory store or recall. The inclusions are shown on the display. |
| ME | Select only specific ME inclusions for the memory action. Press and hold ME and press the number buttons to add or remove an element from the inclusions for the memory store or recall. The inclusions are shown on the display. |
| MME | Select only specific MiniME™ inclusions for the memory action. Press and hold MME and press the number buttons to add or remove an element from the inclusions for the memory store or recall. The inclusions are shown on the display. |
| CNVS | Select only specific inclusions for the memory action. Press and hold CNVS and press the number buttons to add or remove an element from the inclusions for the memory store or recall. The inclusions are shown on the display. |
| CHR | Select only specific chroma key inclusions for the memory action. Press and hold CHR and press the number buttons to add or remove an element from the inclusions for the memory store or recall. The inclusions are shown on the display. |
| LOCAL ROW | Select only the ME that the panel row is assigned to as the inclusion for the memory action. |
| ATTRIB | Jump to the Memory Attributes page in DashBoard. |
| ME RATE | Set the background transition rate for the ME that the panel row is assigned to. Press ME RATE and use the keypad to enter the new rate. The rate is shown on the display in the Transition area. |
| KEY RATE | Set the key only transition rate for the ME that the panel row is assigned to. Press KEY RATE and use the keypad to enter the new rate. The rate is shown on the display in the Keyer area for each individual key. |
| EFF RATE | Set the effects dissolve rate. Press EFF RATE and use the keypad to enter the new rate. |
| STORE | Set the Memory area to store mode. By default, the Memory area is in Recall mode. Press STORE (On) to put the Memory area in Store mode to store
memories. Tip: Press and hold STORE and press LOCAL ROW to reset only the row
you are working on or ALL to reset all rows. |
| MENU | Set the Memory area to follow the menu selections. This allows you to use the keypad to select wipe pattern or media items. Press MENU (On) to turn the follow on. |
| PGM | Set the Program recall mode where all elements of the memory are recalled as they are stored. |
| MEM AI | Set the Memory AI mode where current on-air elements are unchanged and the transition area is configured to take the on-air elements of the memory on-air with the next transition. |
| EFF DISS | Turn on the Effects Dissolve effect for the memory recall. On-air elements are transitioned to the elements stored in the memory. The time it takes to go from the current elements to the elements in the memory is set with the EFF RATE. |
| +/- UNDO | Undo the last memory recall. When entering number values with the keypad, press +/- to toggle between positive and negative values. |
| BANK | Select the memory bank you want to use. Press and hold the BANK button and press the number for the custom control or memory bank you want to access. |
| CLEAR | Clear the current value being entered. For example, enter an incorrect value on the keypad and press CLEAR to remove it. |
| ENTER | Commit the currently entered value. For example, enter a new key rate using the keypad and press ENTER to apply it. |
| 0-9 | The keypad numbers are used to select ME inclusions as well as enter rate values or clip ids. |
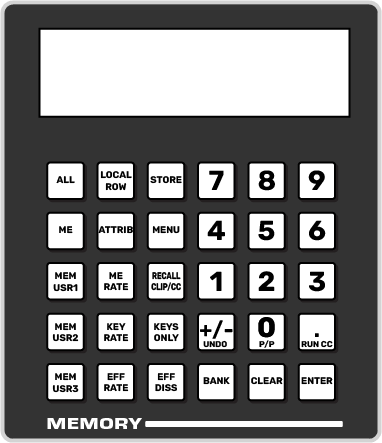
Acuity® Configuration
The memory area is used to store and recall memories, and to enter the various transition rates used by the switcher. The buttons in the left column assign the memory area to a specific ME.

Tip: Toggle the STORE button on to store a memory or off to recall.
| Button | Function |
|---|---|
| ALL | Select all ME inclusions for with the memory action. Press ALL to include all the elements with the memory store or recall. The inclusions are shown on the display. |
| ME | Select only specific ME inclusions for the memory action. Press and hold ME and press the number buttons to add or remove an element from the inclusions for the memory store or recall. The inclusions are shown on the display. |
| MEM USR# | User assignable buttons. You can assign any function to these buttons from the Personality menu. |
| LOCAL ROW | Select only the ME that the panel row is assigned to as the inclusion for the memory action. |
| ATTRIB | Allows you to view the memory attributes menu, or override the attributes stored with the memory with the default attribute settings. To override attributes, press and hold the ATTRIB button while recalling the memory. |
| ME RATE | Set the background transition rate for the ME that the panel row is assigned to. Press ME RATE and use the keypad to enter the new rate. The rate is shown on the display in the Transition area. |
| KEY RATE | Set the key only transition rate for the ME that the panel row is assigned to. Press KEY RATE and use the keypad to enter the new rate. The rate is shown on the display in the Keyer area for each individual key. |
| EFF RATE | Set the effects dissolve rate. Press EFF RATE and use the keypad to enter the new rate. |
| STORE | Set the Memory area to store mode. By default, the Memory area is in Recall mode. Press STORE (On) to put the Memory area in Store mode to store
memories. Tip: Press and hold STORE and press LOCAL ROW to reset only the row
you are working on or ALL to reset all rows. |
| MENU | Have the Memory area follow menu selections. Press the MENU button on a Memory area to have that Memory area follow menu selections, such as wipe pattern, DVE sequence, or media item selection. |
| RECALL CLIP/CC | Allows you to either recall a clip on the selected device using a Clip ID or Clip Number by entering it using the keypad, or run a custom control by entering the bank and custom control number. The functionality of the Recall Clip/CC button is set using the CC Global Recall personality option. |
| KEYS ONLY | Recall a memory on a panel row that does not include the program and preset bus selections. Only the keyer selections are recalled. |
| EFF DISS | Turn on the Effects Dissolve effect for the memory recall. On-air elements are transitioned to the elements stored in the memory. The time it takes to go from the current elements to the elements in the memory is set with the EFF RATE. |
| +/- UNDO | Undo the last memory recall. The UNDO button lights up after each memory recall, indicating that the action can be undone. If you perform 10 or more button presses after the memory recall, the UNDO button goes out, and the memory can no longer be recalled. When entering number values with the keypad, press +/- to toggle between positive and negative values. |
| BANK | Select the memory bank you want to use. Press and hold the BANK button and press the number for the custom control or memory bank you want to access. |
| CLEAR | Clear your current entry. For example, if you are entering a memory register to recall, but then decide not to recall the memory, you can press the CLEAR button to return to the previous state. |
| ENTER | Commit the currently entered value. For example, enter a new key rate using the keypad and press ENTER to apply it. |
| RUN CC | Run a custom control that you have recalled using the RECALL CC button. |
| 0-9 | The keypad numbers are used to select ME inclusions as well as enter rate values or clip ids. |
