Troubleshooting
Topics in this section include:
- “Symptoms and Possible Causes”
- “Finding the IP Address of a VRzero Module”
- “Restoring the Ross Video Default Configuration”
Symptoms and Possible Causes
This section describes common problems and possible solutions. If you encounter a problem that is not listed, or your require help, please contact Ross Video Technical Support (see “Contacting Technical Support”).
No Tracking Data, or Intermittent Data
If your VCC application receives no tracking data, or receives data intermittently, check the following:
-
Does the VRzero module have power? Check the Power LED on the module. It should be green.
-
Is there network connectivity between the VRzero module and the computer running your VCC application?
- Is the Ethernet cable between the VRzero module and the network connected properly?
- Are the subnet mask and gateway configured properly? This does not apply if the system worked previously and the network settings have not changed.
No Pan and/or Tilt Data
Check the data cables between the VRzero module and the eSensor fluid head.
No Lens Data (no zoom or focus data)
This topic assumes you already checked that the data cable between the lens and the VRzero module is connected.
When you use the VRzero module, you must turn on the camera and lens before applying power to the module. If the camera and lens are not powered first, the system may not be able to relay lens encoder data (zoom and focus).
To fix this problem, disconnect power from the VRzero module, wait a few seconds, and then reconnect power. After the module initializes, it should relay data.
Virtual Elements Move in the Wrong Direction (inverted pan and/or tilt axis)
By default, the orientation of the pan and/or tilt axis may be reversed compared to what your VCC application expects.
For example, the VCC application may expect the pan encoder count to decrease as the eSensor fluid head pans clockwise, but the count actually increases instead.
You can effectively reverse the axis orientation by modifying the scale value in your VCC application. Multiply the scale by minus 1, by placing a negative symbol (-) before the scale value for that axis.
Jittering, Rough Motion, or Delayed Response
If your virtual elements experience jittering, rough motion, or delayed response, try the following:
-
Check that the video reference (genlock/sync) data cable is properly connected and that the SYNC LED on the VRzero module is green.
-
Ensure the following are synchronized:
-
Position data from every encoded axis (pan, tilt, zoom, focus)
The VRzero module assembles encoder count data from each axis into a single data stream consisting of one data channel per axis. The data channels from the VRzero may not be synchronized to the same video frame. For example, some lenses take longer to process encoder data so their data may be delayed by a frame or two.
To synchronize the data channels, adjust delay settings in your VCC application.
-
Camera video
The camera video signal must be delayed by the correct number of frames to account for processing time required by the lens, the VRzero module, the VCC application, and the rendering engine.
Video delay is typically performed by a hardware device applied to the camera video output.
-
-
If jittering and rough motion persist, check the performance of the actual scene to make sure it is running in real time.
Finding the IP Address of a VRzero Module
This section describes how to discover the IP address of a VRzero module. This is required only if you do not know the IP address.
You can use the MOXA NPort Search Utility to detect a VRzero module on the network, and to find its IP address. The NPort Search Utility is available as a free download from the MOXA website.
The steps in this section were accurate at the time they were written. Ross Video does not control the MOXA website, so the steps to find and download the MOXA NPort Search Utility may not work perfectly.
To find the IP address of a VRzero module :
-
Power ON the VRzero module.
-
Connect an Ethernet cable between the VRzero module and your computer.
-
Download and install the NPort Search Utility from the MOXA website:
-
In a web browser with Internet connectivity, navigate to http://www.moxa.com.
-
Using the Search tool on the MOXA website, search for NPort 5150A .
-
Follow the link to the MOXA Device Servers product page, and then click Drivers & Software .
-
In the Software list, click Utilities .
-
Download the NPort Search Utility , and save it locally.
A zip file with a name similar to nploc_setup_Ver1.15_Build_14063019.zip is downloaded. By default, it is saved in the Downloads folder.
-
Unzip the file and then run the executable file (*.exe) to launch the application’s installer.
-
During the installation process, accept all the defaults by clicking Next or Finish on each dialog.
The installation proceeds, and then the NPort Search Utility opens (see Figure ??).
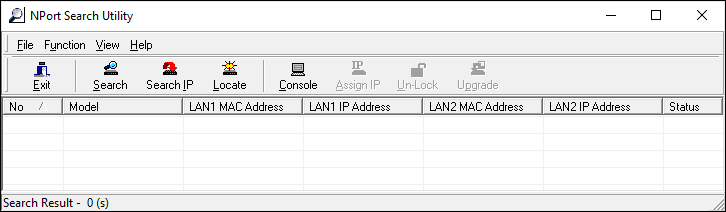
Figure 1 - - The NPort Search Utility
-
-
In the NPort Search Utility , click Search .
The Searching window appears.
-
After a few seconds, an entry for the connected VRzero module appears (see Figure ??).
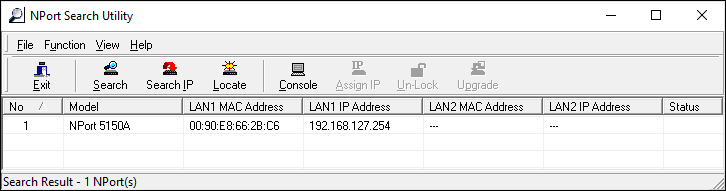
Figure 2 - - The NPort Search Utility Detects a VRzero Module
-
Record the IP address.
Restoring the Ross Video Default Configuration
The VRzero module is shipped partially configured by Ross Video.
When setting up the VRzero module, you use the MOXA NPort web console application to configure specific properties to suit your specific application. While configuring the VRzero module, you may make a mistake and accidentally change settings, causing undesired behavior.
This section describes how to restore the VRzero module to the original Ross Video factory settings.
To restore the VRzero module to Ross Video factory settings:
-
Access the MOXA NPort web console application on the VRzero module.
For more information, see “Accessing the Configuration Application”.
-
If you want to later configure the VRzero module to have the current IP address and/or data destination(s), find and record the customized values:
-
On the Main Menu , click Network Settings .
The Network Settings page appears.
-
Note the IP address .
-
On the Main Menu , navigate to Operating settings > Port 1 .
-
Note each Destination IP address and corresponding Port number.
-
-
On the Main Menu , click Load Factory Default .
The Load Factory Default page appears (see Figure ??).
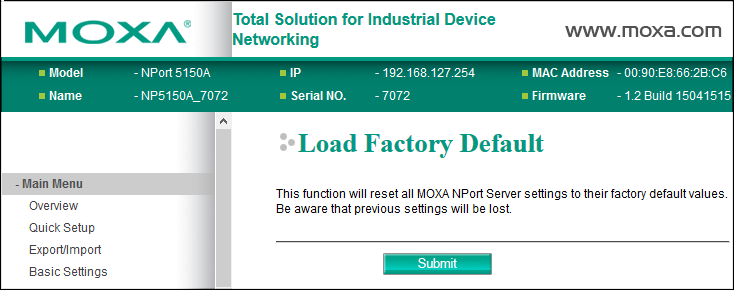
Figure 3 - - The Load Factory Default Page
-
Scroll to the bottom of the page, and then click Submit .
The Network Settings OK! message appears.
-
Click Save/Restart .
The VRzero module restarts. This takes approximately ten seconds.
-
Click Home to return to the Main Menu of the NPort web console .
noteThe IP address of the VRzero module is now the factory default, which is 192.168.127.254.
-
On the Main Menu , navigate to Basic Settings , and then configure the settings to match those in Figure ??.
tipThe Basic Settings menu item is shown with yellow background in Figure ??.
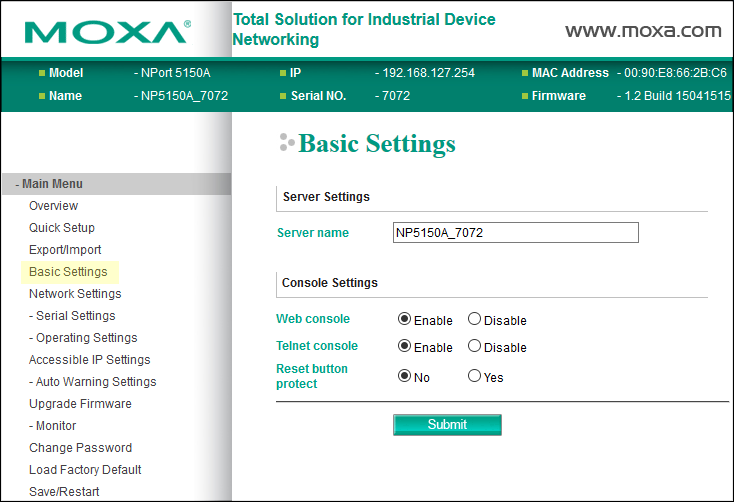
Figure 4 - - Ross Factory Values for the Basic Settings Page
-
On the Main Menu , navigate to Network Settings , and then configure the settings to match those in Figure ??.
tipThe Network Settings menu item is shown with yellow background in Figure ??.
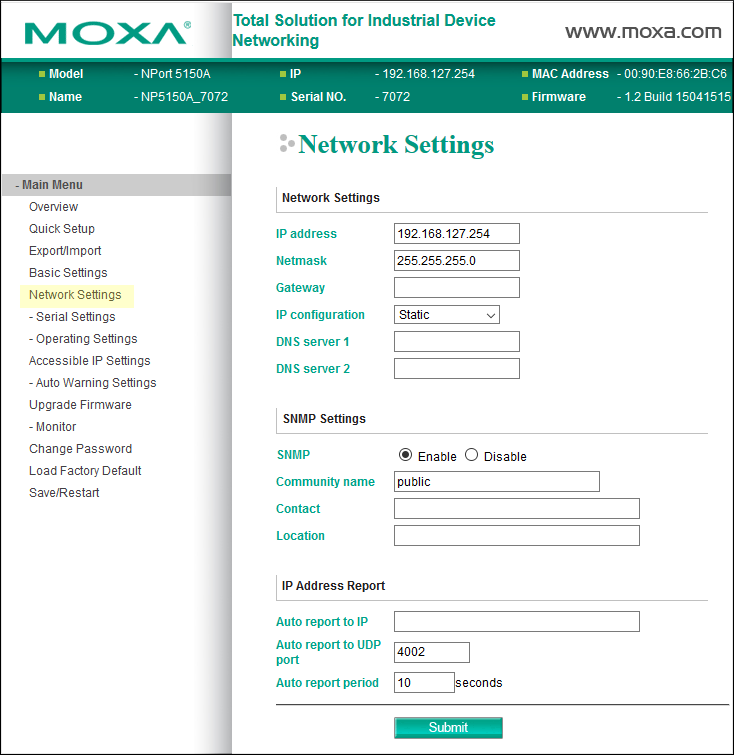
Figure 5 - - Ross Factory Values for the Network Settings Page
-
On the Main Menu , navigate to Serial Settings > Port 1 and then configure the settings to match those in Figure ??.
tipThe Serial Settings > Port 1 menu item is shown with yellow background in Figure ??.
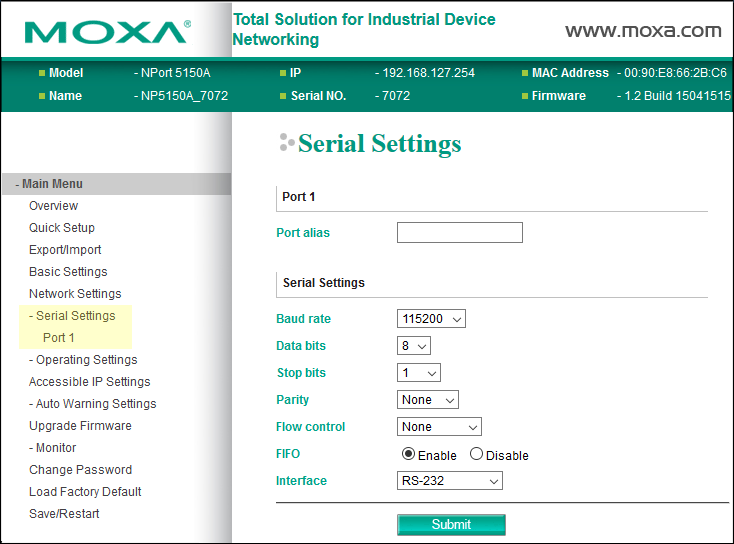
Figure 6 - - Ross Factory Settings for the Serial Settings > Port 1 Page
-
On the Main Menu , navigate to Operating Settings > Port 1 and then configure the settings to match those in Figure ??.
tipThe Operating Settings > Port 1 menu item is shown with yellow background in Figure ??.
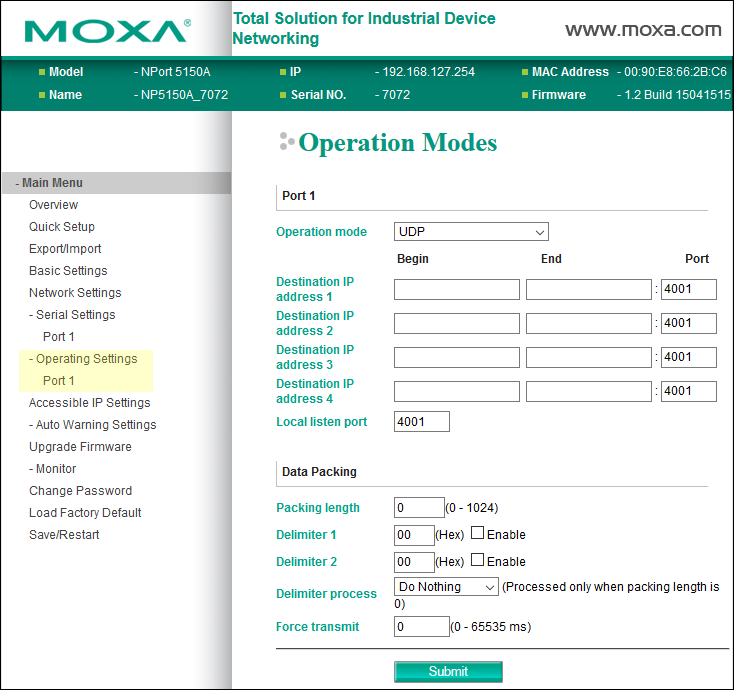
Figure 7 - - Ross Factory Settings for the Operating Settings > Port 1 Page
- Before you can use the VRzero module, you must configure it to suit your specific application. For more information, see “Setting the IP Address”, and “Specifying Data Destination Addresses”.