Web Interface
You can connect to PTZ-12G & PTZ-NDI cameras over an IP network to configure them and to view live video (only for PTZ-12G or PTZ-NDI with NDI disabled).
This section describes how to connect to a camera, and describes the camera’s built-in web interface. It also provides information about viewing an RTSP video stream.
Topics include the following:
- “Connecting to the Web Interface”
- “Web Interface Features”
- “Viewing RTSP Video Stream (PTZ-12G or PTZ-NDI with NDI disabled)”
Connecting to the Web Interface
You can connect to a camera via a network switch or router, or by connecting a network cable directly from the camera to your computer.
Network cable type must be CAT6 (minimum).
To connect via a network switch or router:
- Connect a network cable between the camera and the network switch or router (Figure ??).
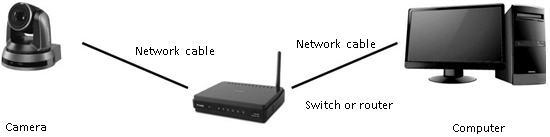
Figure 1 - Connecting over an IP Network
To connect directly, using a network cable:
-
Connect a network cable between the camera and your computer.

Figure 2 - Connecting Directly using a Network Cable
-
Configure the IP address , Subnet mas k, and Default gateway on your computer so it is on the same network segment as the camera (Figure ??).
tipThe camera’s factory-set default IP address is 192.168.100.100 . Each device on the network must have a unique IP address.
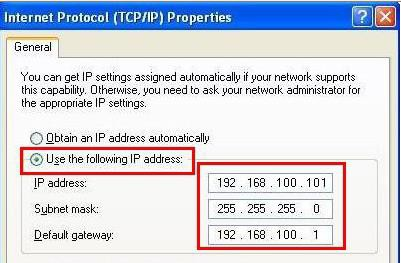
Figure 3 - Configuring the IP Address, Subnet mask, and Default gateway
To Access the Web Interface:
-
In a web browser, navigate to the IP address of the camera.
tipThe factory-set default IP address is 192.168.100.100 . Each device on the network must have a unique IP address.
The login page appears.
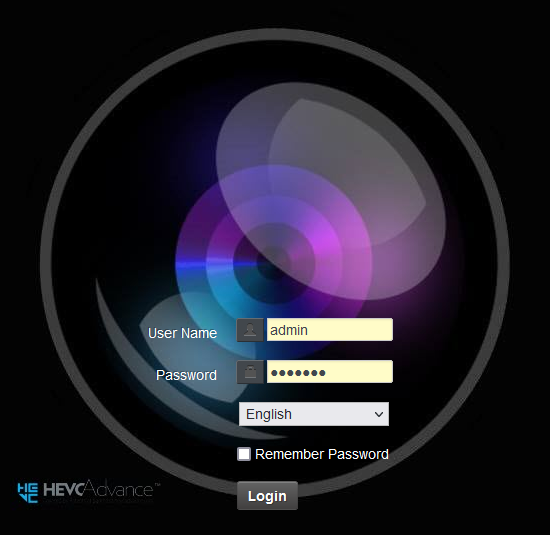
Figure 4 - Login Page
-
Type a valid User Name and Password , and then click the Login button.
tipThe default User Name is admin . The default Password is 9999 . If this is the first login, you are prompted to change the password.
The web interface appears (Figure ??).
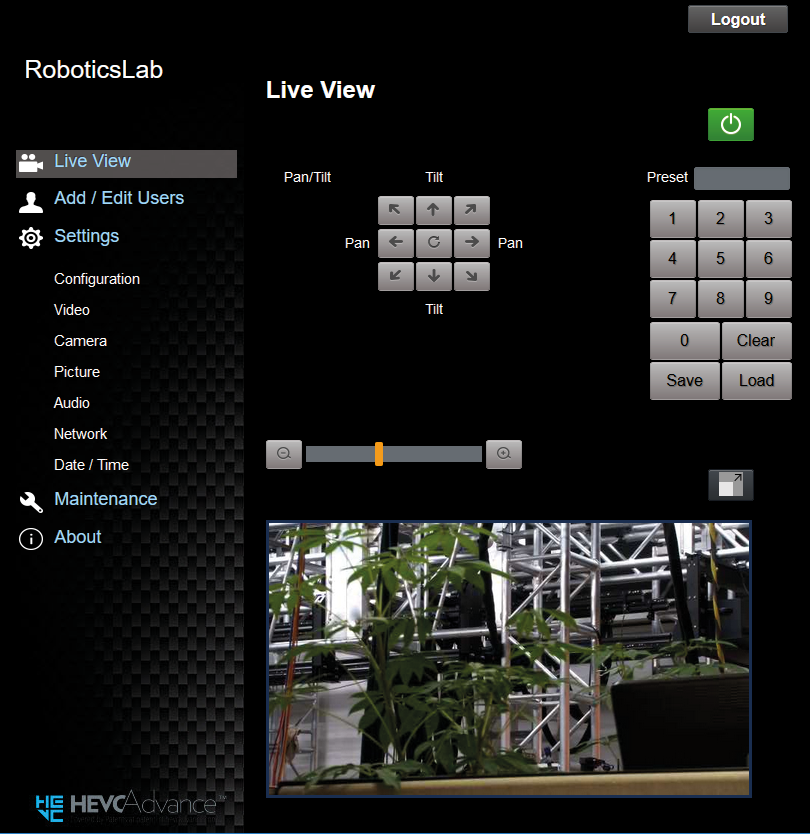
Figure 5 - Web Interface for a PTZ-12G Camera
-
Note : Live video in the web interface is available only for PTZ-12G or PTZ-NDI with NDI disabled. To view live video from a PTZ-NDI camera, you can use the NDI® Studio Monitor tool, which is part of a free NDI Tools package available through https://ndi.tv/tools.
Web Interface Features
This section describes the web interface for PTZ-12G & PTZ-NDI cameras.
It includes the following topics:
- “Login Page”
- “Live View Page”
- “Add / Edit Users Page”
- “Settings: Configuration Page”
- “Settings: Video Page”
- “Settings: Camera Page”
- “Settings: Picture Settings Page”
- “Settings: Audio Settings Page”
- “Settings: Network Settings Page”
- “Settings: Date / Time Page”
- “Maintenance: Firmware Upgrade Page”
- “Maintenance: Error Log Page”
- “Maintenance: Security Page”
- “Maintenance: System Service Page”
- “Maintenance: Reboot Page”
Login Page
This section describes features available on the Login page (Figure ??).

Figure 6 - Login Page
Table 1
| No. | Item | Function Descriptions |
|---|---|---|
| 1 | User Name | Enter user account (default: admin) |
| 2 | Password | Enter user password (default: 9999) If this is the first login, you are prompted to change the password, and the Add / Edit Users page appears. For more information, see “Add / Edit Users Page”. |
| 3 | Language selection | Sets the language for the web interface. Options include English, Traditional Chinese and Simplified Chinese. |
| 4 | Remember Password | Saves user account name and password to the browser. When you log in next time, there is no need to re-enter them. |
| 5 | Login button | Logs in to the web interface. |
Live View Page
This section describes features available on the Live View page (Figure ??).
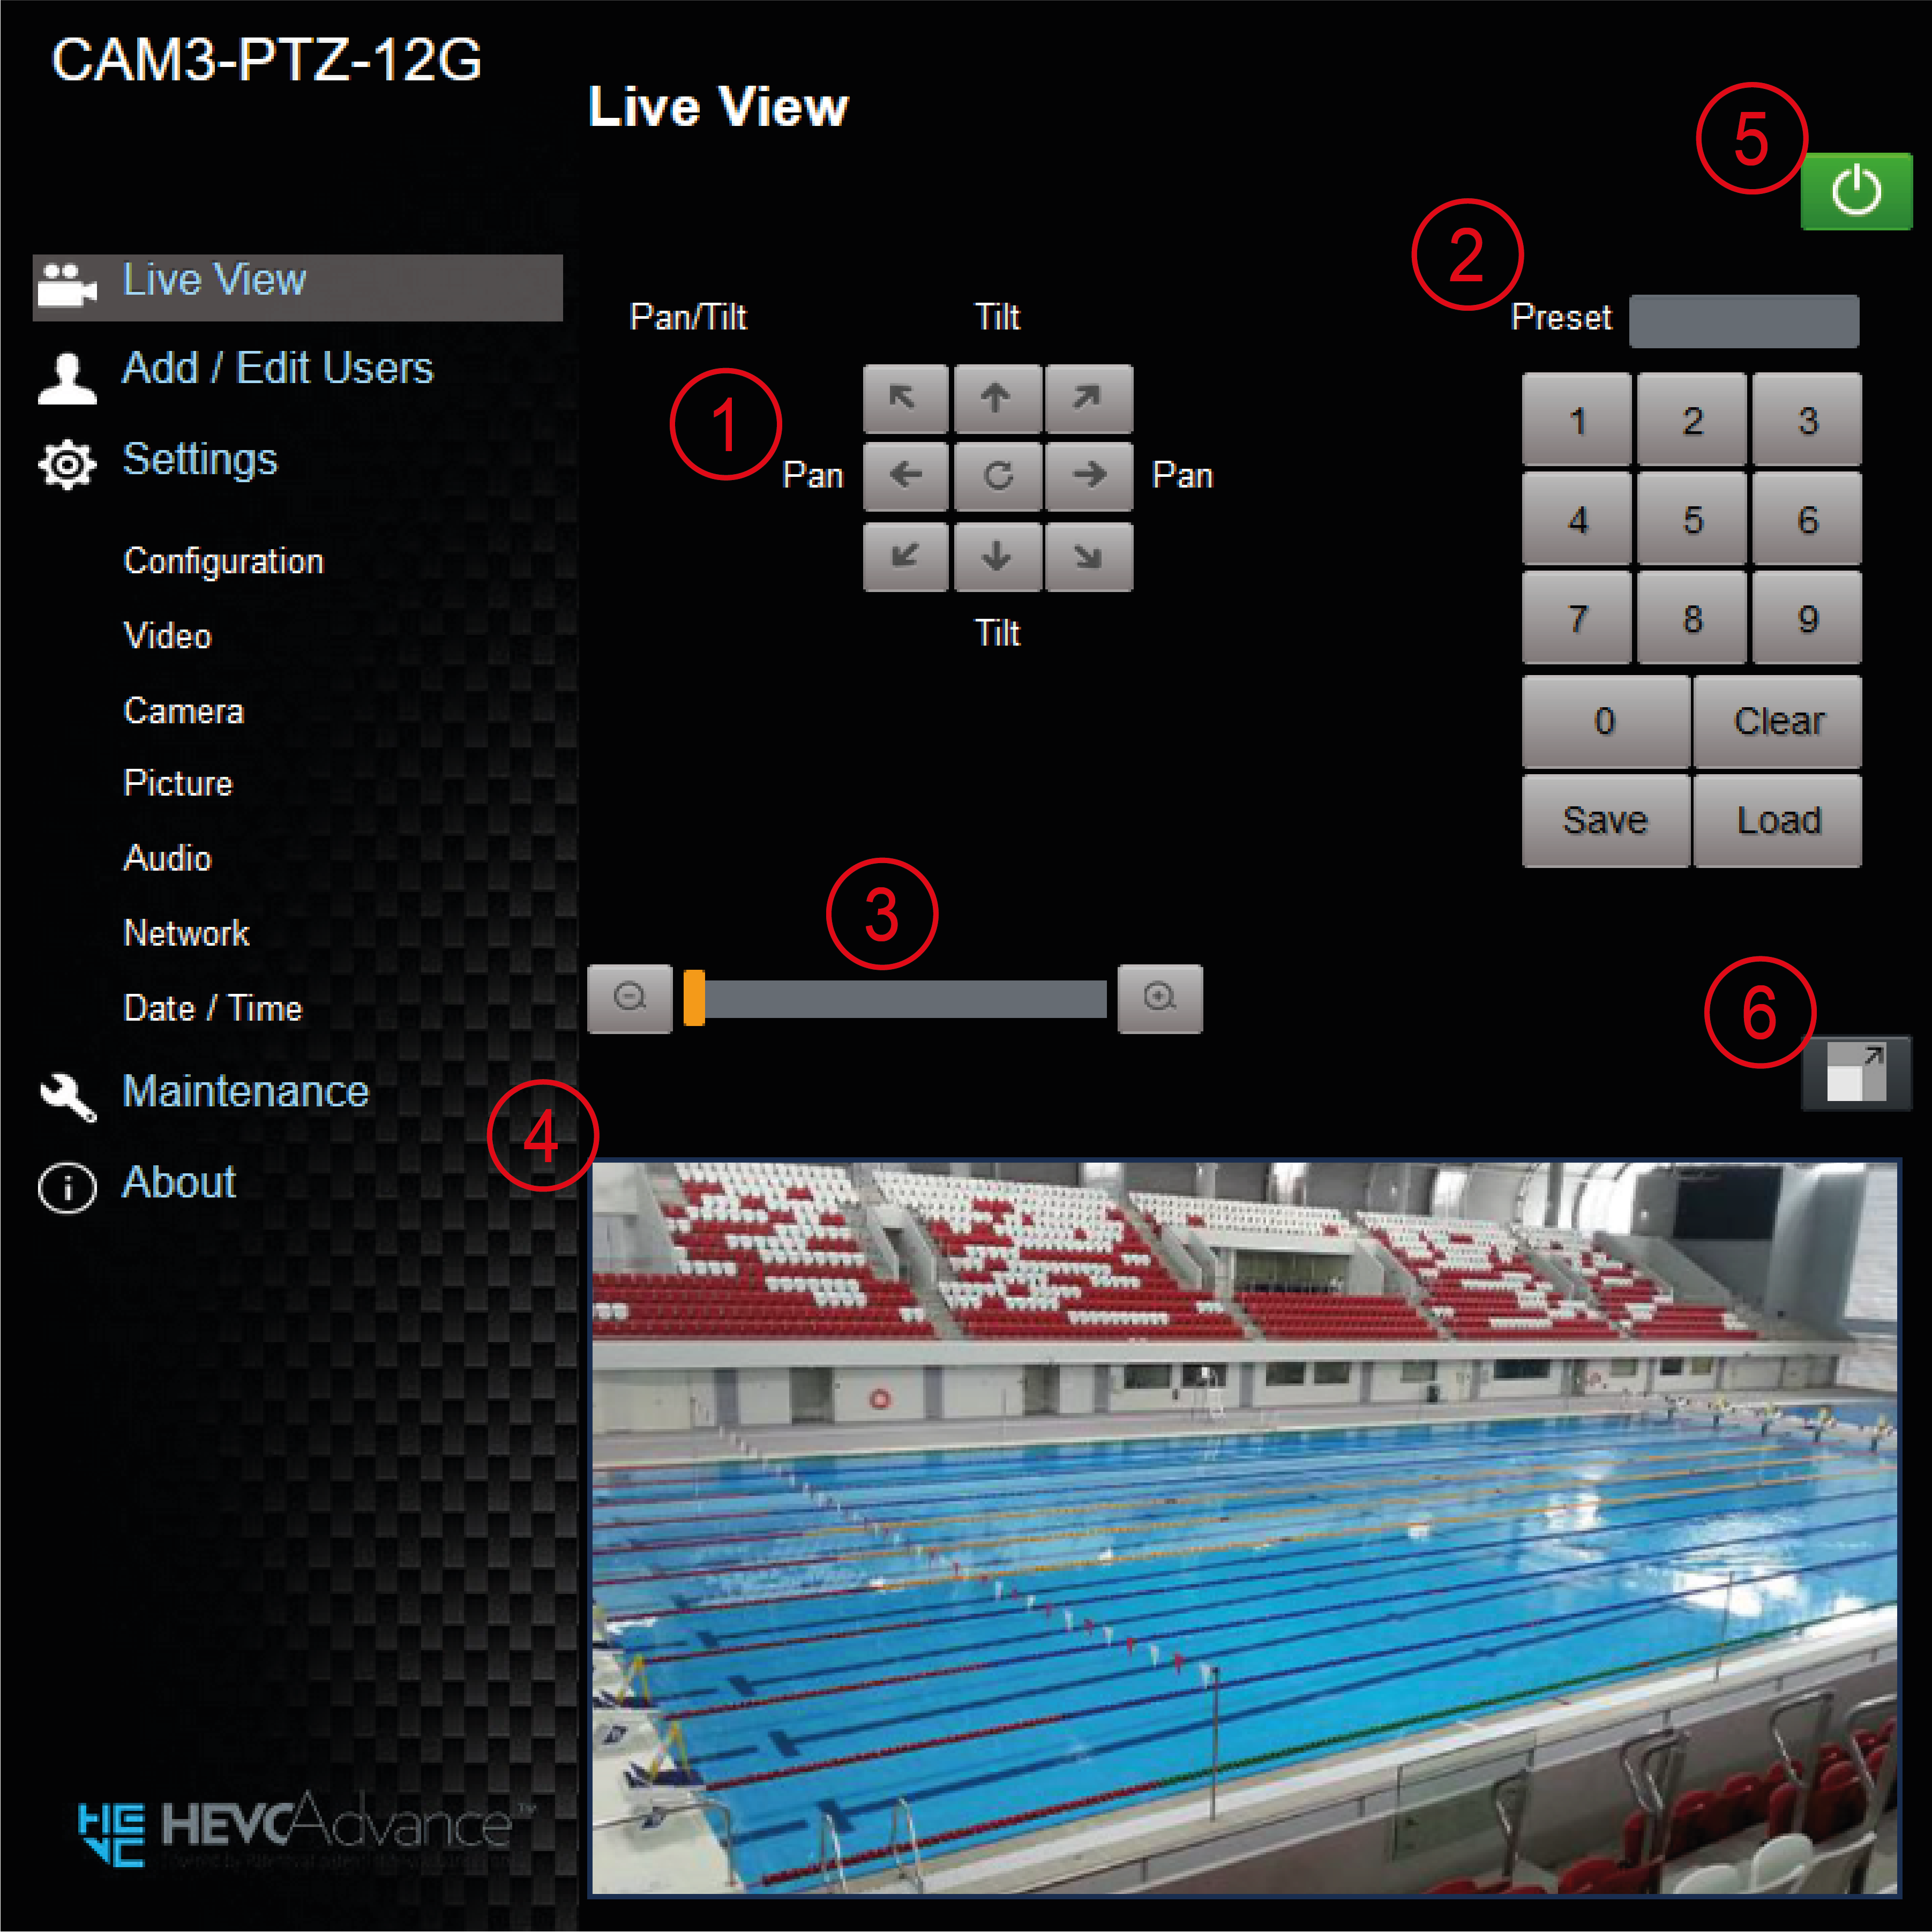
Figure 7 - Live View Page
Table 2
| No | Item | Function Descriptions |
|---|---|---|
| 1 | Pan / Tilt setting | Adjust the Pan/Tilt position of the camera. |
| 2 | Preset setting | Type or select a preset number, and then do one of the following:
|
| 3 | Zoom ratio | Adjusts the zoom position of the camera lens. |
| 4 | Preview window | Shows live video from the camera (only for PTZ-12G or PTZ-NDI with NDI disabled). |
| 5 | Power button | Turns camera power On or places it in Standby mode. |
| 6 | Switch to Full Screen | Switches the preview window to full screen (only for PTZ-12G or PTZ-NDI with NDI disabled). |
Add / Edit Users Page
This section describes features available on the Add / Edit Users page (Figure ??).
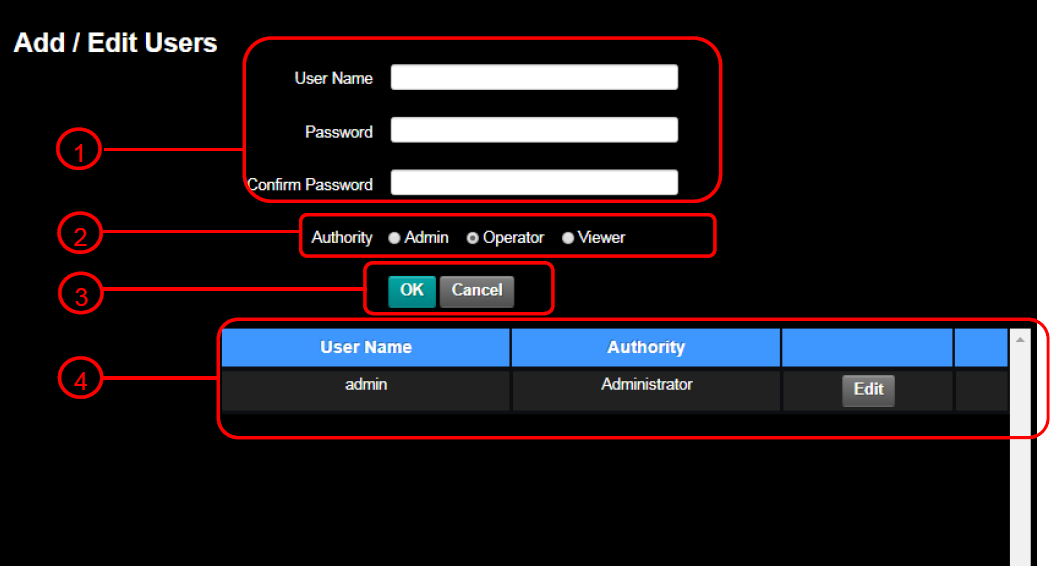
Figure 8 - Add / Edit Users Page
Table 3
| No | Item | Function Descriptions |
|---|---|---|
| 1 | User Name Password Confirm Password | Enter a user name and password to add a new user. Use only letters and numbers. No symbols. |
| 2 | Permission setting | All user types can view live video (for PTZ-12G or PTZ-NDI with NDI disabled). Operators can also modify settings. Administrators (Admin) can modify settings and manage users. |
| 3 | Applying settings | Click OK to apply the user settings, or click Cancel to cancel changes. |
| 4 | List of accounts | Edit — Enables you to modify the user password and user permissions. Delete — Deletes the user account |
Settings: Configuration Page
This section describes features available on the Settings > Configuration page (Figure ??).
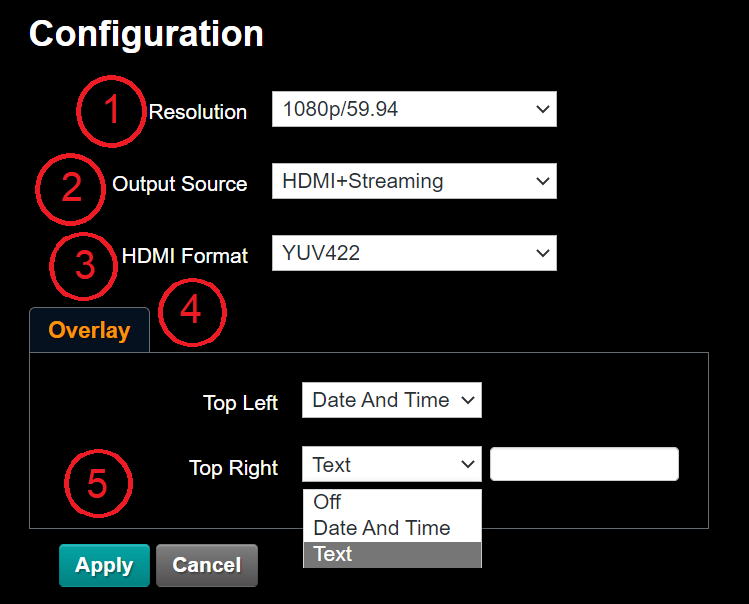
Figure 9 - Settings > Configuration Page
Table 4
| No. | Item | Function Descriptions |
|---|---|---|
| 1 | Resolution | Sets the resolution of the camera. Supported resolutions are as follows:
Note: For PTZ-NDI cameras, if resolution is to 1080i/59.94 or 1080i/50, NDI|HX2 output is 1080p. |
| 2 | Output Source | Options for PTZ-12G and PTZ-NDI with NDI disabled:
|
| 3 | HDMI Format | Select YUV422 / YUV420 / RGB Note: YUV420 is exposed and supported when set to a 4K formats. |
| 4 | Overlay | Sets the content at the top left and top right of the screen. The supported options are as follows:
|
| 5 | Apply | After the setting has been modified, click this button to apply the setting. |
Settings: Video Page
This section describes features available on the Settings > Video page (Figure ??).
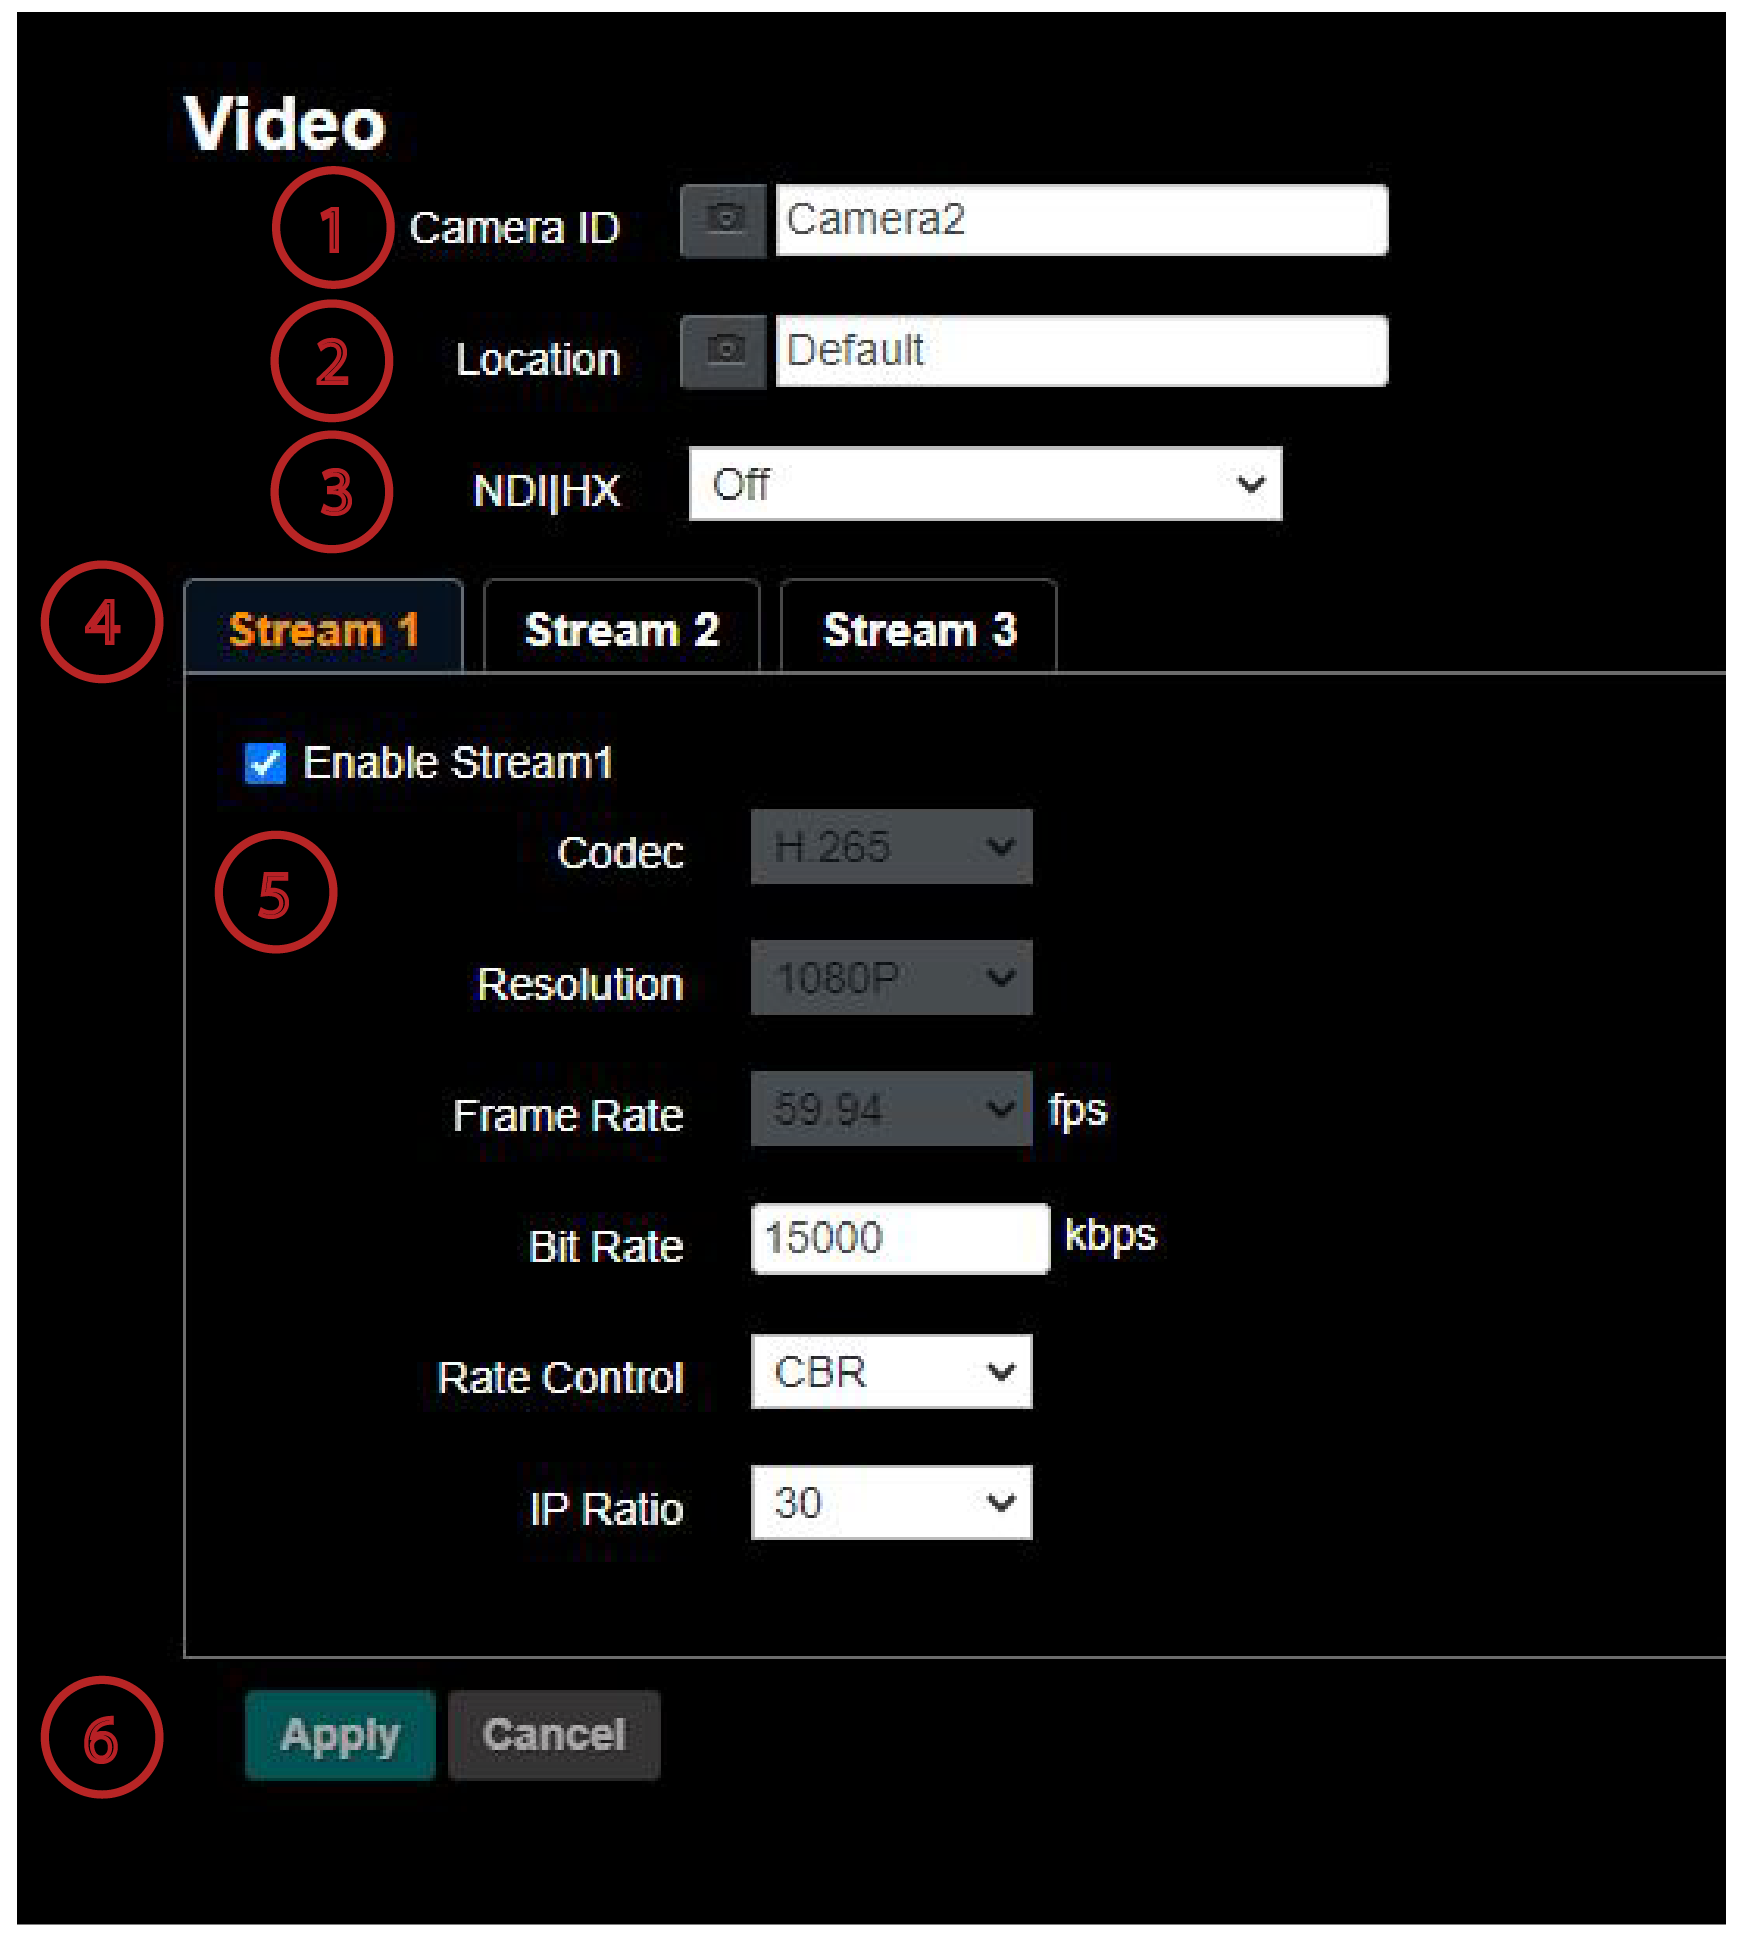
Figure 10 - Settings > Video Page for a PTZ-12G Camera
Table 5
| No | Item | Function Descriptions |
|---|---|---|
| 1 | Camera ID | Modify the camera name
|
| 2 | Camera Location | Modify the location of the camera, such as Meeting Room 1
|
| 3 | NDI|HX | Modify the NDI|HX connection by selecting On or Off. This setting is only available on PTZ-NDI. Note: When NDI|HX is On, the Group Name text box appears. 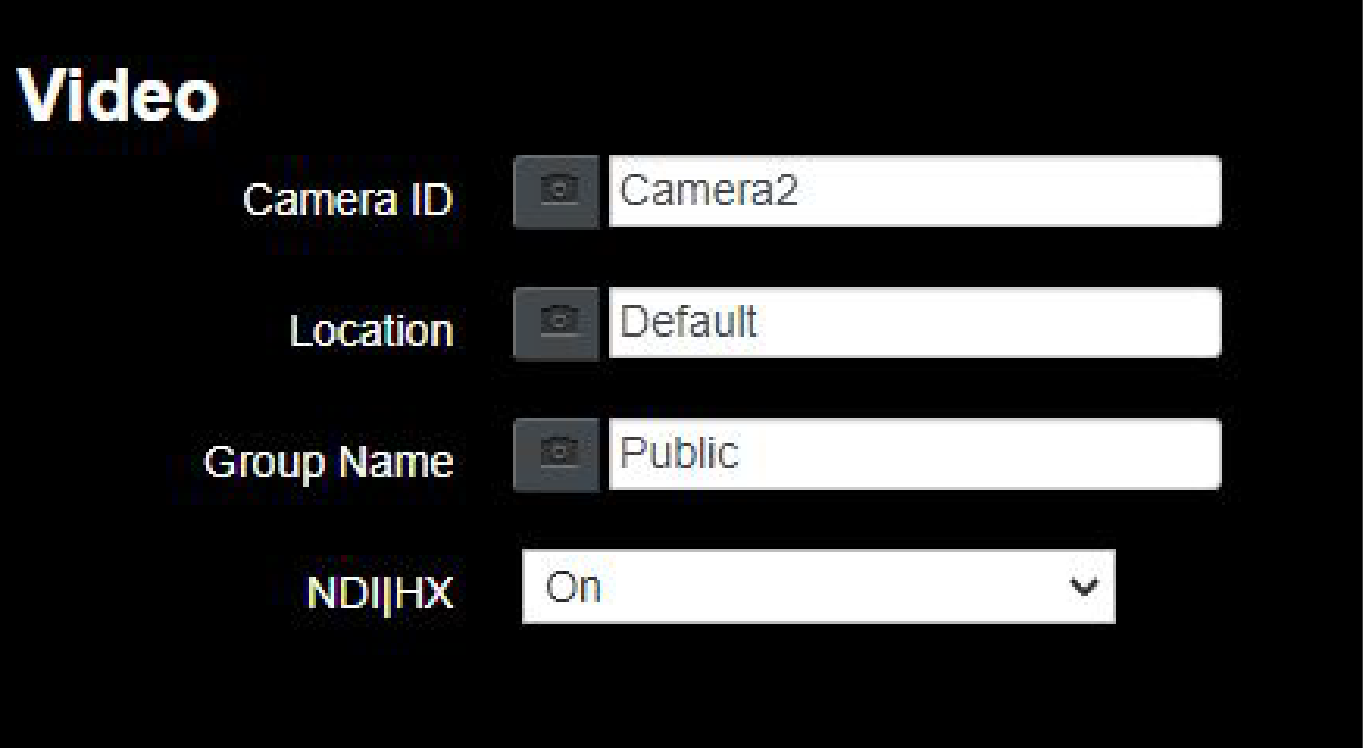 The default setting is Public, which leaves the stream exposed to anyone with access to the network. To set a unique group name, create the same group name in NDI Tools > NDI Access Manager. |
| 4 | Stream 1 Stream 2 Stream 3 | Click a Stream tab to configure the associated RTSP video stream. Note: The Stream tabs are available only when Settings > Configuration > Output Source is set to HDMI + Streaming. Streams are available on PTZ-NDI when NDI|HX is turned off. For information about settings on each Stream tab, see “Streaming Parameter Settings”. |
| 5 | Enable Stream | Enables / Disables the streaming channel. This setting is available on PTZ-12G or PTZ-NDI with NDI disabled. |
| 6 | Apply | Apply any changes made. |
| 7 | UVC | Note: The UVC tab is available only when Settings > Configuration > Output Source is set to HDMI + UVC. 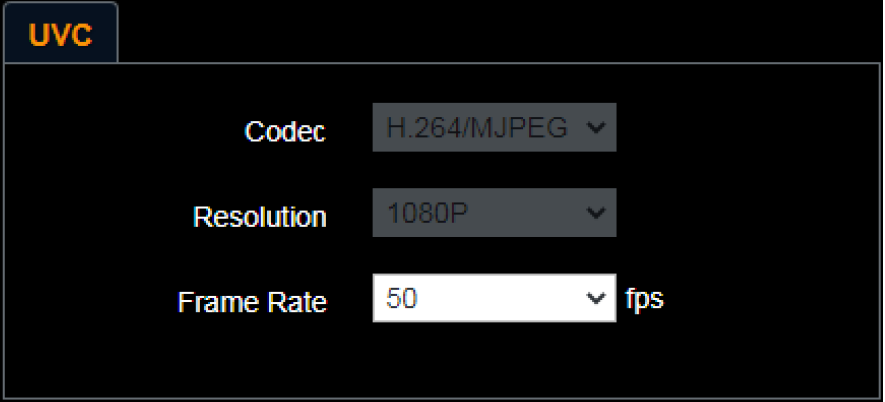 Encode (Codec) Format:
Resolution is based on Settings > System Settings > Resolution. Note: For 3840 x 2160 resolution, UVC is supported for only for a frame rate of 29.97 fps or lower. |
Streaming Parameter Settings
The following table describes video streaming settings available on the three Stream tabs. Video streaming is available on PTZ-12G or PTZ-NDI with NDI disabled.
Table 6
| Function | Stream 1 | Stream 2 | Stream 3 | |
|---|---|---|---|---|
| Encode Format | H.265 | H.264 | ||
| Resolution | 4K/1080p/720p | 1080/p720p | 640 x 360 | |
| Frame Rate | Setting according to the supported resolution | |||
| Bit Rate (kbps) | Range | 2,000 - 20,000 | 2,000 - 20,000 | 512 - 5,000 |
| Factory Default | 7,000 | 7,000 | 1,000 | |
| Rate Control | CBR / VBR | |||
| IP Ratio | Setting according to the supported resolution | |||
Settings: Camera Page
This section describes features available on the Settings > Camera page (Figure ??).
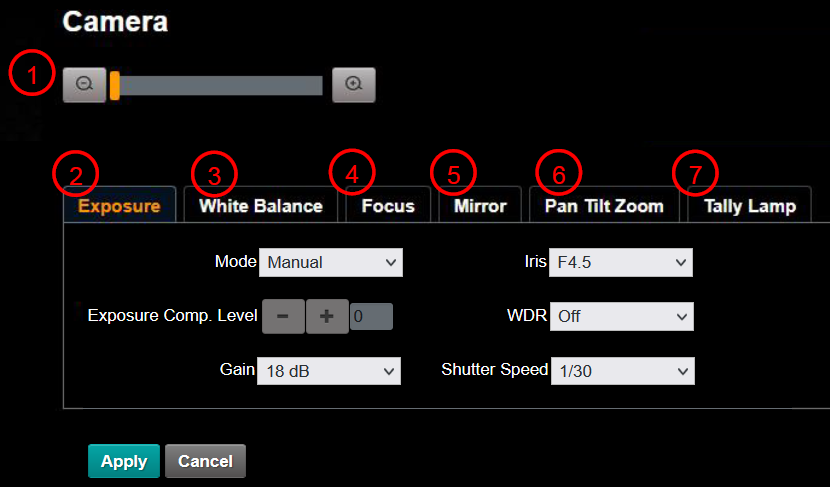
Figure 11 - Settings > Camera Page
Table 7
| No | Item | Function |
|---|---|---|
| 1 | Zoom ratio | Adjusts the zoom-in or zoom-out ratio. |
| 2 | Exposure | 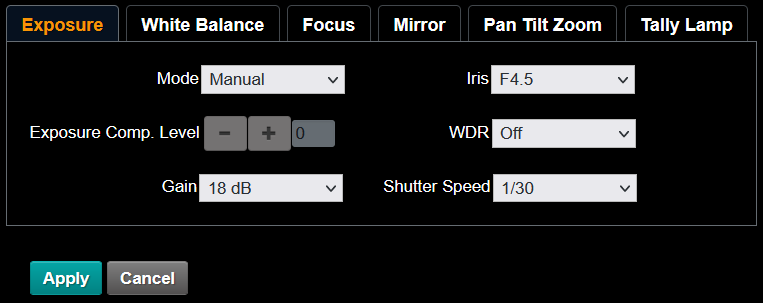
|
| 3 | White Balance | 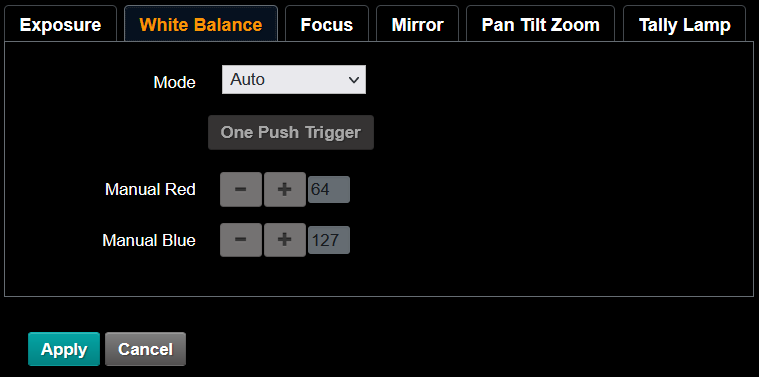
|
| 4 | Focus | 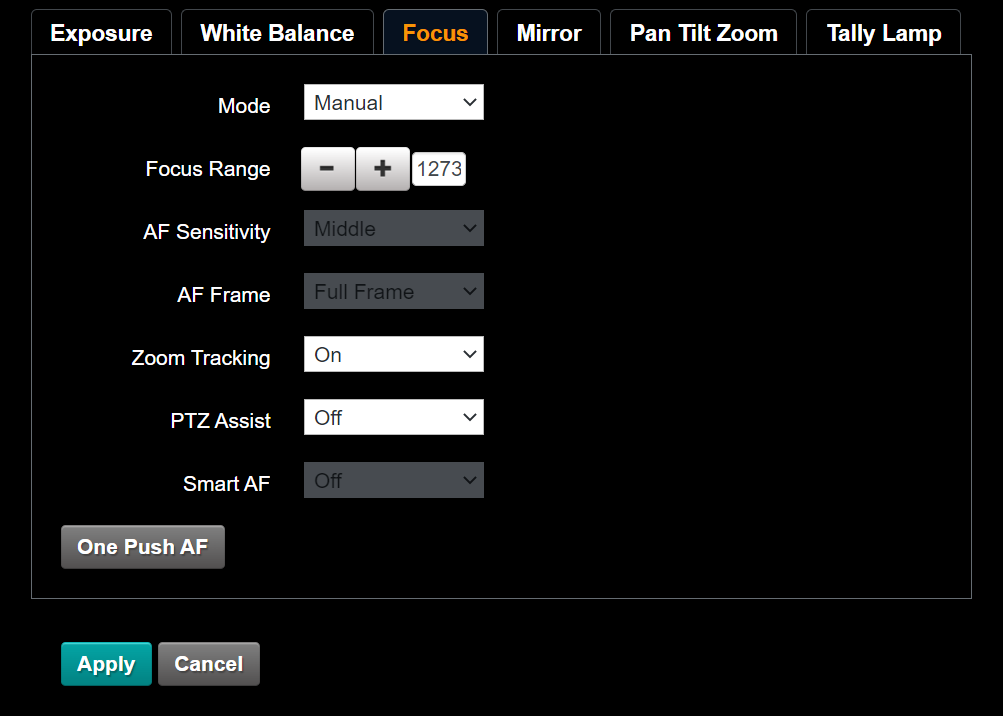
|
| 5 | Mirror | 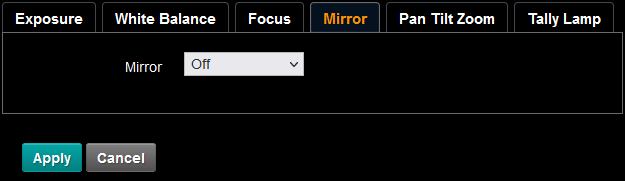
|
| 6 | Pan Tilt Zoom | 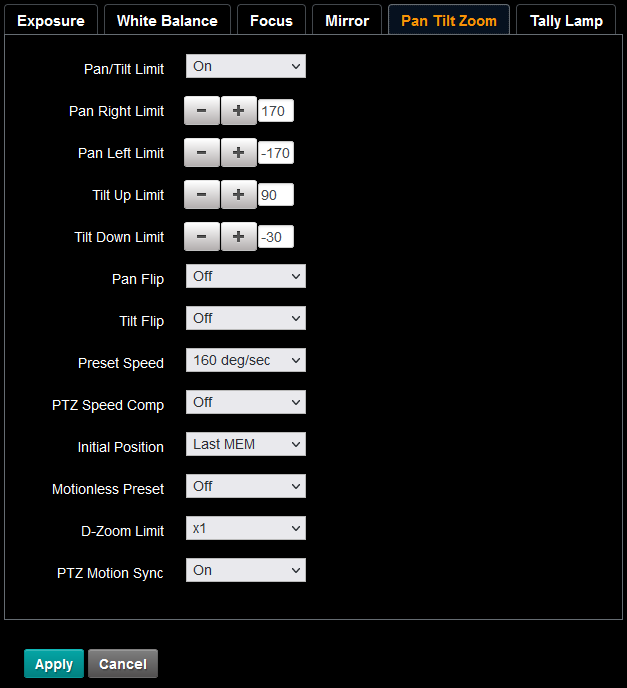
|
| 7 | Tally Lamp | 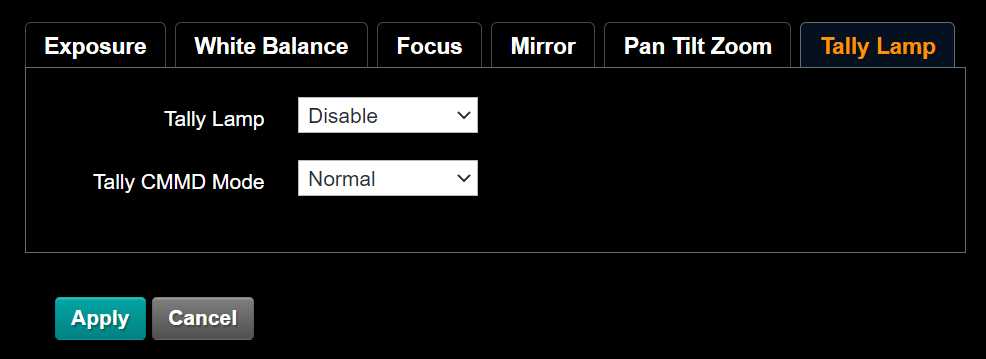
Note: When Tally Lamp is disabled, it cannot receive VISCA commands to enable or disable it. Tally CMMD Mode: Impacts how the camera handles tally commands from a VISCA controller. Use normal operation and when connecting DashBoard to the camera, unless otherwise specified by the controller software manufacturer. |
Settings: Picture Settings Page
This section describes features available on the Settings > Picture page (Figure ??).
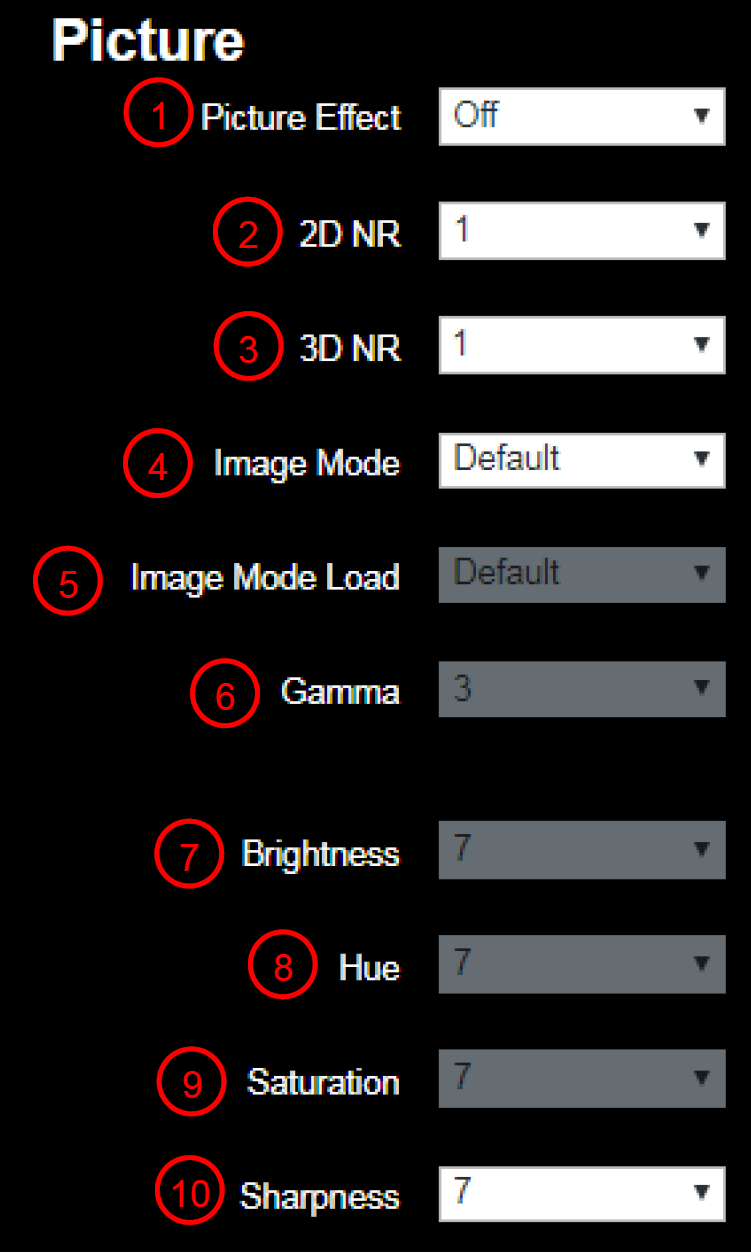
Figure 12 - Settings > Picture Page
Table 8
| No | Item | Function Descriptions |
|---|---|---|
| 1 | Picture Effect | Set picture effect, Off/Neg/Black and White |
| 2 | 2D NR settings | 2D noise reduction settings |
| 3 | 3D NR settings | 3D noise reduction settings |
| 4 | Image mode | Enables you to customize the image mode. |
| 5 | Image mode load | Click Default to reset picture settings to factory defaults. |
| 6 | Gamma | Gamma Level adjustment; Adjustable only when Image Mode is set to Custom. |
| 7 | Brightness | Brightness adjustment; Adjustable only when Image Mode is set to Custom. |
| 8 | Contrast | Contrast adjustment; Adjustable only when Image Mode is set to Custom. |
| 9 | Saturation | Saturation adjustment of the image; Adjustable only when Image Mode is set to Custom. |
| 10 | Sharpness | Adjust the sharpness of the image |
Settings: Audio Settings Page
This section describes features available on the Settings > Audio page (Figure ??).
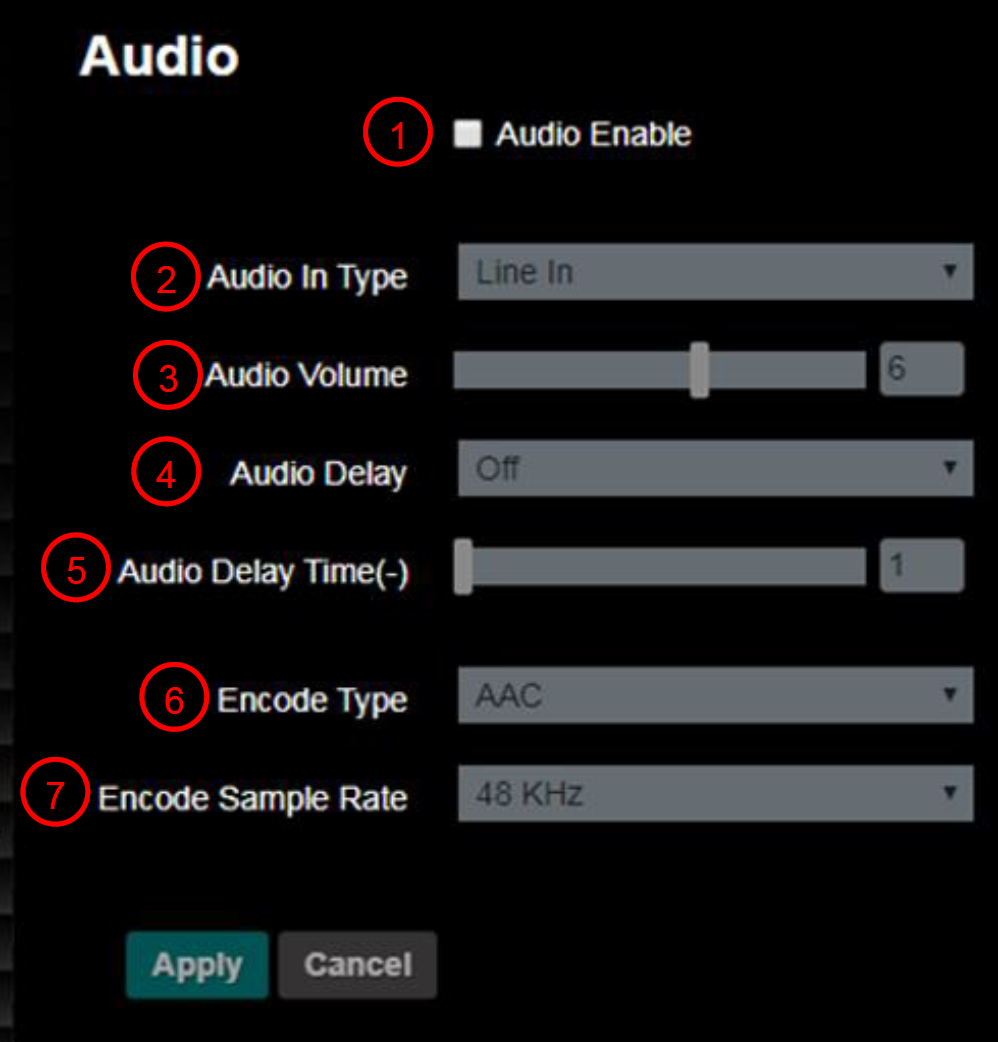
Figure 13 - Settings > Audio Page
Table 9
| No | Item | Function Descriptions |
|---|---|---|
| 1 | Open audio | Turns on/off sound |
| 2 | Audio Input setting type | Sets MIC In/Line In |
| 3 | Audio Volume | Adjusts Volume |
| 4 | Audio Delay | Turns on / off Audio Delay. Available only on PTZ-12G or PTZ-NDI with NDI disabled. |
| 5 | Audio Delay Time (ms) | Set Audio Delay Time (-1~-500ms) Available only on PTZ-12G or PTZ-NDI with NDI disabled. |
| 6 | Encode Type | AAC / G.711 Available on PTZ-12G or PTZ-NDI with NDI disabled. |
| 7 | Encode sample rate | Set Encode sample rate
|
Settings: Network Settings Page
This section describes features available on the Settings > Network page (Figure ??).
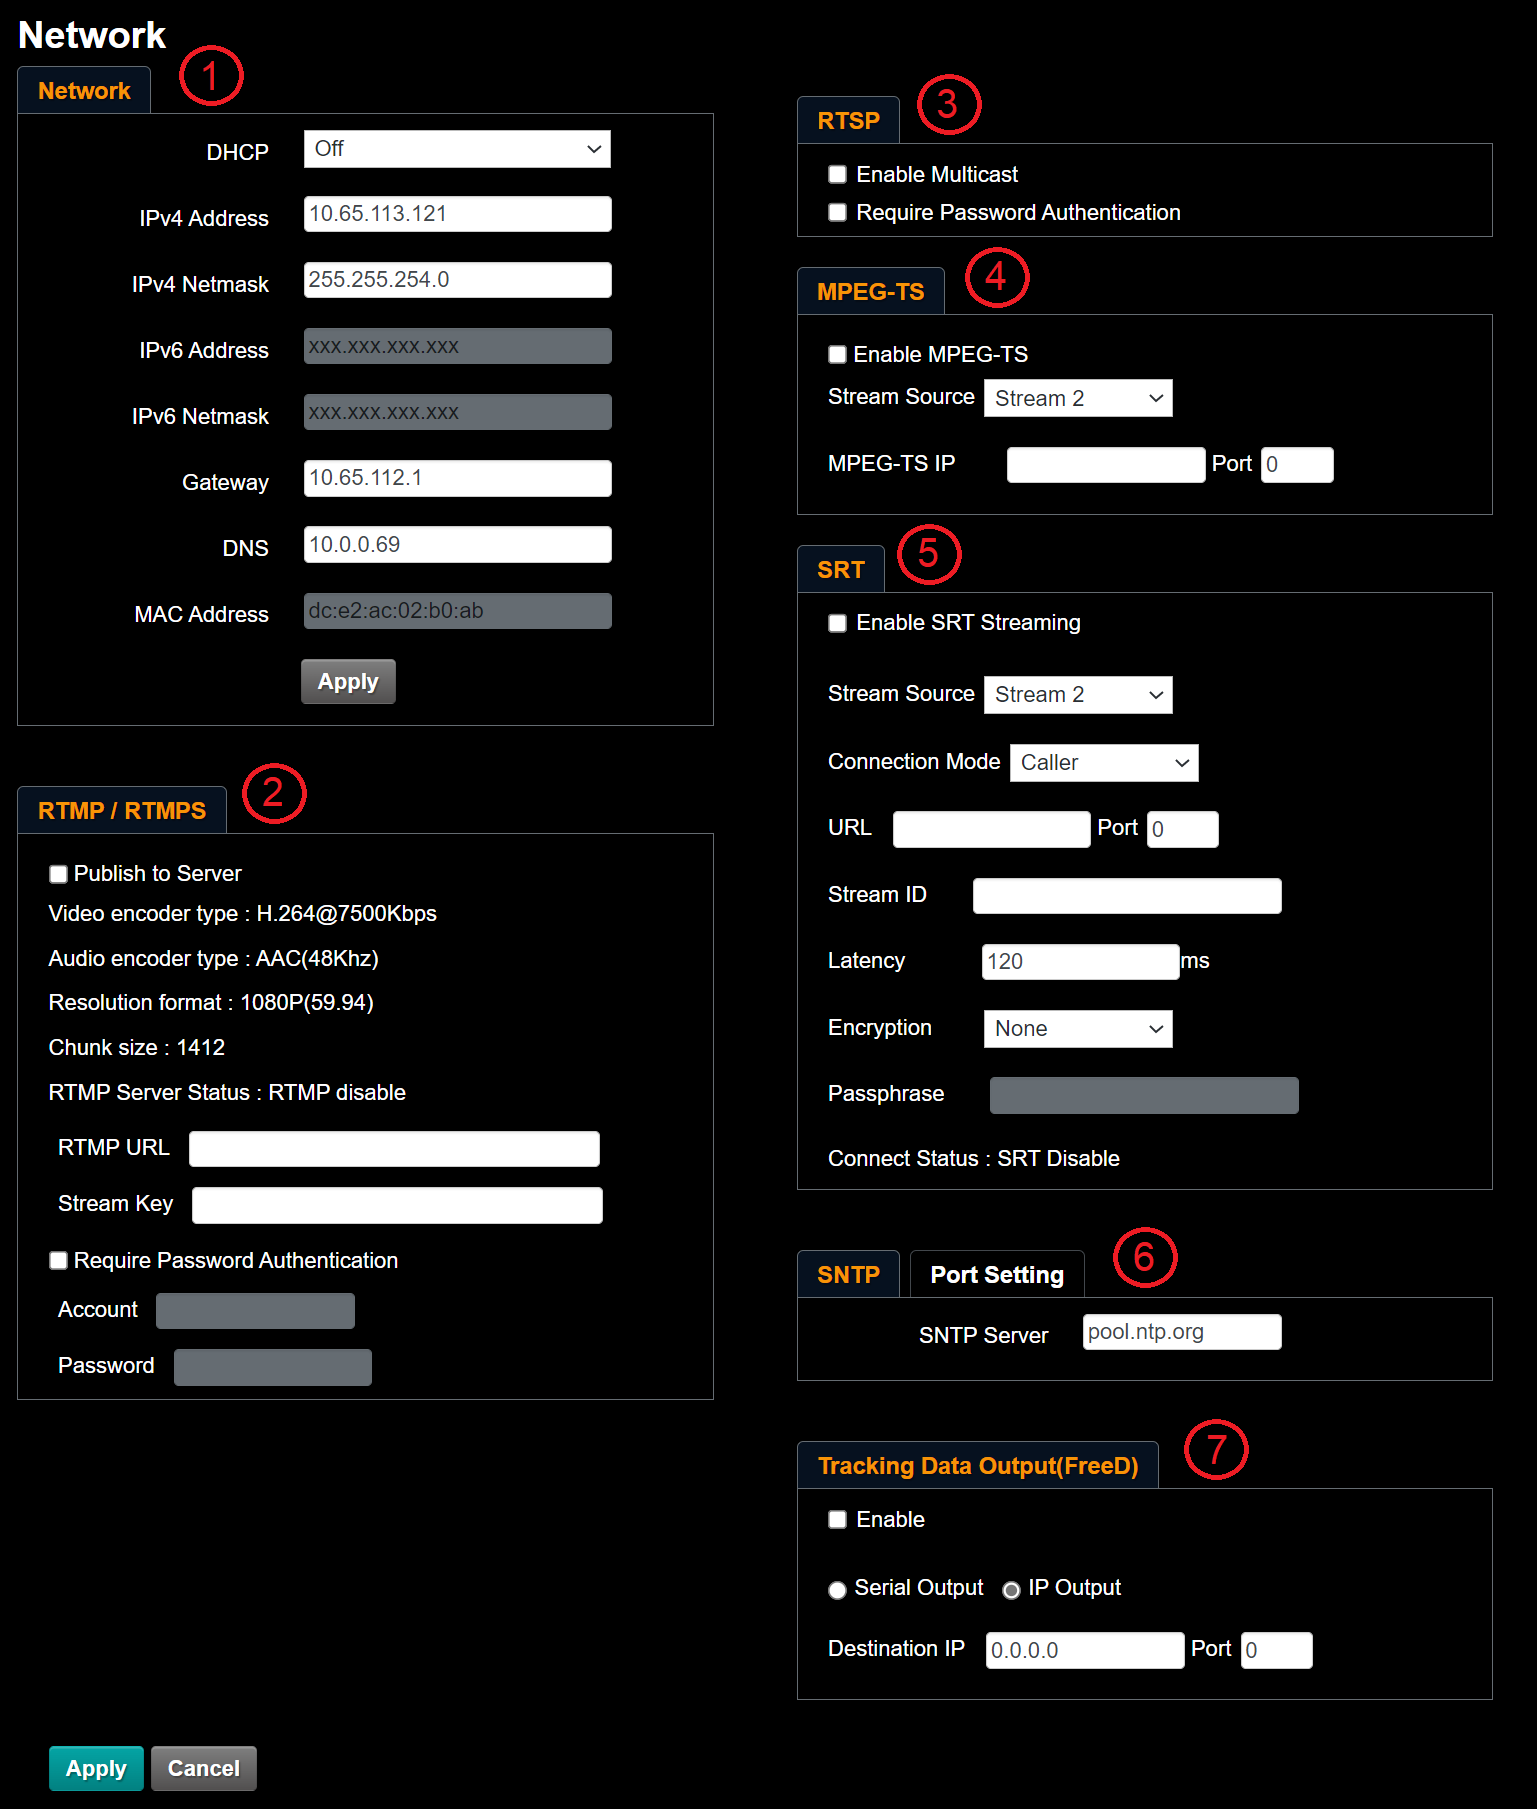
Figure 14 - Settings > Network Page
Table 10
| No | Item | Function Descriptions |
|---|---|---|
| 1 | Network | Network settings of camera. Change of setting is available when DHCP function is Off. |
| 2 | RTMP Setting | Copy the RTMP web address provided by the RTMP service platform and paste it to the RTMP connection address to publish the camera images on the RTMP service platform. You must also enter the Stream Key, and optionally select the Require Password Authentication check box to input an Account and Password. Tip: Before you can start live streaming to YouTube, audio must be enabled. For more information, see “Settings: Audio Settings Page”). Note: RTMP and RTMPS are available on PTZ-12G or PTZ-NDI with NDI disabled. |
| 3 | RTSP Setting | Enable/Disable Multicast. It is suggested to enable Multicast when the number of users online watching the live image simultaneously is more than four. RTSP is available on PTZ-12G or PTZ-NDI with NDI disabled. Note: When PTZ-NDI has NDI enabled, the Enable Mutlicast check-box has two fields associated with it: IP Setting and Netmask.  |
| 4 | MPEG-TS Setting |
MPEG-TS is available on PTZ-12G of PTZ-NDI with NDI disabled. |
| 5 | SRT Setting |
4) Enter the Stream ID. 5) Delay time is for 20 to 8000 microseconds. The default value is 120 microseconds SRT is available on PTZ-12G or PTZ-NDI with NDI disabled. |
| 6 | SNTP Setting Tab and Port Setting Tab | SNTP Tab: Set SNTP Server IP. Port Setting Tab (Figure ??): Set the HTTP Port number (default is 80) Set the HTTPS Port number (default is 81) Note: Port numbers can be changed only when DHCP is Off. 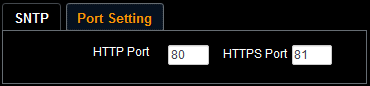 |
| 7 | Tracking Data Out | Configures output method and destination for FreeD position tracking data:
Note: Only FreeD type D1 message structures are supported. Note: Generation of FreeD tracking data puts a high processing load on the camera. When tracking is used in conjunction with video streaming and VISCA control, the timing of the FreeD data transmission may be adversely affected. No other aspects of camera performance should be impacted. Note: Tracking data is temporarily interrupted by some camera actions, such as changing video output resolution or mode, changing the audio or video configuration, and opening the on-screen menu.
|
Settings: Date / Time Page
This section describes features available on the Settings > Date / Time page (Figure ??).
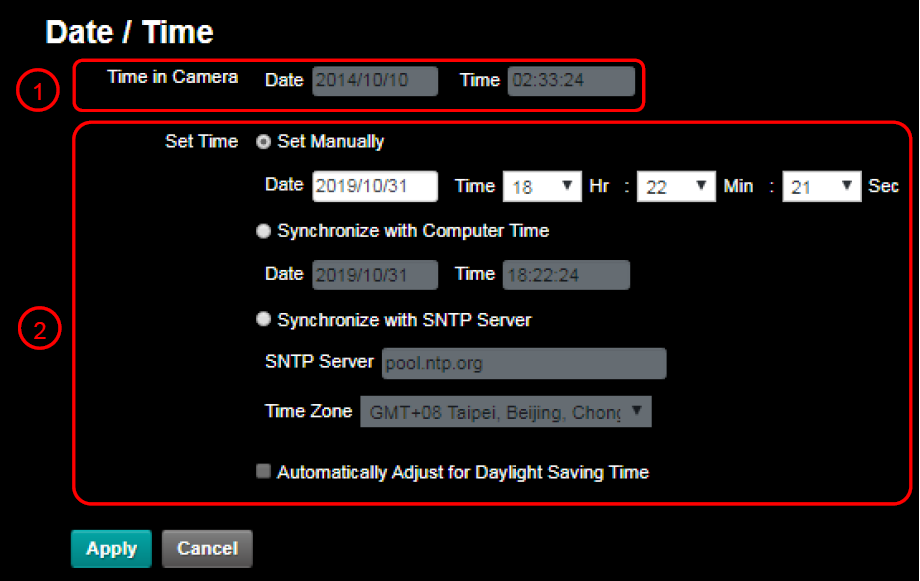
Figure 15 - Settings > Date / Time Page
Table 11
| No | Item | Function Descriptions |
|---|---|---|
| 1 | Time in Camera | Displays the current date and time of the camera. |
| 2 | Set Time |
|
Maintenance: Firmware Upgrade Page
This section describes features available on the Maintenance > FW Upgrade page (Figure ??).
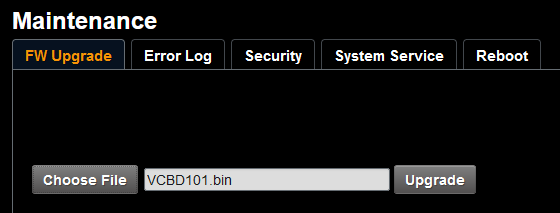
Figure 16 - Maintenance > FW Upgrade Page
Table 12
| Item | Function Description |
|---|---|
| Choose File and Upgrade | When you upgrade camera firmware, user credentials and presets are retained. IMPORTANT: Before you upgrade, contact Ross Video Technical Support for the latest upgrade file and for instructions. Use firmware upgrade files provided by Ross Video only. |
Maintenance: Error Log Page
This section describes features available on the Maintenance > Error Log page (Figure ??).

Figure 17 - Maintenance > Error Log Page
Table 13
| Item | Function Descriptions |
|---|---|
| Error Log | If the camera encounters an error, an error code appears in the log. After you review the log, click the Clear button to reset the log. |
Maintenance: Security Page
This section describes features available on the Maintenance > Security page (Figure ??).
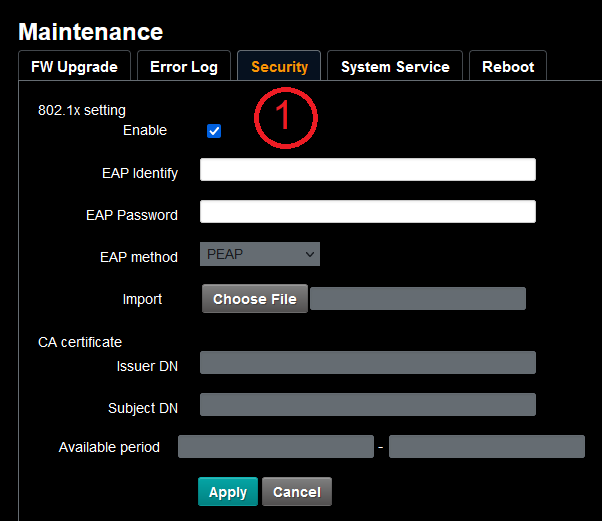
Figure 18 - Maintenance > Security Page
Table 14
| No | Item | Function Descriptions |
|---|---|---|
| 1 | 802.1x Setting | Enable/Disable 802.1x Protocol. Setting can be made after enabling. In order to enable this function, the network router must support 802.1x Protocol. |
Maintenance: System Service Page
This section describes features available on the Maintenance > System Service page (Figure ??).
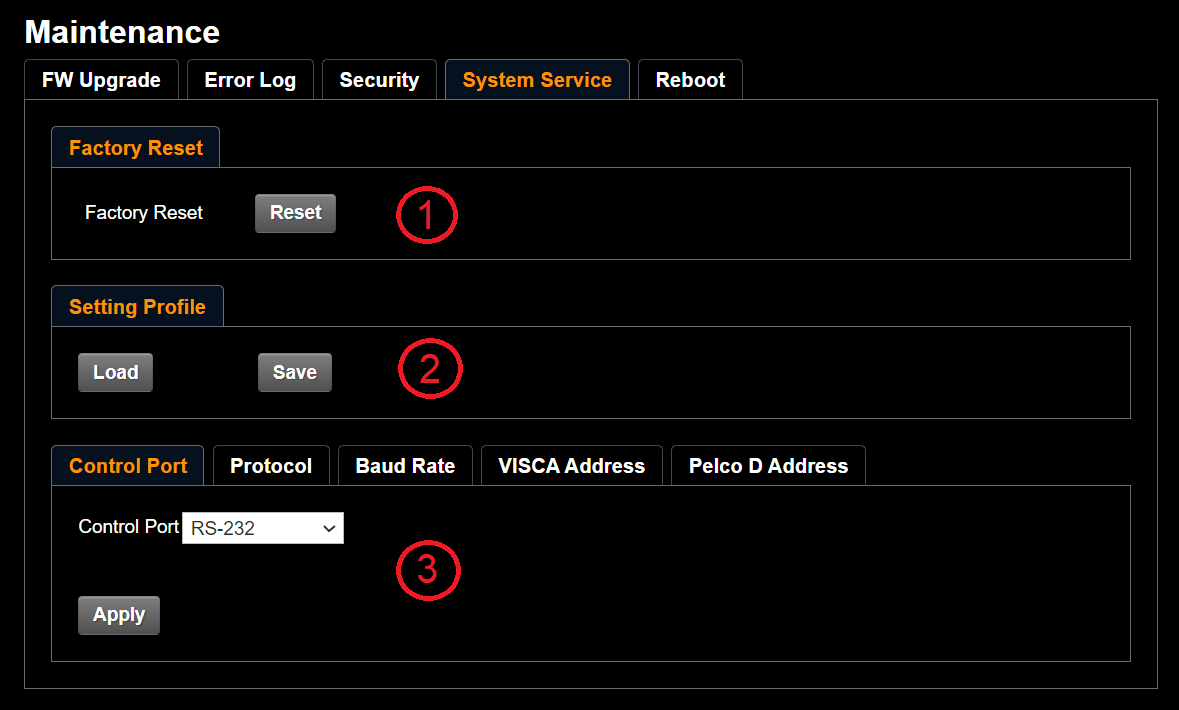
Figure 19 - Maintenance > System Service Page
Table 15
| No | Item | Function Descriptions |
|---|---|---|
| 1 | Factory Reset Reset to the default | To apply factory default settings, click the Reset button, and then click Yes to confirm. Settings are applied as follows:
|
| 2 | Setting | The web page setting parameters can be exported from the computer and imported/applied to another camera. |
| 3 | Control Port Setting | Communication protocol related settings for connection with RS-232/RS422 communication. Note: To control PTZ-12G & PTZ-NDI cameras using the DashBoard PTZ Camera Control Plugin, Protocol must be set to VISCA. |
Maintenance: Reboot Page
This section describes features available on the Maintenance > Reboot page (Figure ??).
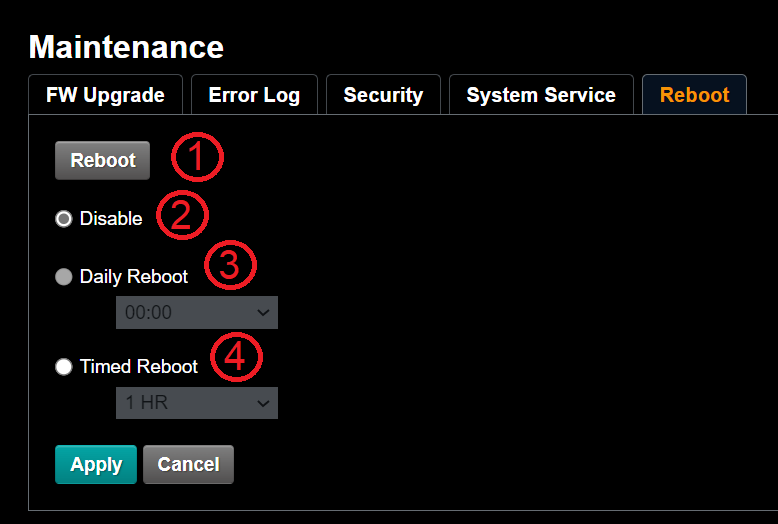
Figure 20 - Maintenance > Reboot Page
Table 16
| No | Item | Function Descriptions |
|---|---|---|
| 1 | Reboot | Reboots immediately. |
| 2 | Disable | Disables the reboot settings. |
| 3 | Daily reboot | Sets a daily reboot time. Synchronize the camera’s clock with an SNTP server to set daily reboot. For more information, see “Settings: Date / Time Page”. |
| 4 | Timed Reboot | Set the reboot time, and then click Apply. |
About Page
This section describes features available on the About page (Figure ??).
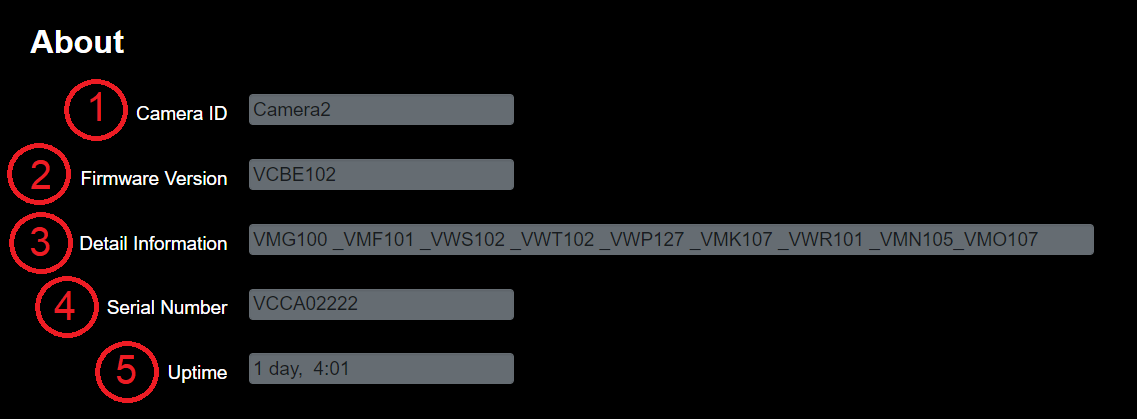
Figure 21 - About Page
Table 17
| No | Item | Function Descriptions |
|---|---|---|
| 1 | Camera ID | Displays the camera name. |
| 2 | Firmware Version | Displays the firmware version installed on the camera. |
| 3 | Detail Information | Displays list of individual firmware components included in the installed firmware version. |
| 4 | Serial No. | Displays the camera serial number. |
| 5 | Uptime | Displays the amount of time the camera has been on. |
Viewing RTSP Video Stream (PTZ-12G or PTZ-NDI with NDI disabled)
The PTZ-12G and PTZ-NDI with NDI disabled output an RTSP video stream. You can view this video output in an RTSP-compatible playback application such as VLC media player.
To view the RTSP stream in VLC media player:
-
In the camera’s web interface, navigate to Settings > Configuration .
-
Set the resolution.
-
Set the Output Sourc e to HDMI + Streaming .
-
Navigate to Settings > Video .
The Video page appears (Figure ??).
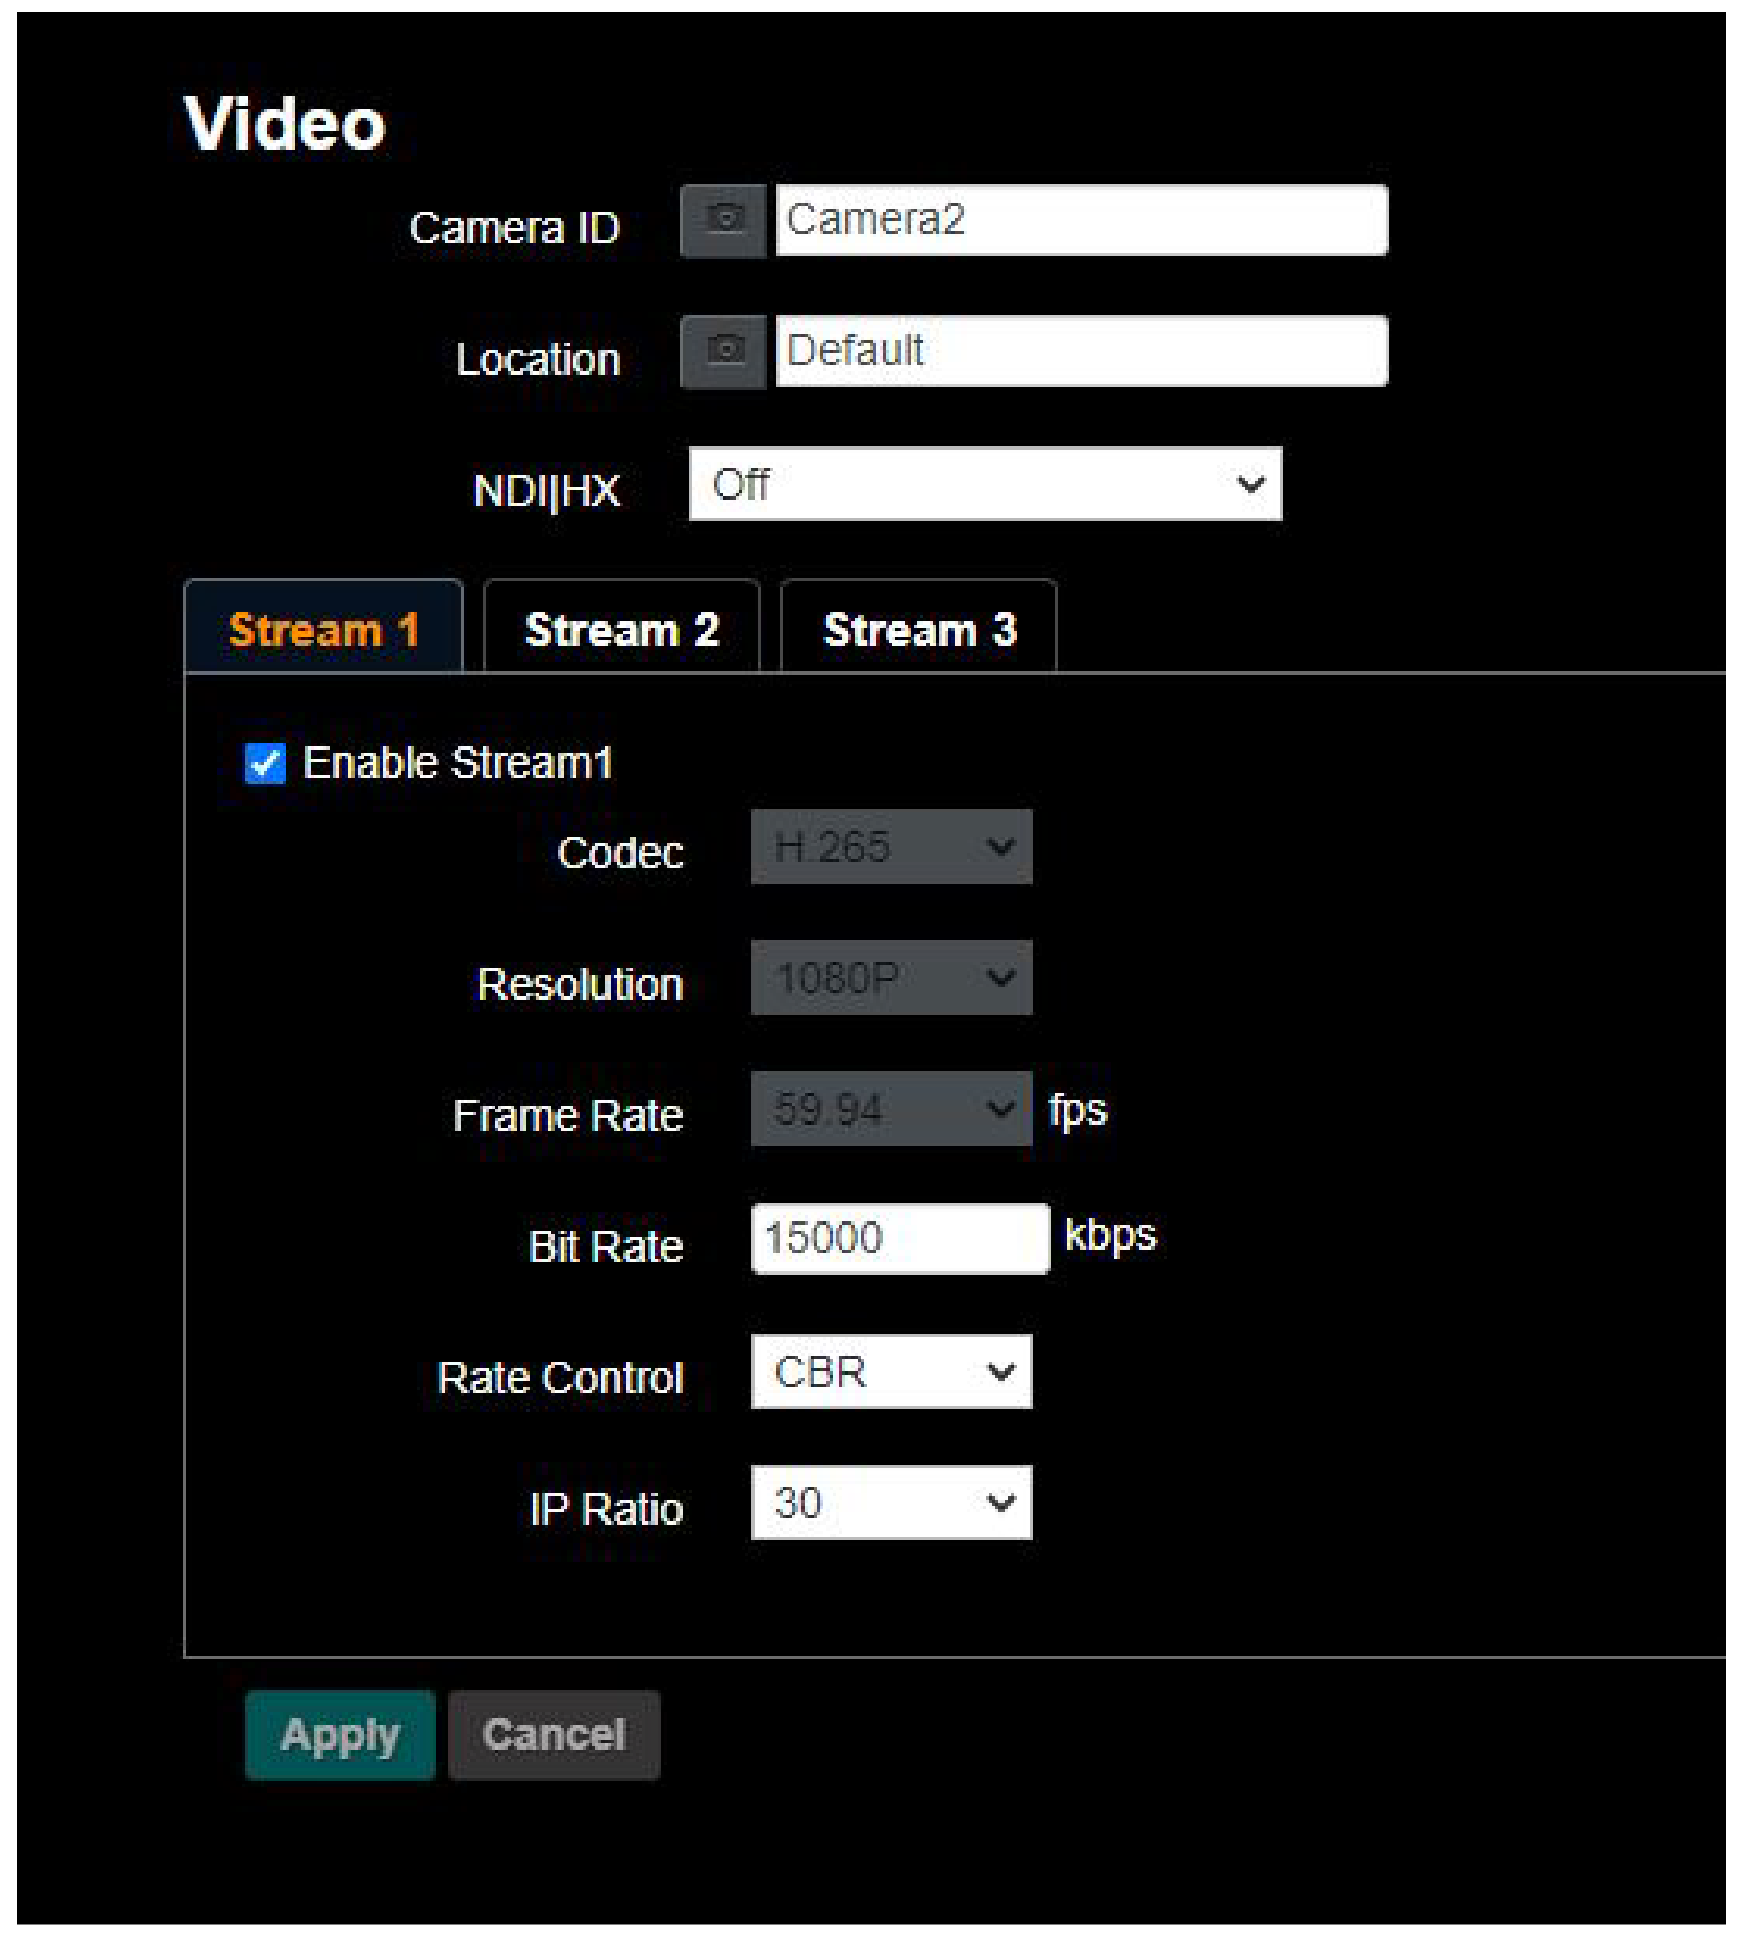
Figure 22 - The Settings > Video Page
-
Configure settings for each video stream (1, 2, 3), as required
-
In VLC media player, open a network stream, and specify the URL for the stream:
- Stream 1 — PTZ-12G or PTZ-NDI with NDI disabled:
Main Streaming (@H.265) — rtsp:// camera_IP :8554/hevc - Stream 2 — Sub1 Streaming (@H.264) — rtsp:// camera_IP :8557/h264
- Stream 3 — Sub2 Streaming (@H.264) — rtsp:// camera_IP :8556/h264
noteIn the paths listed above, replace camera_IP with the IP address of the PTZ camera.
Figure ?? and Figure ?? show how to open a network stream and specify the URL for Stream 1 , based on a camera with an IP address of 192.168.4.48 .
- Stream 1 — PTZ-12G or PTZ-NDI with NDI disabled:
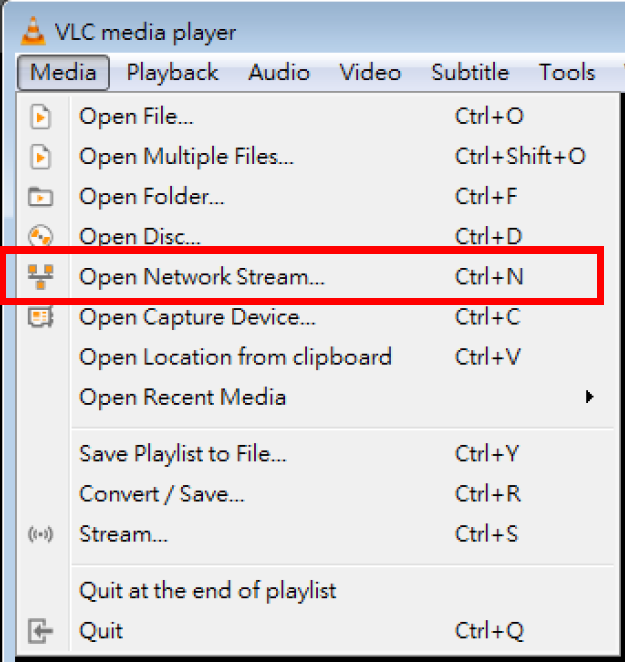
Figure 23 - Opening a Network Stream in VLC Media Player
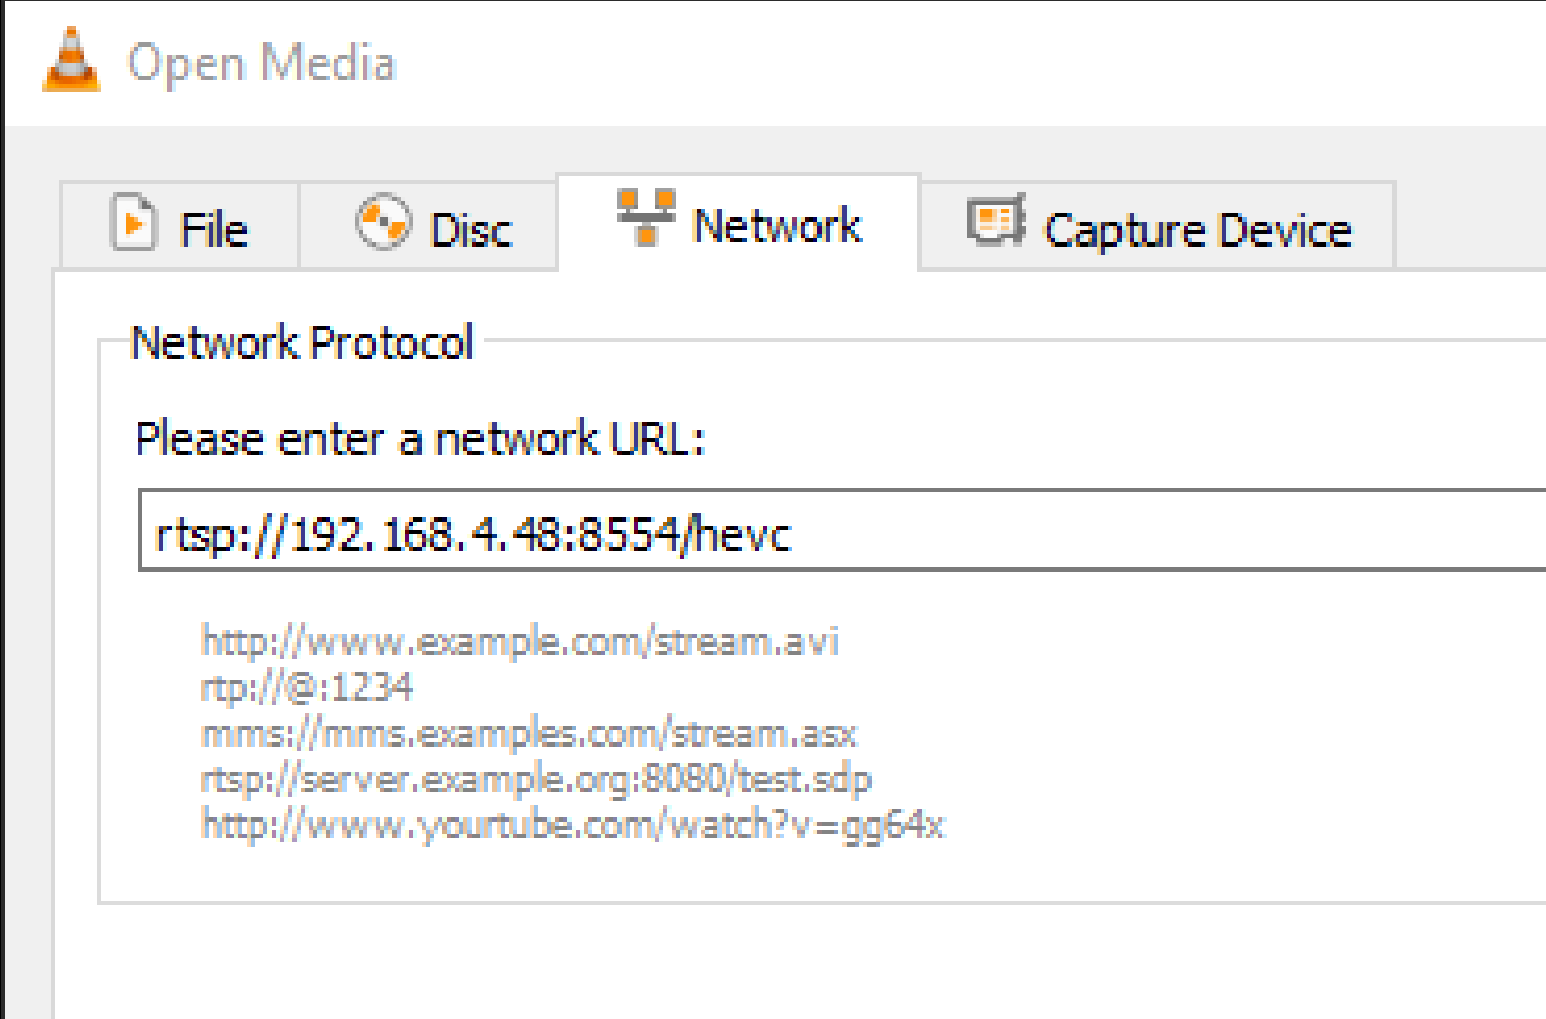
Figure 24 - Specifying a Stream URL in VLC Media Player