Sony Paint Control User Guide
Introduction
1. About Sony Paint Control
Ross Video’s Sony Paint Control system enables you to adjust lens iris, camera paint (shading), and other settings on supported Sony cameras. You can also save and load Sony scene files.
The Sony Paint Control panel is an easy-to-use software interface that runs within Ross Video’s DashBoard application. Multiple cameras can be adjusted from a single paint control workstation. Your system may also include an optional Camera Paint Box, which features physical knobs for adjusting lens iris and paint settings (gains and pedestals).
The Sony Paint Control system can be set up as part of a Ross Robotics system, or as a standalone paint control workstation.
Starting the Sony Paint Control System
2. Connect and Turn On All Components
Ensure that the following are connected and turned on:
-
Control Computer. Depending on your system, this may be a dedicated computer, or a SmartShell Computer that also controls a Ross Robotics system.
-
Network switch
-
Sony CNA-1 Camera Control Network Adapter(s), and Sony MSU Master Setup Unit (if equipped)
-
Sony cameras, and accessories
-
Camera Paint Box (if equipped)
-
Ross Robotics System components (if equipped)
For system setup information, see the Sony Paint Control Installation Guide (8351DR-012-xx) .
3. Start the Sony Paint Control Panel
Access the panel through a node in the DashBoard component tree:
-
In DashBoard, navigate to the Sony Cameras node, and then expand any camera node.
-
Double-click Remote Control . The Sony Paint Control panel appears.
tipThe panel is designed for full-screen mode on a 1920 x 1080 display. To turn full-screen mode on or off, press Shift + F11 .
Camera Control Features

Figure 1
4. Camera Selection and Connection Status
-
Tap a camera button to select and configure that camera. The camera button turns purple. If the camera is connected to the system, the panel shows configuration values for the camera.
-
The connection status column displays the following information about the selected camera:
- Camera brand name (SONY ), and camera name (configured during initial setup)
- IP address and port number of the CNA-1 controlling the camera, and the camera’s Sony CNS device number (MSU mode only)
- Operating Mode : CNA-1 for camera may be in RCP mode, or MSU mode (Single Operator or Multi-Operator)
- Connection Status : Connected (Green), Inactive (Yellow), or Disconnected (Red)
- Status Indicator : Displays a green dot when system is working properly. Status messages include:
- OK : System is working properly and data is kept up-to-date. To refresh data manually, tap the Refresh button.
- CNA-1 Disconnected : In MSU mode, means the system cannot connect to the CNA-1 adapter that controls the camera. In RCP mode, may mean the system cannot connect to the camera. To try re-establishing a connection, tap the Reconnect button.
- Camera Disconnected : The system is connected to the CNA-1 adapter, but not to the camera. To try re-establishing a connection, tap the Reconnect button.
- Camera Inactive : The camera is not the active camera (Single Operator mode only). Tap Set Active to make it active.
- Scan Failure : One or more requested data items is not being received from the camera. If this problem persists, contact Ross Video Technical Support for help adjusting the Min Scan Time and Scan Timeout advanced configuration settings. For more information, see the Help (?) messages available alongside these settings.
-
Tap the Disconnect button to disconnect from the camera. Tap the Reconnect button to re-establish the connection.
Camera Control Areas
5. Camera Control Areas (Upper & Lower)
Camera Control Areas (upper and lower)
Each Camera Control Area (see 5a and 5b ) displays one group of controls at a time. On the left side of each area, tap one of the following buttons to select the group of controls to display:
-
Setup — This group includes controls for Camera Gain, Shutter Speed, White Balance, and Scene Files. For more information see Section 11 .
-
Paint — This group includes Iris controls, Pedestal controls (Master, Red, Green, and Blue), and Gain controls (Red, Green, and Blue). For more information see Section 12 .
tipPurple buttons indicate selected options.
Advanced Configurations
6. Advanced Configuration Settings
The Sony Paint Control panel features a restricted-access configuration interface for viewing the status of camera and CNA-1 connections, and for managing advanced configuration settings.
To access the configuration interface:
- If the Manage Cameras button is available, tap it.
- Otherwise, in the DashBoard tree, expand the node for the cameras, expand the Sony Camera Server node (Slot 0), and then tap the Master Control node.
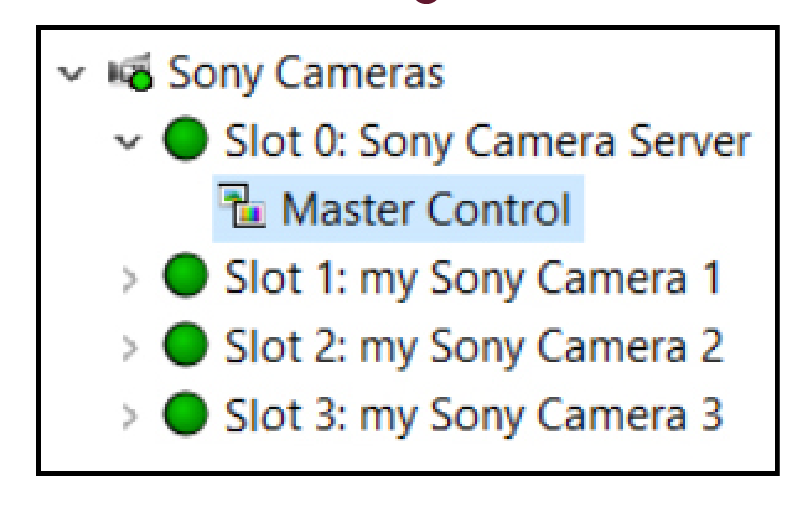
Figure 2
-
Note : If there is no Master Control node, your administrator has not made the advanced configuration interface available to all workstations.
tipFor information about a setting in the configuration interface, tap the Help icon (?) beside that setting.
Types of Controls
7. Value Selectors
The text box at the top of each value selector displays the name of the setting.
Value selectors enable you to specify values in four ways:
- Text Value- Tap the text box, type a value, and then press Enter .
- Up / Down Arrows- Tap the up arrow or down arrow to increase or decrease the value.
- Slider - Drag the slider handle up or down, or tap the vertical scale, to increase or decrease the value.
- Touch Wheel- Tap and hold the touch wheel, and then trace along the edge of the wheel to increase or decrease the value.
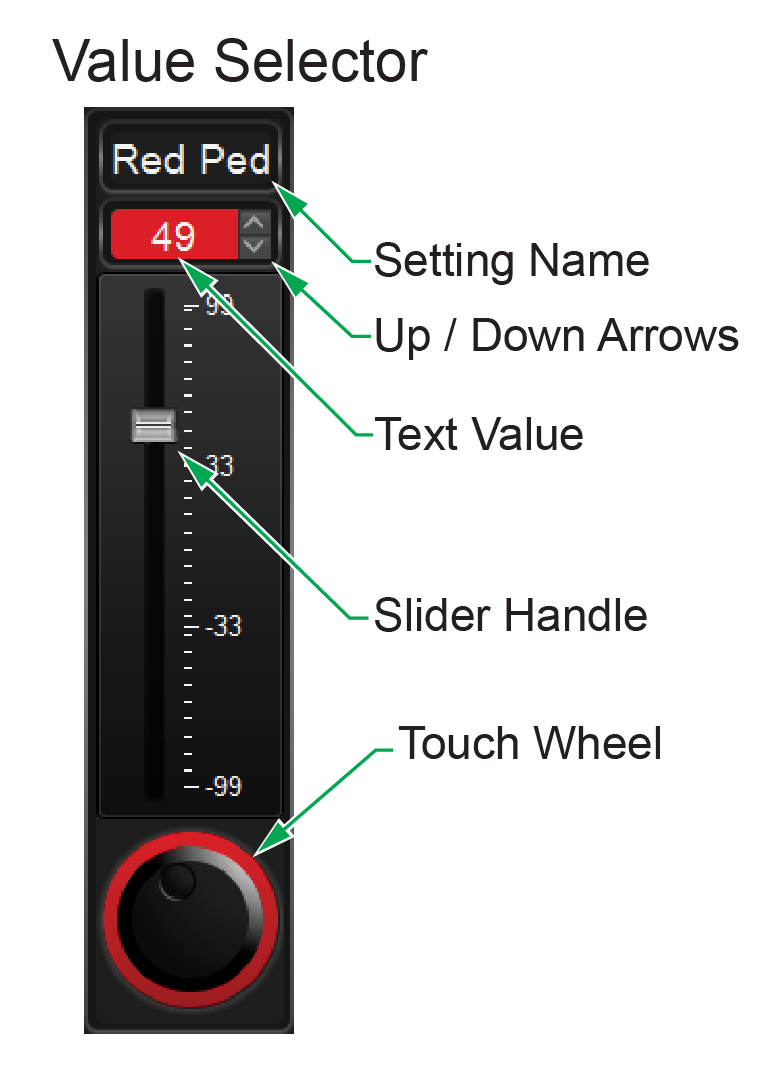
Figure 3
8. Button Options
Many settings in the Sony Paint Control panel appear as buttons. Tap a button to select the option it represents.
Purple buttons indicate selected options.
Blue buttons indicate unselected options.
Blurred button text indicates options that cannot currently be changed. For example, in Setup you cannot specify a shutter speed unless the ON / OFF button at the top of the Shutter Speed column is ON .
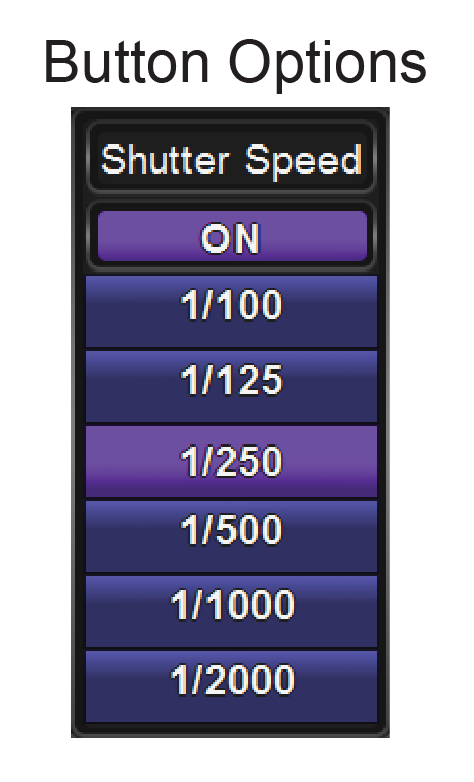
Figure 4
9. Camera Paint Box (Optional Accessory)

Figure 5
The Camera Paint Box controls iris and paint settings for the selected camera.
Camera Paint Box settings include the following:
- • IRIS— The lens has a physical switch to enable either automatic or manual iris control (A or M ). To control iris using the Camera Paint Box, the switch must be set to automatic (A ).
- • RED GAIN , BLUE GAIN , and GREEN GAIN
- • MASTER PED— Master pedestal, also known as Master Black
- • RED PED— Red pedestal
- • BLUE PED — Blue pedestal
- • GREEN PED — Green pedestal
- Each knob on the Camera Paint Box adjusts two settings, one at a time. The names of the settings appear above and below the knobs. To switch between the upper group and the lower group, flip the UPPER / LOWER switch.
- Tip: When you turn a knob on the Camera Paint Box , you can view the resulting value in theSony Paint Controlpanel.
10. Refresh, Reconnect, and Set Active Buttons
A single button is used for all three:
- Refresh : Camera is connected. Tap to tap to request an update of all parameters from camera.
- Reconnect : Camera is disconnected. Tap to attempt to re-establish a connection to the camera.
- Set Active : Camera is inactive. Tap to activate the camera. Applies to Single Operator mode only.
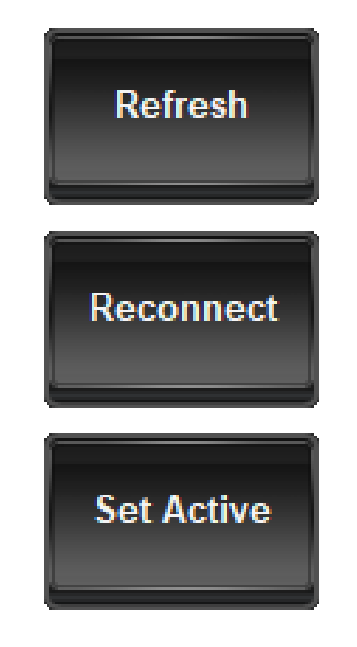
Figure 6
Setup Controls
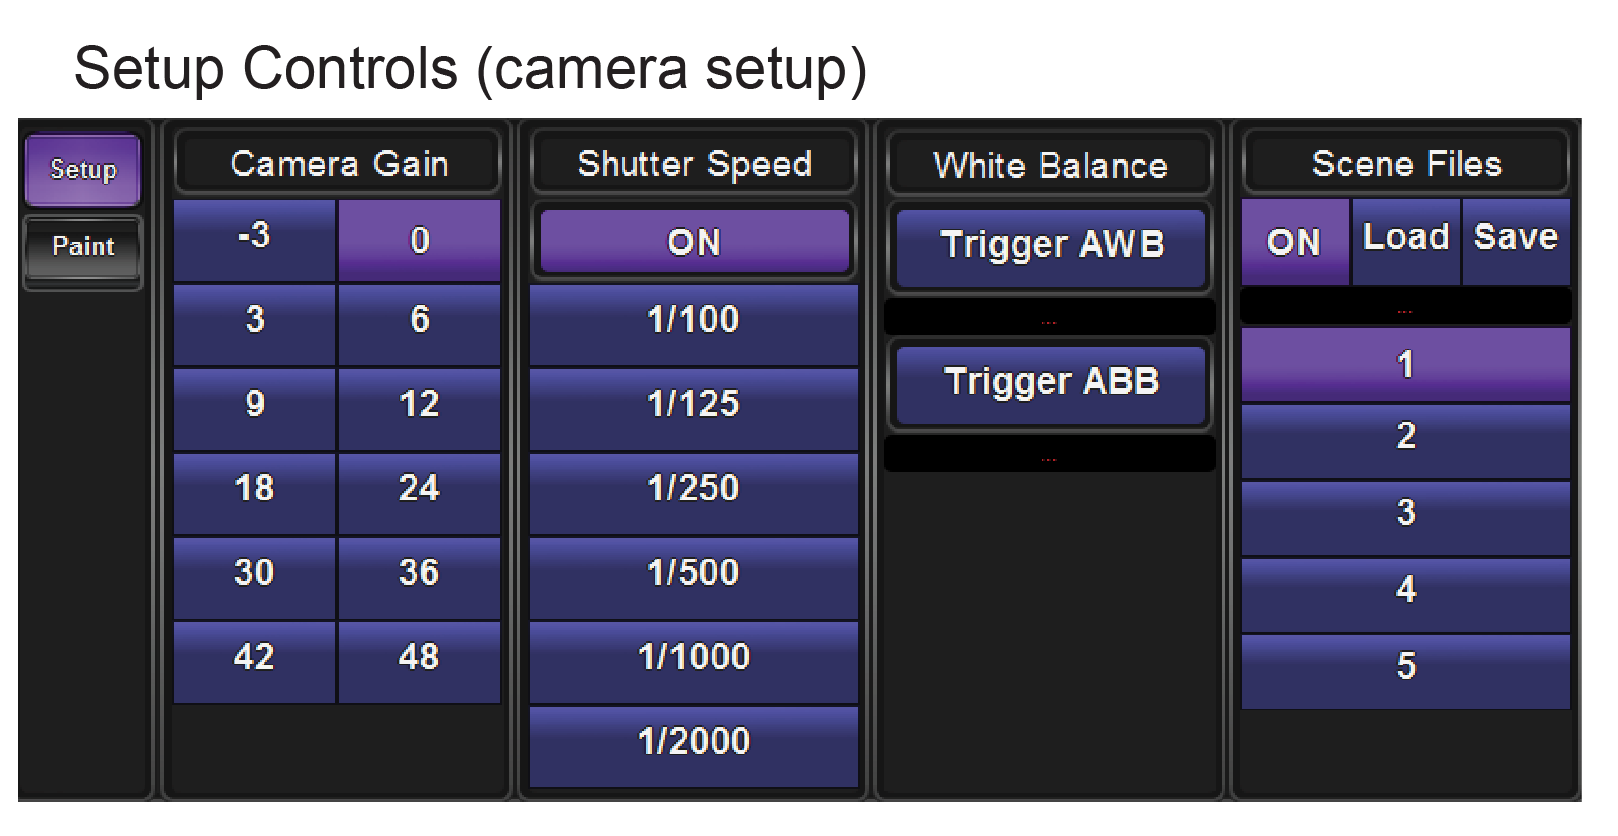
Figure 7
11. Camera Setup Controls
Camera setup controls include the following:
-
Camera Gain — Tap a Camera Gain button to select a camera gain value between -3 and 48.
-
Shutter Speed — The ON / OFF button at the top of the Shutter Speed column shows whether shutter speed selection mode is ON or OFF . To specify a shutter speed, turn shutter speed selection mode ON , and then tap a speed button to specify a shutter speed between 1/2000 and 1/100 .
-
White Balance — Tap a White Balance button corresponding to the type of white balance you want to perform (Trigger AWB or Trigger ABB ).
-
Scene Files — The ON / OFF button at the top of the Scene Files column shows whether scene file management is enabled (ON ) or disabled (OFF ). To manage scene files, turn Scene Files ON , and then:
-
To save current settings in a scene file, tap the numbered scene file button corresponding to the scene memory you want to overwrite, and then tap the Save button.
-
To load settings from a scene file, tap the numbered scene file button corresponding to the scene memory you want to load, and then tap the Load button.
Paint and Iris Controls
-
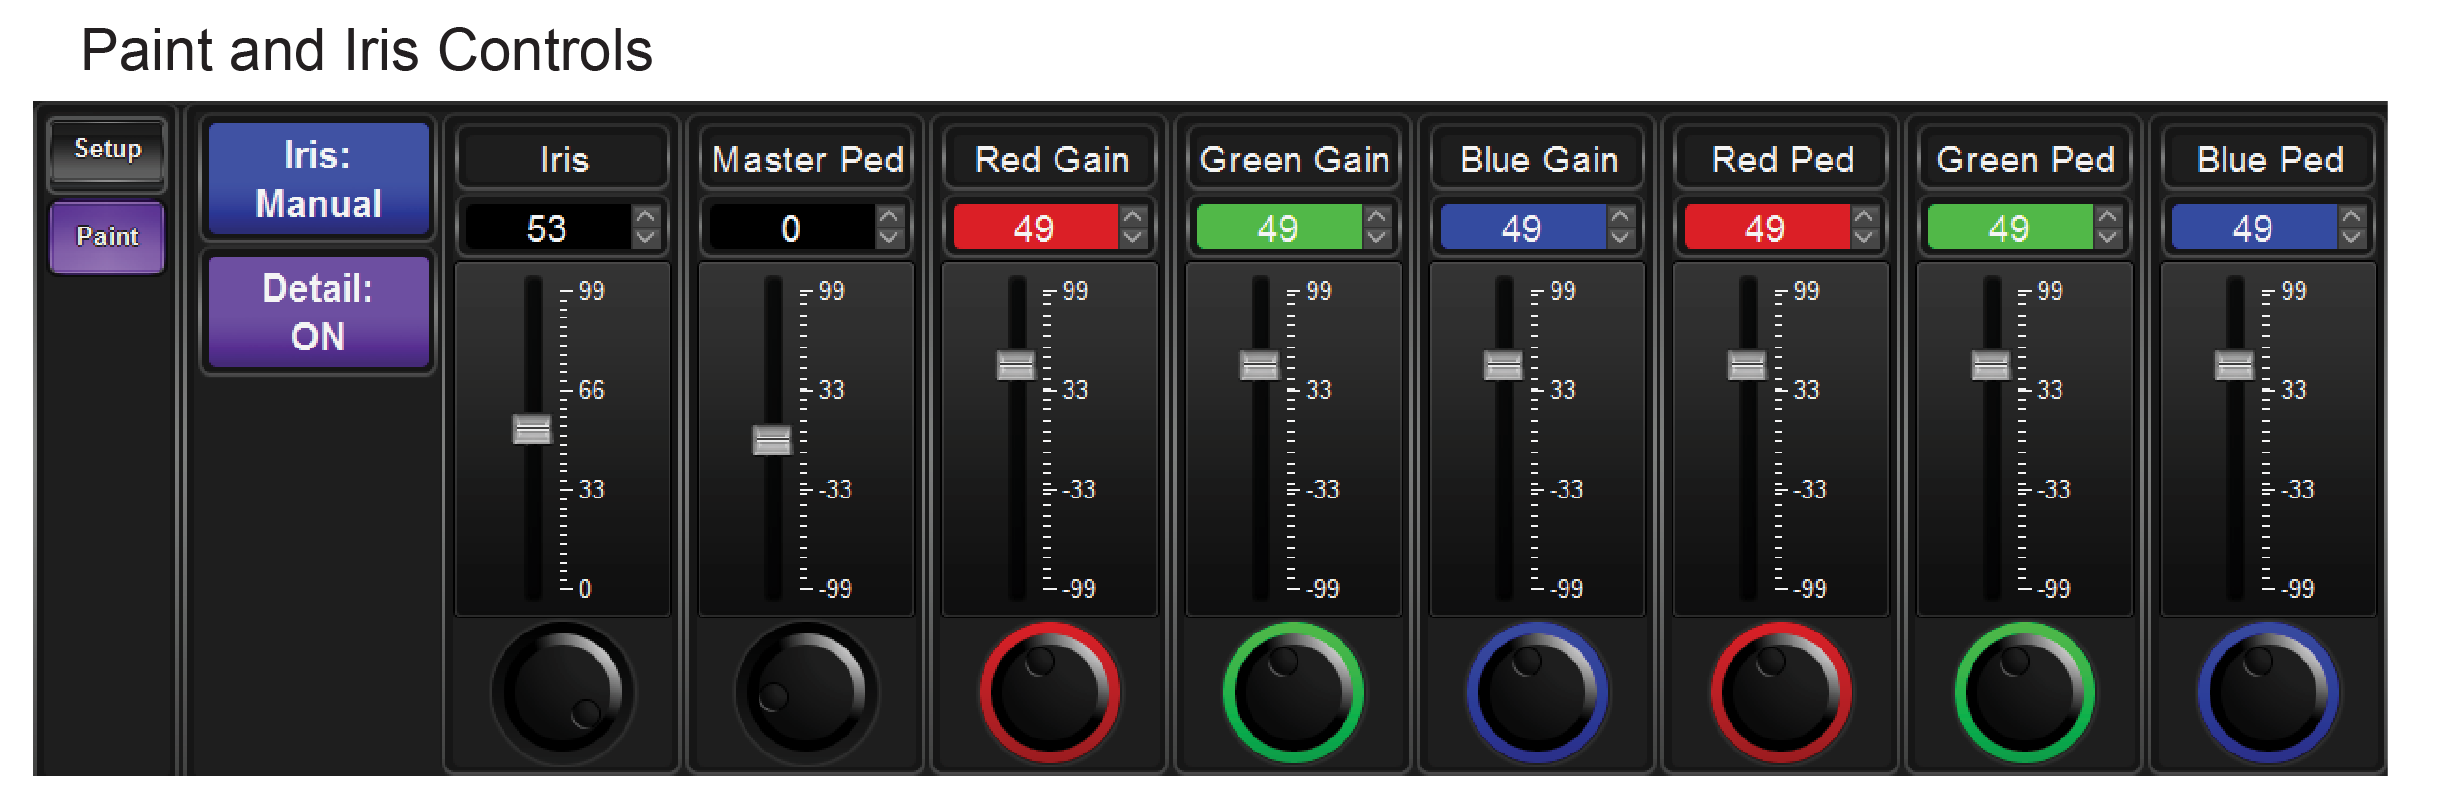
Figure 8
12. Paint and Iris Controls
Paint and Iris controls include the following:
-
Iris — When set for manual control, the Iris value selector adjusts lens iris.
The Iris button indicates Auto or Manual control. The iris can be controlled only if the Iris button is set to Manua l. To switch between Auto and Manual, tap the Iris button.importantThe lens has a physical switch to enable either automatic or manual iris control (A or M ). To control iris using the Camera Control System, the switch must be set to automatic (A ).
-
Detail — Tap the Detail button to turn detail mode ON or OFF . The Detail button shows the current state.
-
Master Pedestal — also known as Master Black .
-
Red Gain
-
Green Gain
-
Blue Gain
-
Red Pedestal
-
Green Pedestal
-
Blue Pedestal