Canon Paint Control User Guide
Introduction
1. About the Camera Control System
The Camera Control System enables you to adjust lens iris, camera paint (shading), and all camera menu settings on supported Panasonic cameras.
The Camera Control Panel is an easy-to-use software interface that runs within Ross Video’s DashBoard application. Multiple cameras can be adjusted from a single workstation.
Your system may also include an optional Camera Paint Box, which features physical knobs for adjusting iris and paint controls (gains and pedestals).
The Camera Control system can be set up as part of a Ross Robotics system, or as a standalone camera control station.
Starting the Camera Control System
2. Connect and Turn On All Components
Connect and Turn On All Components
Ensure that the following are connected and turned on:
-
Control Computer. Depending on your system, this may be a dedicated computer, or a SmartShell Computer that also controls a Ross Robotics system.
-
Network switch
-
Serial to Ethernet converter(s) (Comtrol units)
-
Panasonic cameras and accessories
-
Camera Paint Box (if equipped)
-
Ross Robotics System components (if equipped)
For information about how to set up the Camera Control System, see the Panasonic Camera Control System Installation Guide (8351DR-008-xx) .
3. Start the Camera Control Panel
The Camera Control Panel is accessible through a node in the DashBoard component tree.
-
In DashBoard, navigate to the node that contains the cameras you want to control. Expand any camera node
-
Double-click Remote Control.
The Camera Control Panel appears.tipThe panel is designed for full-screen mode on a 1920x1080 display. To turn full-screen mode on or off, press Shift+F11 .
Camera Control Features
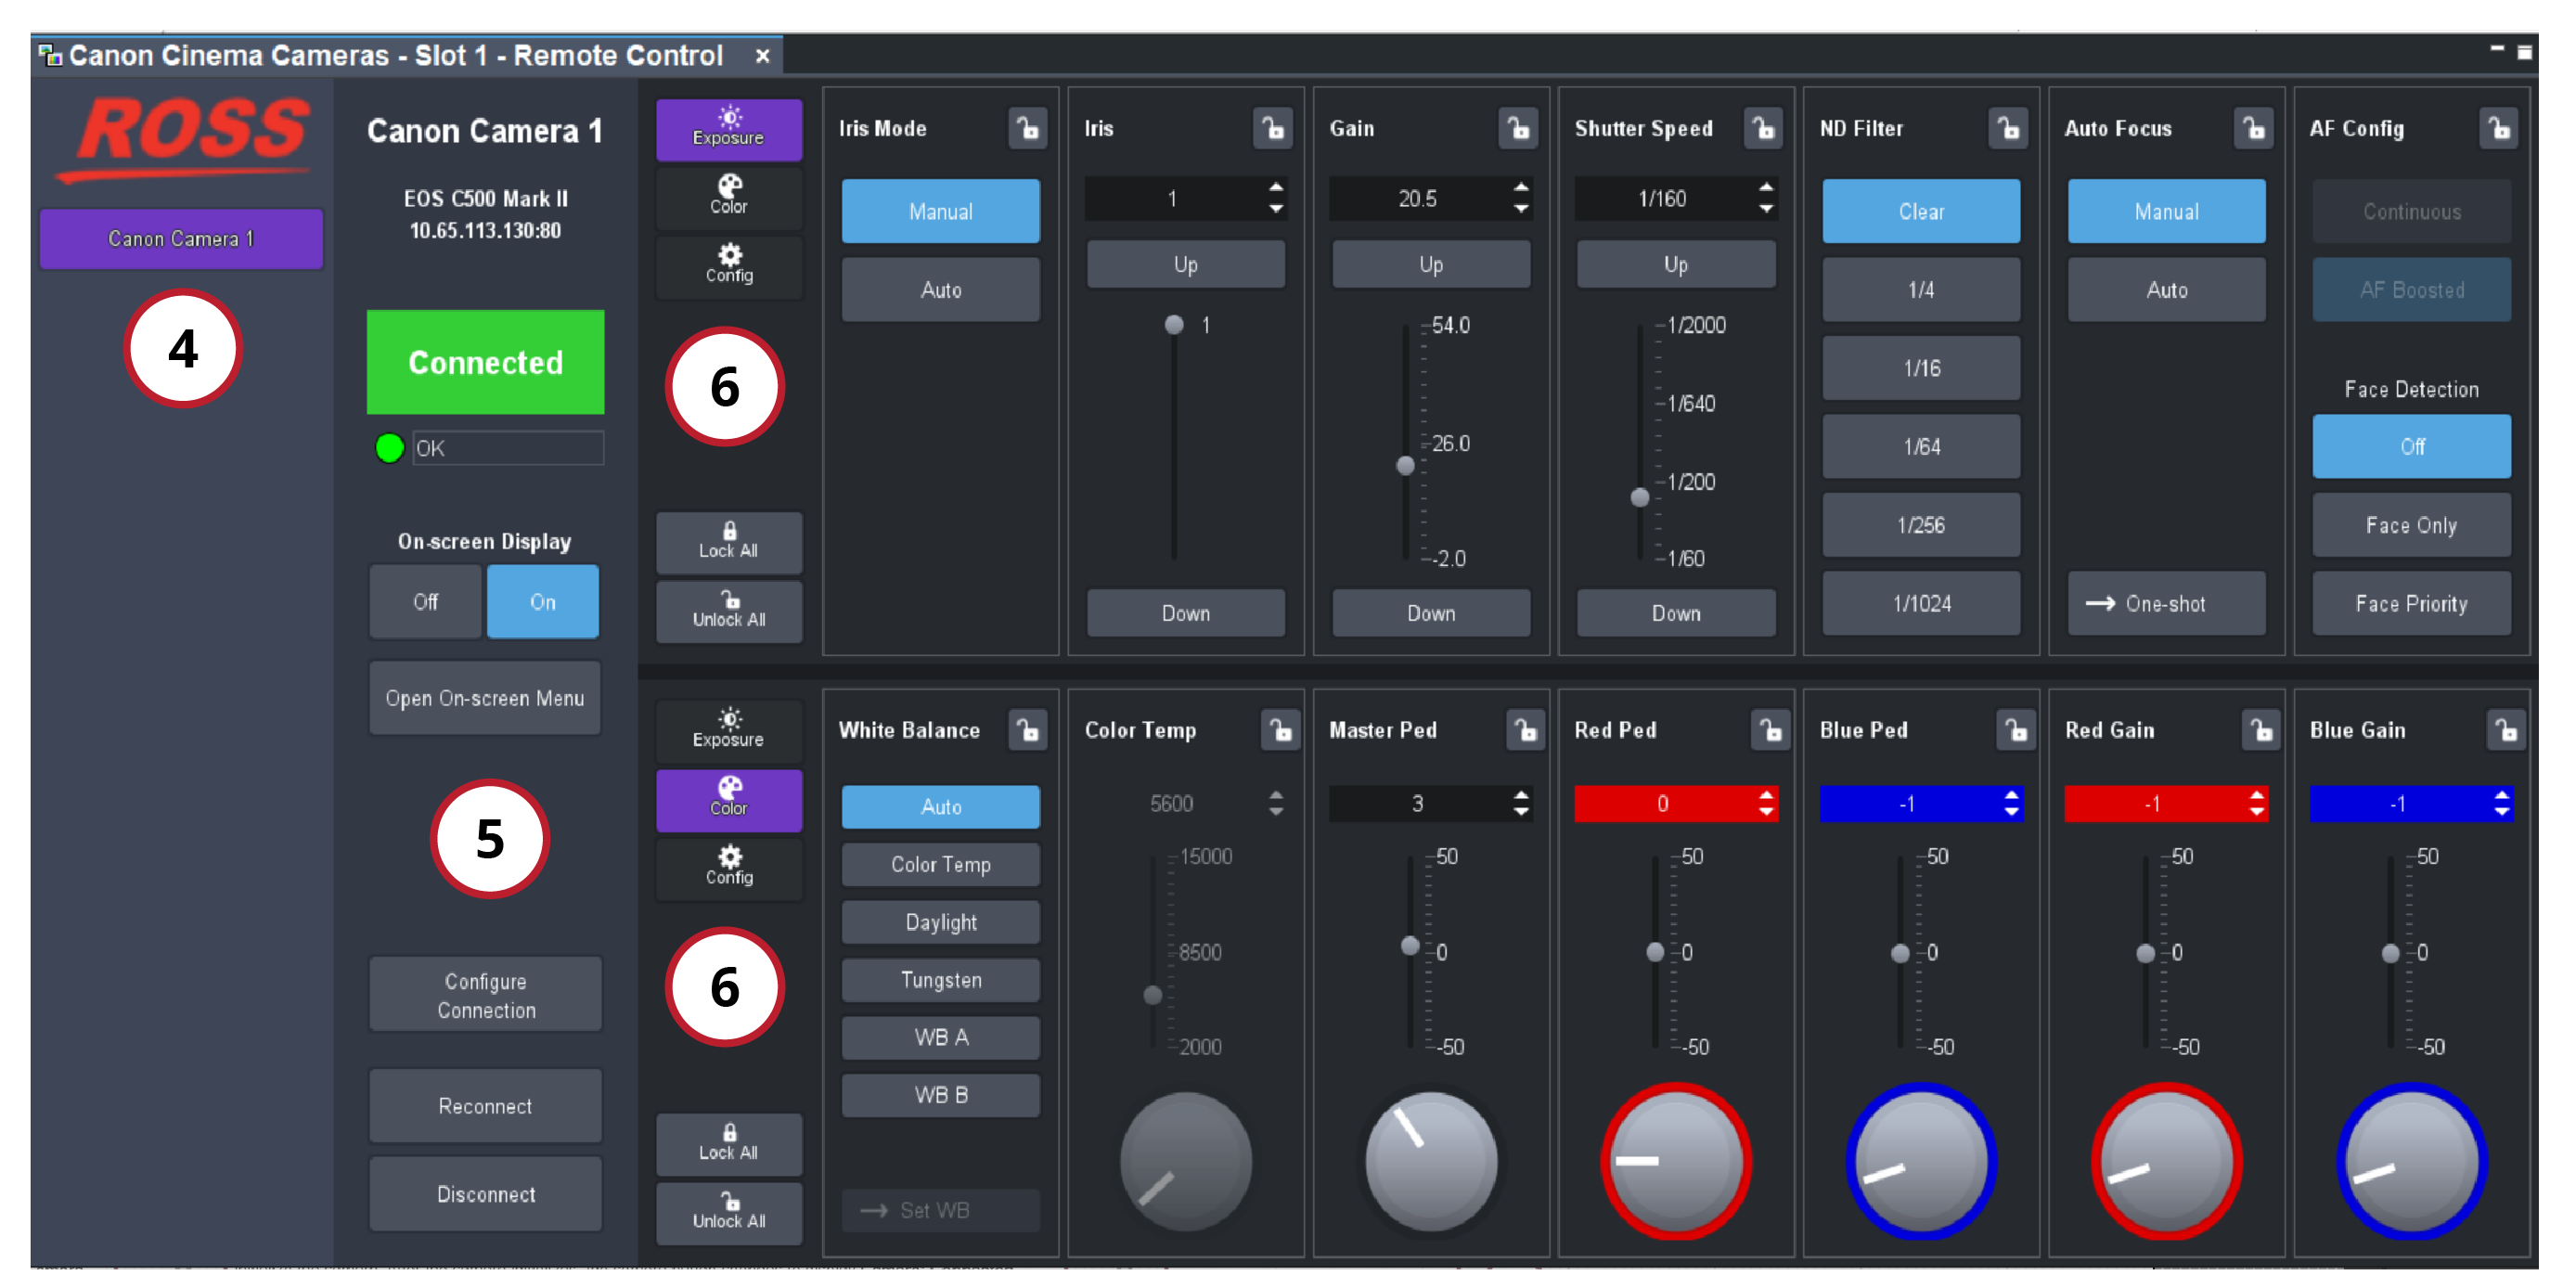
Figure 1
4. Camera Selection Area
Tap a camera button to select and configure that camera. The button turns purple. If the camera is connected, the panel shows configuration values for the camera.
Cameras must be initialized. If the red Camera: Disconnected button is visible at the top of the panel, tap it to initialize the camera. After the camera initializes, the camera button changes to display Camera: Connected .
If your system includes a Camera Paint Box, it can control iris and paint settings for the selected camera.
If your system is integrated with the SmartShell robotic control application, and SmartShell is configured for Selection Follow , selecting a camera in any interface selects it in all others. For example, if you select a camera on the joystick panel, it is also selected in SmartShell and in the Camera Control Panel.
You can turn the Selection Follow feature on or off for each Control Computer in your system:
-
Open the DashBoard Component Tree , navigate to DashBoard Services, and then double-tap Selector UI Mappings .
-
In the Selection Mapping panel, do one of the following:
- To turn Selection Follow ON , tap the UI Follows Selection ON button.
- To turn Selection Follow OFF , tap the UI Follows Selection OFF button.
5. General Camera Controls
The Connection Status Bar appears along the top of this area with camera-specific information such as the brand, model, name, and IP address.
Turn the On-screen Display either Off or On with the buttons provided. The Menu Control window appears when selecting Open On-Screen Menu . The Menu Control window allows you to access the On-Screen Menu within DashBoard. You can access and modify On-Screen Menu settings by using the arrow buttons shown.
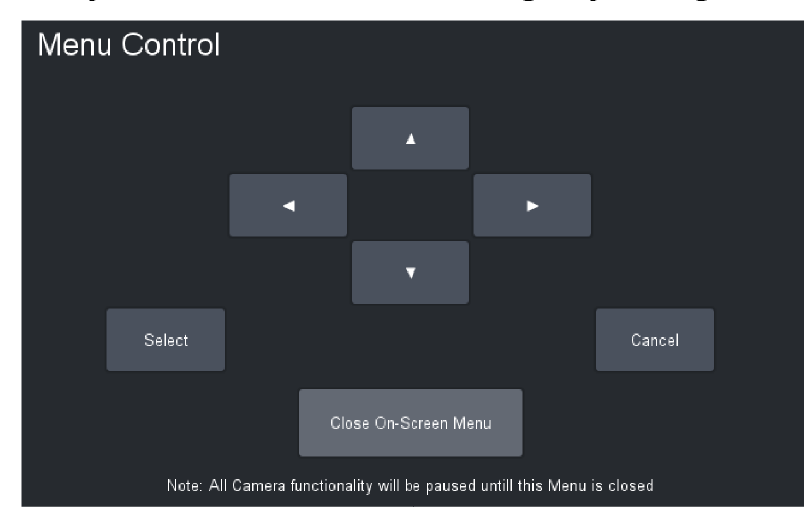
Figure 2
The Camera Configuration menu appears when selecting Configure Connection. This window enables modification of login credentials and connection settings. Note that some settings can only be changed from the Canon camera. Refer to the Canon Camera Paint Control Setup Guide (8351DR-020-xx) .
To change Connection status, select either Reconnect or Disconnect
6. Camera Control Areas (Upper & Lower)
Each Camera Control Area displays one group of controls. On the left side of each area, select one of the following buttons to select the control group to display: Exposure , Color , or Config .
When selecting between Auto or Manual controls for group settings, some features become unavailable. For example, when Iris Mode is set to Auto , the Iris controls become inaccessible.
Purple buttons indicate selected control groups.
All controls can be locked by selecting the lock icon. To modify all group control restrictions, use the Lock All or Unlock All buttons. Refer to page 2 for images of each control group.
If Iris Mode is set to Manual and the camera’s power is disconnected and reconnected, Iris Mode reverts to Auto mode but Manual displays. To regain Manual control, select the Iris button to change it to Auto , and then select it again to change it to Manual.
The Iris switch on the lens must be set to Automatic (A ) and the Focus switch must be set to Auto Focus (AF).
7. Camera Paint Box (Optional Accessory)
Knobs on the Camera Paint Box adjust two settings, one at a time. Setting names appear above and below the knobs. Flip the UPPER / LOWER switch to alternate between upper and lower settings.
Camera Paint Box settings include the following:
- Iris Control
- Red Gain and Red Pedestal
- Blue Gain and Blue Pedestal
- Green Gain and Green Pedestal
- Master Pedestal — Also known as Master Black
When you turn a knob on the Camera Paint Box , you can view the resulting value in the Camera Control Panel .

Figure 3
Camera Control Panel - Groups of Controls
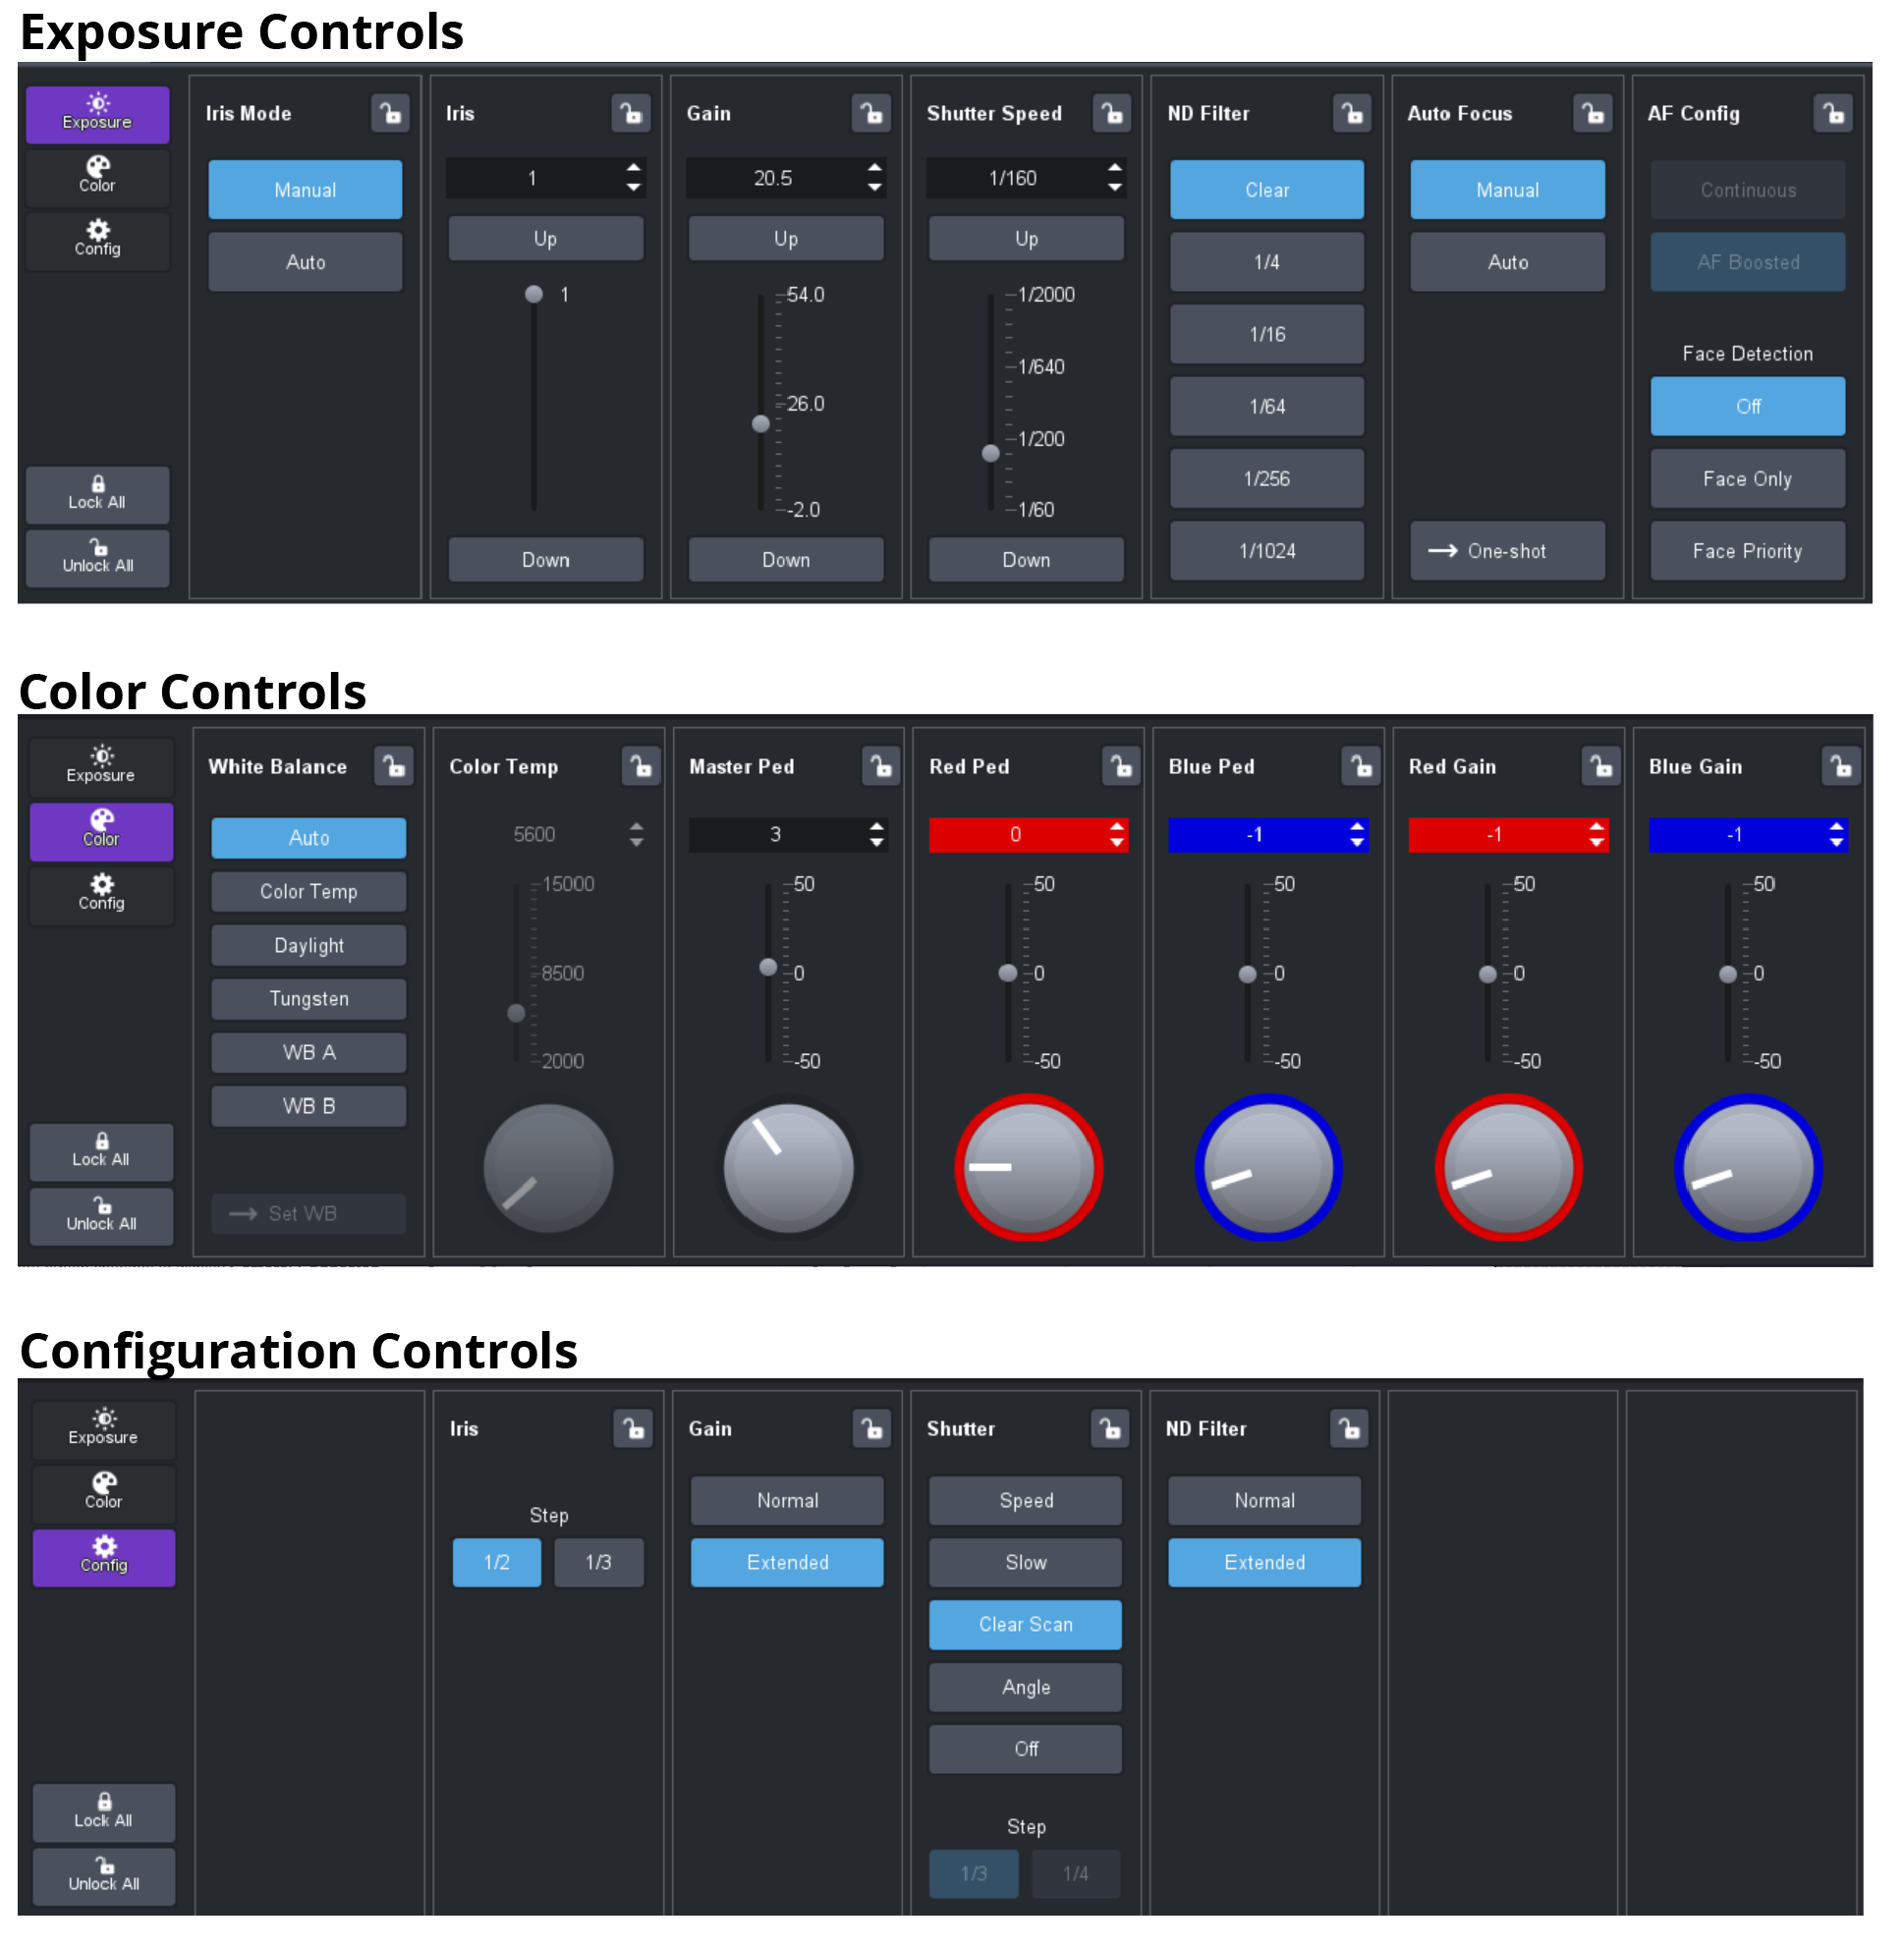
Figure 4
8. Groups of Controls Available in the Camera Control Areas
The upper and lower camera control areas can display any two of three groups of controls: Exposure , Color , and Config (camera configuration). Exposure and Color controls are intended for use during normal camera operation, whereas Config controls enable alteration to exposure control behaviors (like range and mode).
This page shows the three groups of controls, describes typical control interfaces (value selectors and button options), and explains how to configure camera settings using on-screen camera menus. All control groups can be Locked or Unlocked .
For more information about linking camera selection between interfaces, see the Canon Camera Paint Control Setup Guide (8351DR-020-xx) .
Camera Control Panel - Types of Controls
9. Value Selectors
The text box at the top of each value selector displays the name of the setting.
Value selectors enable you to specify values in four ways:
- Text Value - Select the text box, type a value, and press Enter.
- Up / Down Arrows- Select the up arrow or down arrow to increase or decrease the value.
- Slider - Drag the slider handle up or down, or select the vertical scale, to increase or decrease the value.
- Touch Wheel- Select and hold the touch wheel, and move to the left or right of the wheel to increase or decrease the value, respectively.
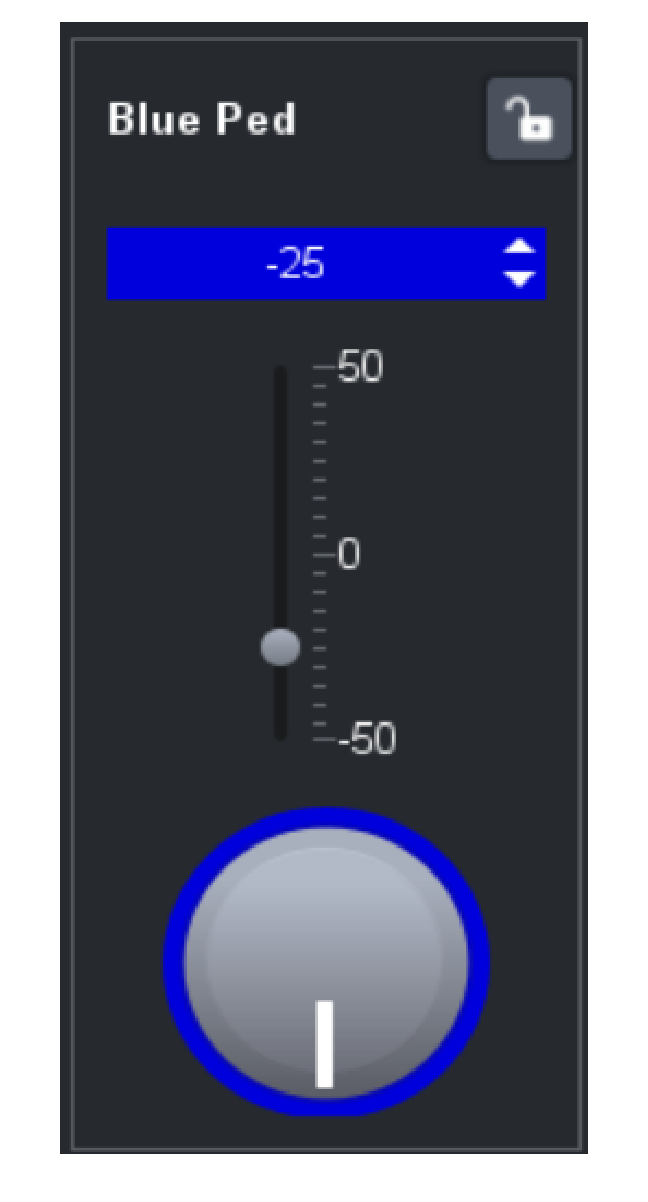
Figure 5
10. Button Options
Many settings in the Camera Control Panel are presented as buttons. Selecting a button actions the option it represents.
Blue buttons indicate selected options.
Grey buttons indicate unselected options.
For example, in the Exposure Controls group, the Continuous and AF Config buttons are only available in the AF Config settings when Auto Focus is set to Auto .
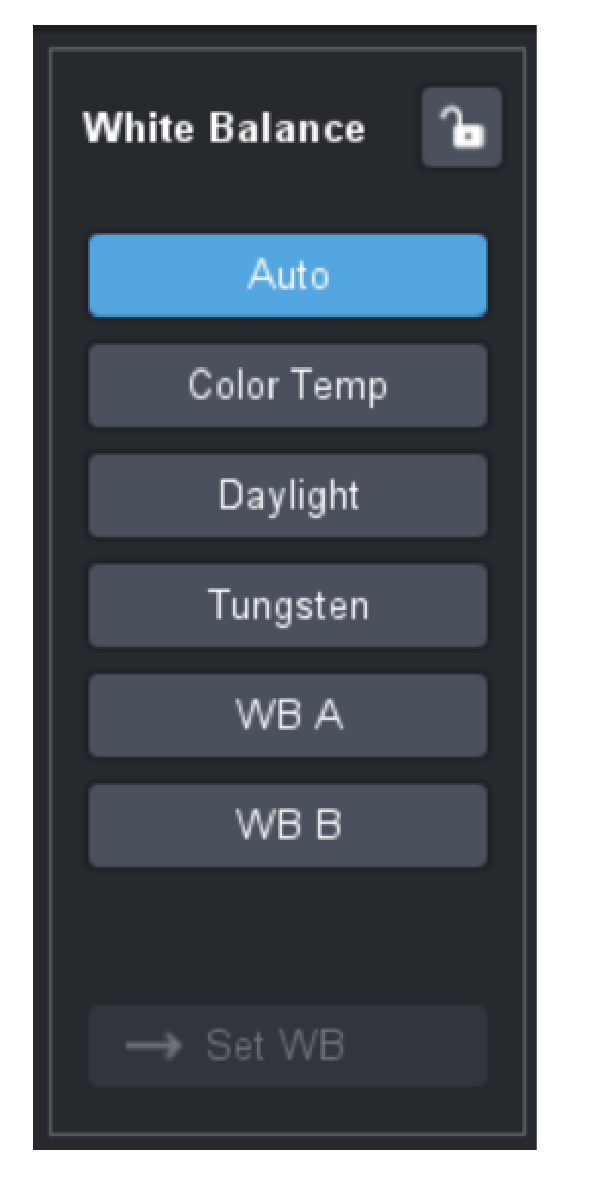
Figure 6
Configuring Camera Settings Using On-Screen Camera Menus
11. Configure Camera Settings Using On-Screen Menus
-
For the camera you want to configure, route the camera’s video output to a video monitor you can see. You must be able to see the on-screen menus to use them.
-
Set the On-screen Display to On .
-
In the Camera Control Panel , select the camera, ensure it is connected, and then tap the Setup button.
-
Navigate the on-screen menu, and configure settings as desired:
- In the On-screen Menu , an arrow points to the current item.
Select the up and down arrows in the Menu Control Panel to move the on-screen arrow to the desired item. - To select the current item, select the Enter button in the Menu Control Panel .
- If the selected item has submenu options, those options appear.
- When a value is flashing, it is editable.
Select the up and down arrows to choose a value, then select Enter to set the value. - For text values, a full keyboard displays on the screen.
- Use the up and down arrows to select the character you want to edit, and then select Enter to set it.
- Tip : Alternatively, you may use an attached keyboard to enter text values if you have them.
- To go to a higher level in the menu, navigate to the top item and then select Enter .
- To go back to a previous menu setting, select the Cancel button in the Menu Control Panel .
- In the On-screen Menu , an arrow points to the current item.
-
When you are finished configuring camera settings using the on-screen menu, select the Menus : OFF or Cancel button to turn off the menus.