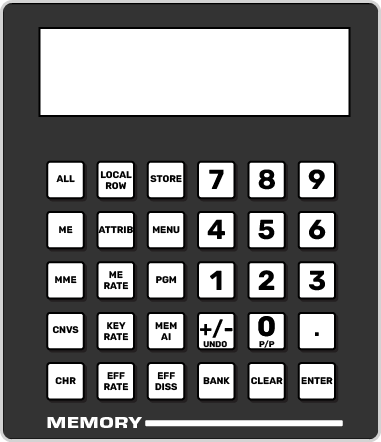
To Store a Memory on TouchDrive (Memory Area)
Some of the TouchDrive control panels have a dedicated Memory area that allows you to store and recall memories for any ME.
Note:
Carbonite button configuration and menus shown.
Tip:
You can double-press the STORE button to lock the memory system in store mode. Press STORE again to return to recall
mode.
-
Press STORE in the Memory area.
Tip:Press and hold STORE and press LOCAL ROW to reset only the row you are working on or ALL to reset all rows.

-
Press and hold BANK and use the keypad to select the memory bank that you want to store a memory to. The new bank selection is shown on the display.
Tip:Tapping the Bank button on the display is the same as pressing the BANK button. Each press advances the Bank by one.
-
Select the areas you want to include in the memory.
Note:Not all switchers support chroma keys being recalled independently. Refer to the documentation that came with your switcher to see this feature is supported.Tip:The resources that are included (Inclusions) are shown on the display.

- LOCAL ROW — press LOCAL ROW to include the resource that the row is currently assigned to. For example, if the row is assigned to MiniME™ 2, the LOCAL ROW selects MiniME™ 2.
- ALL — press ALL to include all available resources in the memory.
- ME — press and hold ME and use the keypad to select which ME resources are included with the memory. The available selections glow and turn white when selected.
- MME (Carbonite only) — press and hold MME and use the keypad to select which MiniME™ resources are included with the memory. The available selections glow and turn white when selected.
- CNVS (Carbonite only) — press and hold CNVS and use the keypad to select which MultiScreen resources are included with the memory. The available selections glow and turn white when selected.
- CK (Carbonite only) — press and hold CK and use the keypad to select which chroma key resources are included with the memory. The available selections glow and turn white when selected.
Tip:The buttons on the keypad light to show if a memory register already contains one of the resources that have been selected. For example, if memory register 3 includes an entry for ME 1, the 1 button on the keypad glows when ME 1 is part of the inclusions.Tip:Press ATTRIB to navigate to the memory attributes page. If the attributes settings are different than the default, the ATTRIB button lights. -
Select the recall mode that you want to store with the memory.
- PGM (Carbonite only) — press PGM to select the PGM recall mode.
- MEM AI (Carbonite only) — press MEM AI to select the Memory AI recall mode.
- EFF DISS (Carbonite only) — press EFF DISS to select the Effects Dissolve recall mode.
- Press the number for the memory register you want to select.
- Press ENTER to store the memory.
