Introduction to Creative Console
Monogram Creative Console is a highly customizable control panel consisting of physical control modules that can be pulled apart and rearranged anytime to create a control surface that truly suits your ergonomic needs and personal preferences.
Working in conjunction with Ross Video DashBoard plugins and the Monogram Creator application, Monogram Creator modules can control supported PTZ cameras and PT heads. Easy-to-edit configuration profiles and DashBoard joystick settings define what each control does. You can also use Monogram Creator with your own DashBoard CustomPanels.
Monogram Creative Console modules are designed and produced by Monogram, and sold by Ross Video in packages that include configuration files that enable the modules to control robotic PT heads and PTZ cameras.
Figure ?? shows various Monogram Creator modules that are available from Ross Video individually, or as part of a package.
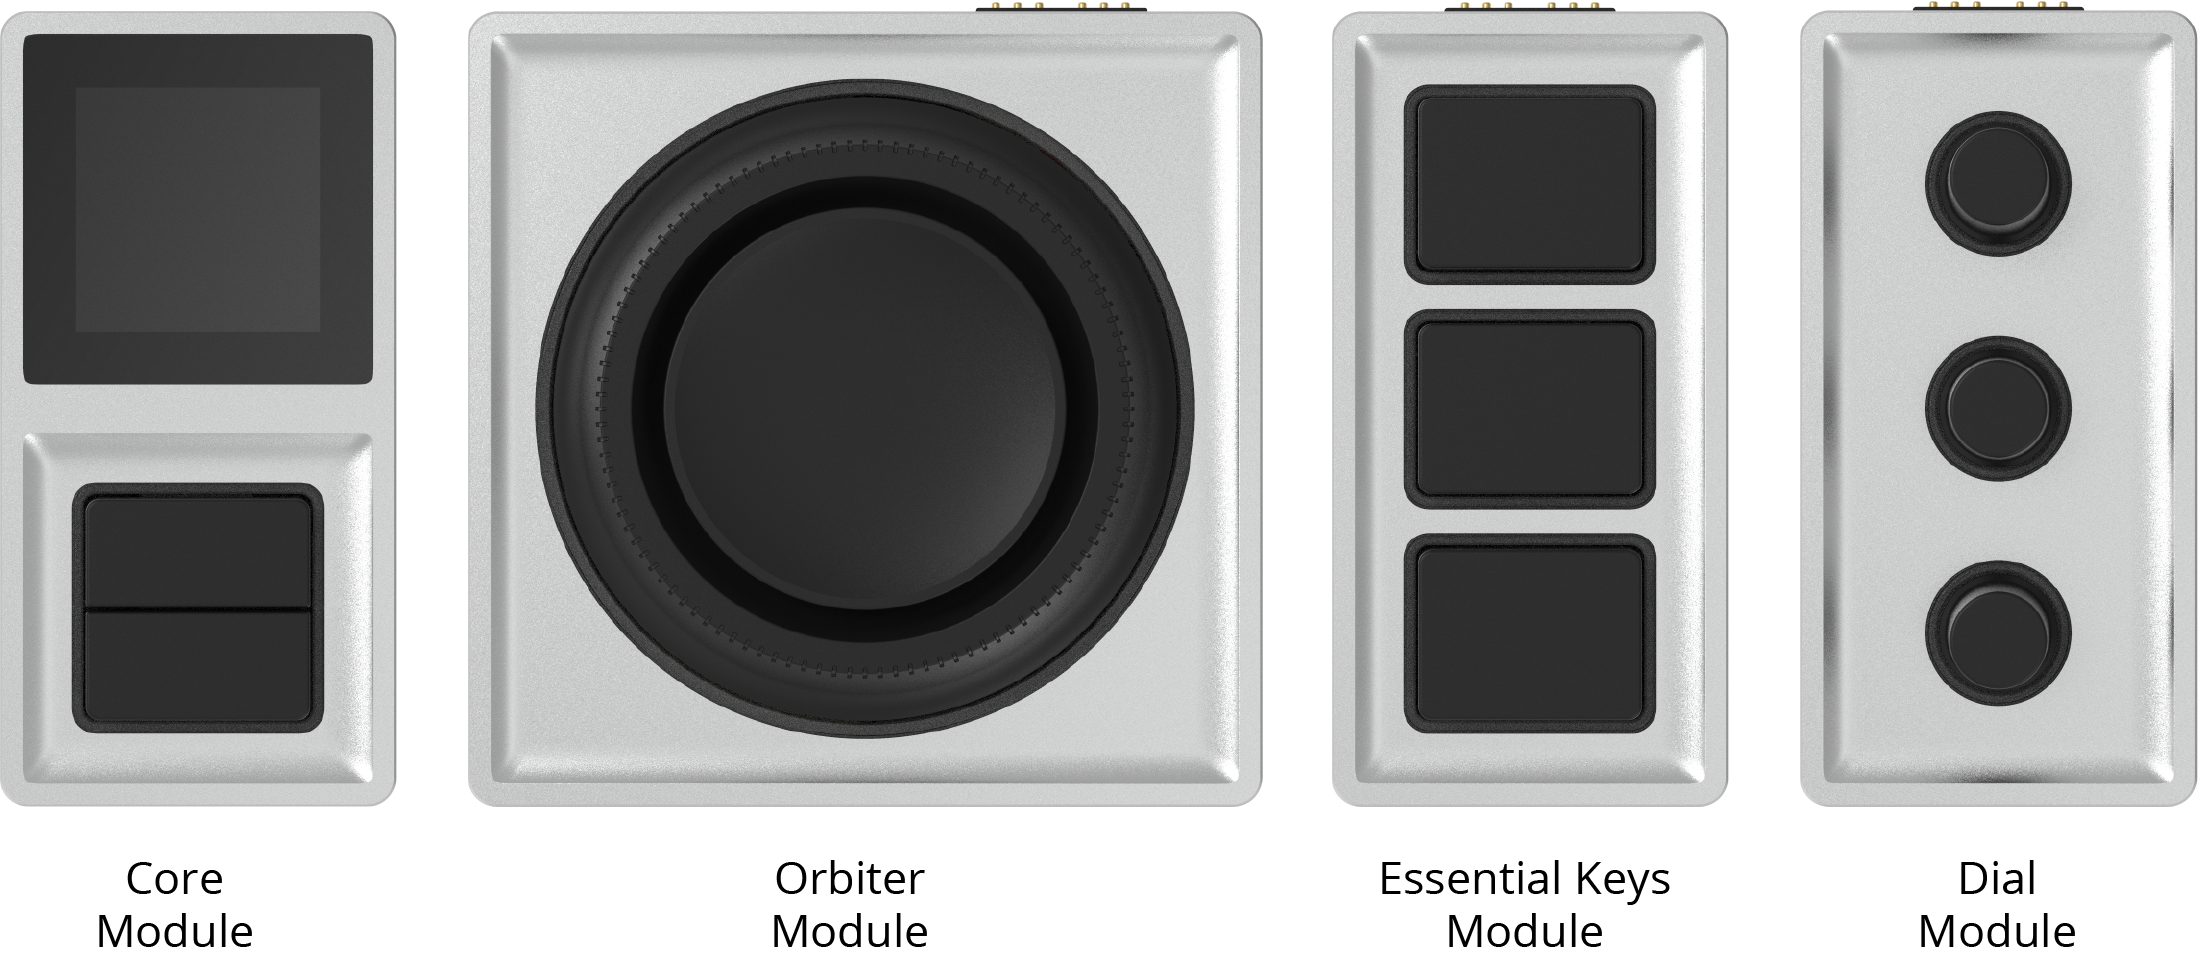
Figure 1 - Monogram Creative Console Modules, Available from Ross Video
The module types are as follows:
-
Core Module — The Core module is at the heart of every Monogram Creator setup. It features two push buttons and an LCD display that shows the name of the current configuration profile.
The Core module connects to a USB port on your DashBoard computer via a 39” (1m) USB cable (included).
-
Orbiter Module — The Orbiter module is an innovative alternative to a traditional joystick. It features a pressure-sensitive disc (pad) that encodes two directions of movement (X-Y) for intuitive control of a pair of axes such as Pan and Tilt. It also has an endless encoder dial for easy and precise adjustment of a variable function such as Focus. These controls, like all Monogram Creator controls, can easily be assigned to perform other functions.
-
Essential Keys Module — The Essential Keys module features three push buttons that can be used for camera selection or for other functions such as performing preset recall actions (Cut, Run, and Halt) actions for PT heads.
-
Dial Module — The Dial module features three dials, each of which is also a push button. The dials can be used for variable functions such as Iris, Zoom, or Gain. The push buttons can be used for such functions as turning AutoFocus on/off, or performing one-time AutoFocus.
Ross Video sells two Monogram Creator packages, each consisting of a set of control modules plus specially-designed configuration profiles for use with Ross DashBoard plugins (PT Head Control and PTZ Camera Control).
PTZ Starter Package
This package is suitable for manual control of up to three PTZ cameras. It includes one of each of the following: Core module, Orbiter module, Essential Keys module, and Dial module.
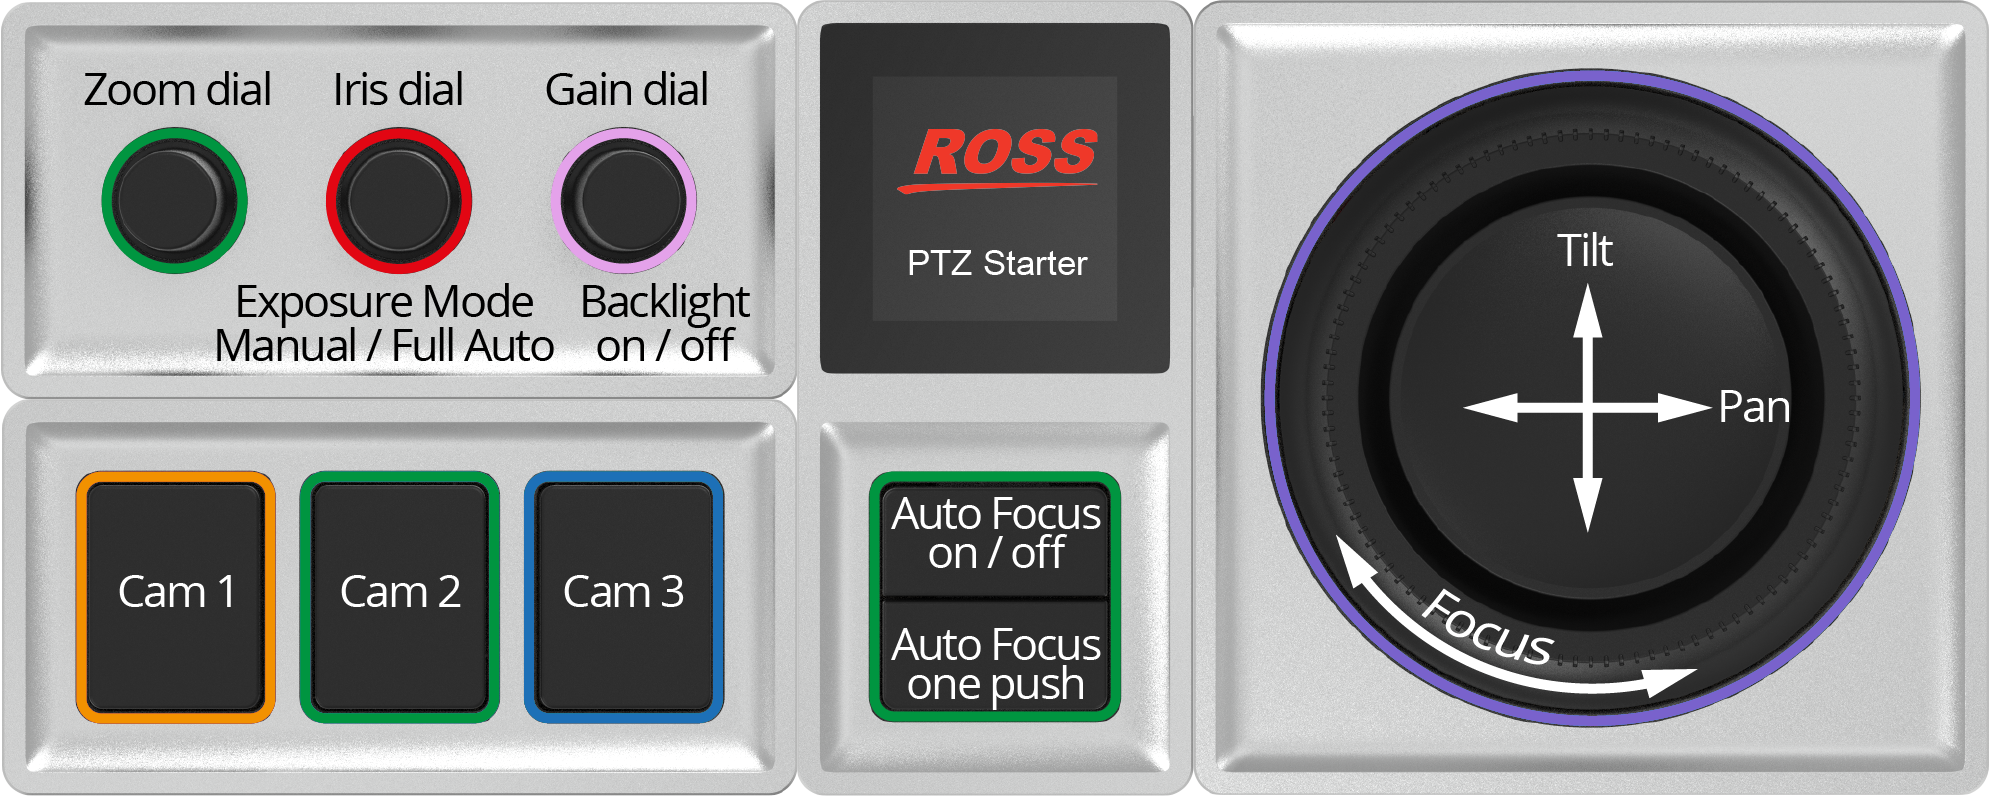
Figure 2 - PTZ Starter Package (labeled to show functions assigned by PTZ Starter configuration profile)
The configuration profile included with this package provides the following controls:
-
Three camera selection buttons
-
Core module buttons for AutoFocus on/off and one push AutoFocus .
tipTo use one push Auto Focus , Auto Focus must be off .
-
Orbiter pad control of Pan and Tilt , and Orbiter ring control of manual Focus .
tipTo adjust Focus manually, Auto Focus must be off . Push the Auto Focus button to turn it on or off .
-
Dial control for Zoom .
-
Dial control for Iris .
tipTo adjust Iris , the Exposure Mode must be Manual . Push the Iris dial to switch between Manual mode and Full Auto mode.
-
Dial control for Master Gain .
tipTo adjust Master Gain , the Exposure Mode must be Manual . Push the Iris dial to switch between Manual mode and Full Auto mode.
-
Push-button control for Backlight on/off (on the same dial as Master Gain ).
tipTo turn Backlight on/off, Exposure Mode must be Full Auto . Push the Iris dial to switch between Manual mode and Full Auto mode.
PTZ Pro Package
This package is suitable for manual control of up to six PTZ cameras, or manual and preset control of up to six PT heads. It includes one Core module, one Dial module, two Orbiter modules, and three Essential Keys modules.
There are two configuration profiles: one for controlling PTZ cameras, and one for controlling PT heads.
PTZ Pro Layout for Controlling PTZ Cameras
Figure ?? shows the layout and control available when using the PTZ Pro package to control PTZ cameras.
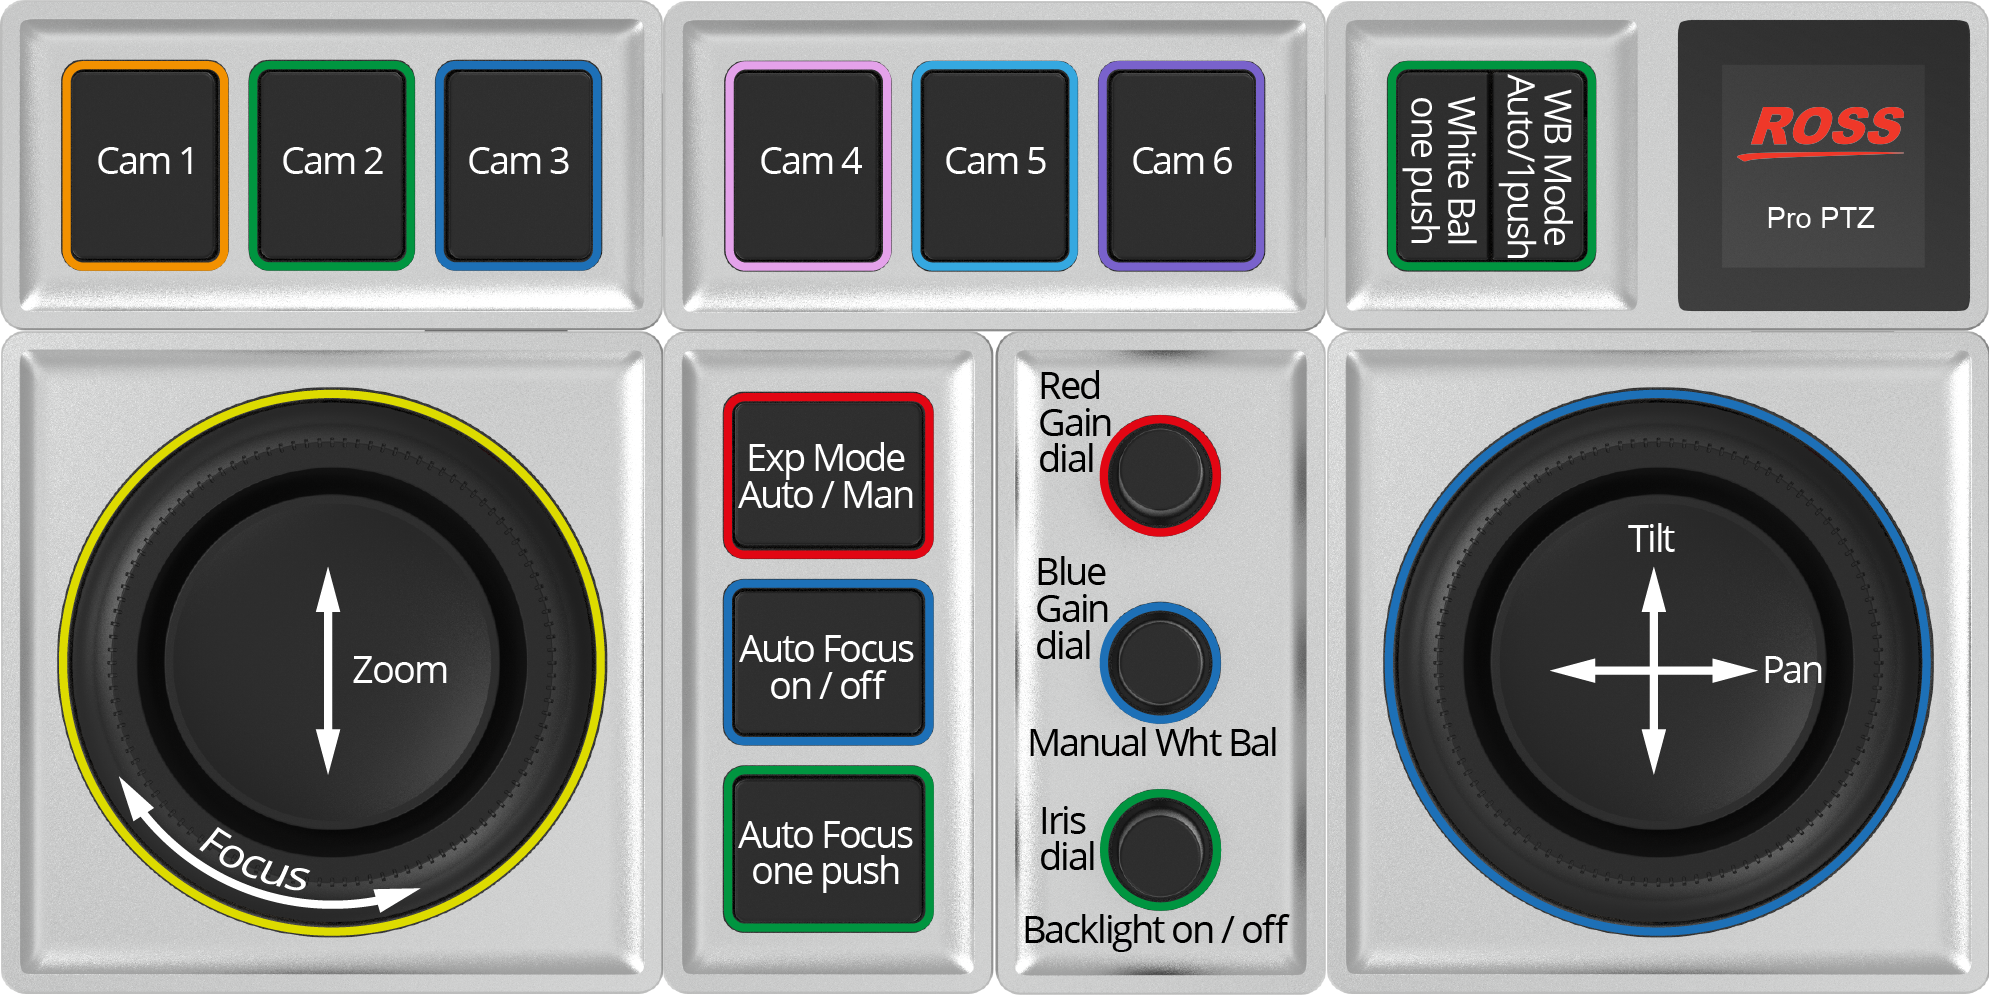
Figure 3 - PTZ Pro Package, Configured to Control PTZ Cameras
The PTZ Pro configuration profile for PTZ cameras provides the following controls:
-
Six camera selection buttons
-
Orbiter pad control of Pan and Tilt .
-
Orbiter pad control of Zoom , and Orbiter ring control of manual Focus .
tipTo adjust Focus manually, Auto Focus must be off . Push the Auto Focus button to turn it on or off .
-
Exposure Mode button to toggle between Full Auto and Manual modes.
-
Auto Focus on/off button.
-
Auto Focus one push button.
tipTo use one push Auto Focus , Auto Focus must be off . Push the Auto Focus button to turn it on or off .
-
Dial controls for Red Gain and Blue Gain .
tipTo adjust Red Gain and Blue Gain settings, the White Balance Mode must be Manual . Push the middle (blue) dial to set the White Balance Mode to Manual .
-
Dial control for Iris .
tipTo adjust Iris , the Exposure Mode must be Manual . Push the Exposure Mode button to switch between Manual mode and Full Auto mode.
-
Button control to turn Backlight on/off (on the Iris (bottom) dial).
tipTo turn Backlight on/off, Exposure Mode must be Full Auto . Push the Exposure Mode button to switch between Manual mode and Full Auto mode.
-
Core module button to toggle White Balance mode between Auto and One Push .
-
Button control to set White Balance mode to Manual (on the Blue Gain (middle) dial)
-
Core module button for one push White Balance .
tipTo use one push White Balance , the White Balance one push mode must be enabled. Push the White Balance mode button (on the Core module) to enable one push White Balance mode.
PTZ Pro Layout for Controlling PT Heads
Figure ?? shows the layout and control available when using the PTZ Pro package to control PT heads.

Figure 4 - PTZ Pro Pack age, Configured to Control PT Heads
The PTZ Pro configuration profile for PT heads provides the following controls:
-
Six camera selection buttons.
-
Core module button to enable control of the PT head currently selected in DashBoard.
-
Orbiter pad control of Pan and Tilt , and Orbiter ring control of manual Focus .
-
Orbiter pad control of Zoom , and Orbiter ring control of Time Dilation .
tipTime Dilation adjusts the speed of robotic motion as a preset runs.
-
CUT button:
- If the PT Head Control interface is in Panel mode, the CUT button commands the PT head to cut to the selected preset as quickly as possible.
- If the PT Head Control interface is in Shot Box mode, the CUT button places the interface in CUT mode, ready to perform a CUT operation.
-
HALT button �— Presets in progress are canceled and movement of the PT head toward the preset destination stops.
-
RUN button:
- If the PT Head Control interface is in Panel mode, the RUN button commands the PT head to run the selected preset.
- If the PT Head Control interface is in Shot Box mode, the RUN button places the interface in RUN mode, ready to perform a RUN operation.
-
Core module button to turn ALT Mode on/off:
- If the PT Head Control interface is in Shot Box mode, ALT mode enables you to run presets using the alternative duration specified in the interface.
- If the PT Head Control interface is in Panel mode, pressing the ALT mode on/off button runs the selected preset.
-
Dial control for Iris , with push button for Iris Enable .
-
Dial control for Alternative Duration with push button for Alternative Duration Enable .
To enable alternative preset durations for all PT heads, push the Alternative Duration Enable button once per DashBoard session. If the button has not been pushed, the dial controls Time Dilation instead (not recommended)
To recall a preset using an alternative duration:
-
If the PT Head Control interface is in Panel mode, select the preset and then turn the Alternative Duration dial to adjust the duration. Run the preset. The alternative duration is used.
-
If the PT Head Control interface is in Shot Box mode, turn the Alternative Duration dial to adjust the alternative duration. Ensure ALT mode is on, and then tap a preset button to run the preset using the alternative duration.
tipIn Shot Box mode, the alternative duration value persists. In Panel mode, you must specify an alternative duration value each time you want to recall a preset using an alternative duration.
-