To Connect DashBoard to the Switcher
DashBoard connects to the switcher as the main panel, or as a satellite panel or SoftPanel. Connecting as a main or satellite panel is selected by the port used to connect to on the switcher. All DashBoard connections and physical panels that connect on the same port mirror each other.
You need the IP address of the Carbonite Code computer to connect to it from DashBoard.
- Launch the DashBoard application.
-
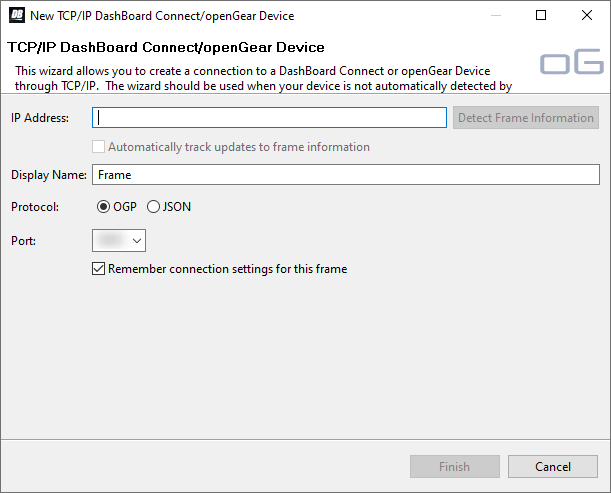
Click File > New > TCP/IP DashBoard Connect or openGear Device.

-
In the IP Address field, enter the IP address of the Carbonite Code computer.
Tip: If you are running DashBoard on the Carbonite Code computer, use localhost as the IP address and click Detect Frame Information. DashBoard will enter the internal IP address of the switcher.
- In the Display Name field, enter the name you want to use to identify the frame in DashBoard. This should be a unique name for the frame you are setting up.
- Select OGP.
-
In the Port field, enter the port you want to connect to on the frame. The port you connect to assigns the relationship the DashBoard
connection has to the frame.
Note: You can use a NAT gateway to connect to the switcher from a DashBoard computer on a different network. If you are connecting to the switcher through a NAT gateway, you must use the NAT ports instead of the regular ports.Tip: Multiple DashBoard connections can use the same port, but they will mirror each other. For example, you can connect a control panel and a separate DashBoard computer to the Main Panel port to give control from the panel and DashBoard.
- Main Panel — 5253 (5258 NAT)
- Satellite 1 — 5255 (5259 NAT)
- Satellite 2 — 5256 (5260 NAT)
- Satellite 3/SoftPanel — 5257 (5261 NAT)
-
Click Finish.
The switcher appears in the Tree View.
