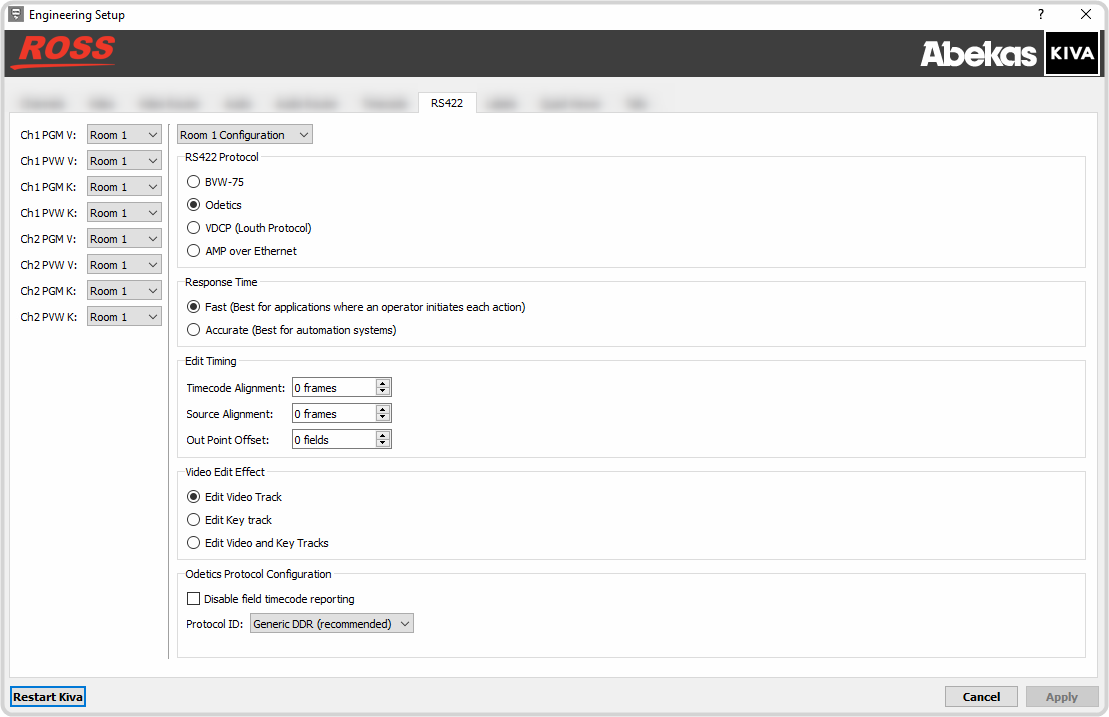
To Configure a Room for the Odetics Protocol
Set up a Room to use the Odetics protocol to control server channels.
-
Launch the Kiva Config application.
You may be prompted to allow the program to make changes on the computer, click Yes.
-
Click the RS422 tab.

- Click Room X Configuration and select the room you want to configure. Later you will assign this room to a channel.
- In the RS422 Protocol area, select Odetics.
-
In the Response Time area, select how quickly the server executes the Clip Play command after the Clip Load command.
- Fast — executes the play command immediately after the load command. This is recommended when controlling the server from an external switcher.
- Accurate — executes the play command only after receiving confirmation that the clip has loaded. This is recommended when controlling the server from an automation system.
-
In the Edit Timing area, select a timing offset for when you are controlling the server from an external editor over serial.
- Timecode Alignment — select the offset, in frames, of the timecode information that is sent to the editor during playout or record.
- Source Alignment — select the offset, in frames, of the timecode information that is sent to the editor during playout.
- Out Point Offset — select the offset, in fields, of the out-point timecode value that is sent to the editor during record.
-
In the Video Edit Effect area, select which tracks get recorded when an external editor issues the Video Record command to the server.
- Edit Video Track — only the video track is recorded.
- Edit Key Track — only the alpha (key) track is recorded.
- Edit Video and Key Tracks — both the video and alpha (key) tracks are recorded. The clip loaded into the VKA Media Player must have an alpha track.
-
In the Odetics Protocol Configuration area, select specific configurations for the protocol you are using.
- Select Disable field timecode reporting to force the server to report timecode only once every video frame. If this option is not selected, the server reports timecode every field.
- Select the Protocol ID that you want to use (Abekas 6000, Sony BVW-75, or Generic DDR).
- Click on the Ch-X XXX X: list and select the room that you want to assign to the channel.
- Click Restart Kiva. A confirmation dialog box is displayed.
- Click Restart Kiva to restart the server application and services with the new setting.
- Click OK when the restart has completed to dismiss the window.
