Inception enables you to create BIM stories from the following panels:
• Running Order — while working with a running order in the Running Order panel you can add a new BIM story directly to the open running order.
• Story Browser — when you do not want to immediately add a new BIM story to a running order, you can create your new BIM story from your Story Browser panel. You can add your BIM story to a running order at any time.
• Story Editor — while editing a story in the Story Editor panel, you can use the content of the current story to create a new BIM story. When you create a BIM story from a story, Inception creates a story family that includes the original story and the new BIM story. All new stories that you create from a story inherit the Slug and content of the original story.
• Assignment — while working on an assignment in the Assignment Editor panel, you can create new BIM story for the assignment. When you create a story from an assignment, Inception automatically makes the Slug for new stories the same as the assignment Slug. Changing the Slug of a new story does not change the assignment Slug.
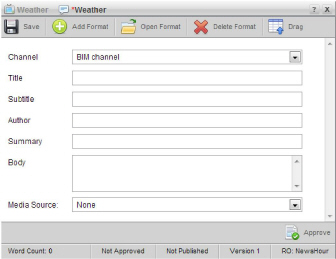
1. Open the Story Editor panel to create a new BIM story. For information about opening the Story Editor from a specific panel to create a new story, refer to the following procedures:
• Running Order — To create a story from the Running Order Panel.
• Story Browser — To create a story from the Story Browser panel.
• Story Editor — To create a story from the Story Editor Panel.
• Assignment — To create a story from the Assignment Editor Panel.
The Story Editor panel opens for you to create a BIM story.
2. In the Channel list, click or tap the BIM account to which you want to publish the story.
The Story Editor panel refreshes to show all available options for BIM stories.
3. In the Title box, type a story title to use in the story.
4. In the Subtitle box, type a story subtitle to use in the story.
5. In the Author box, type the story author’s name.
6. In the Summary box, type a brief summary or a description of the story.
7. In the Body box, type or edit the body text for the story.
BIM stories can contain up to 10,000 characters. The Word Count field at the bottom of the Story Editor indicates how many words the story contains.
Stories imported from an NCS rundown, it
may contain text in ALL UPPER CASE letters. To change the text to mixed
case, click or tap the ![]() Recase icon.
Review the resulting text carefully, because the case adjustment tool
cannot account for all situations.
Recase icon.
Review the resulting text carefully, because the case adjustment tool
cannot account for all situations.
8. If you do not want to include a picture or video with the story, go to step 15.
9. In the Media Source list, click or tap the media source that contains the picture or video for the story.
The Story Editor options change depending on the type of media source that you selected.
If you want to include a video with your BIM stories, your Inception administrator must enable the BIMvid option.
10. If you selected a QuickTurn media source, in the Segment list, click or tap the name of the video segment you want to include with the story.
The QuickTurn column in the running order displays the name of the QuickTurn segment associated with a broadcast story.
11. If you selected a Directory media source, in the File list, click or tap the media file you want to include with the story.
12. If you selected an Upload media source and you want to include a previously-uploaded media file, do the following:
a. When
the Choose File button is visible,
click or tap the ![]() View Uploaded Files icon.
View Uploaded Files icon.
b. In the file list, click or tap the media file name.
c. Go to step 14.
13. If you selected an Upload media source and you want to upload a media file, do the following:
a. Click or tap the Choose File button.
When the Choose
File button is not visible, click the ![]() Upload a File icon to show the button.
Upload a File icon to show the button.
b. If you are on a desktop computer, browse to select the media file, and then click Open.
c. If you are on a mobile device and you want to upload an existing photo or video, do the following:
• Tap Choose Existing.
• Browse to the photo or video, select it, and then tap Use.
The selected photo or video uploads to the Inception Server.
d. If you are on a mobile device and you want to take and upload a new photo or you want to record and upload a new video, do the following:
• Tap Take Photo or Video.
• Take the photo or record the video, and then tap Use.
The taken photo or recorded video uploads to the Inception Server.
14. If you are on a desktop computer
and you want to preview the image or video, click the ![]() Preview icon. Previews are not available
on mobile devices.
Preview icon. Previews are not available
on mobile devices.
The video opens in the Video Player panel. The Video Player panel cannot play some video file formats that Inception supports.
Given that QuickTurn media sources list planned but not yet created video segments, the Video Player panel may not be able to preview video from a QuickTurn media source.
15. Click or tap the ![]() Save
icon.
Save
icon.
Inception saves the story. Drag the new BIM story into a running order to publish the story when you playout the running order. Publishing a BIM story uploads the story content to your BIM content management system.
For More Information on...
• blacklisted content, refer to the section Find Blacklisted Content in Your Stories.
• editing BIM stories, refer to the section Edit a BIM Story.
• adding stories to a running order, refer to the chapter Editing the Running Order.
• approving and publishing stories, refer to the chapter Approving and Publishing Stories.

