Hard Drive Replacement
The hard disk drive on the Frame CPU board must be specially formatted to be used by the switcher. If you are using an replacement drive that was not provided by Ross Video, you must install the drive in the frame and use the web interface to format the drive for use by the switcher.
Hard Drive Replacement
The replacement of the HDD on the Frame CPU board depends on the version of board you have.
- 4800AR-001-xx — uses a 2.5" laptop IDE drive, 80Gb or larger, that supports SMART
- 4800AR-002-xx — uses a 2.5" laptop SATA drive, non-AFD (supporting 512Byte sectors)
- 4810AR-002-xx — uses a 2.5" laptop SATA SSD (240GB or larger).
To Replace the Hard Drive (4800AR-001)
The replacement drive must be a blank/unformatted 80Gb or larger, 2.5" laptop IDE drive supporting SMART.
| Warning Hazardous Voltages: Hazardous voltages are present in this device as long as any of the power supplies are connected to the AC power. |
| ESD Susceptibility: Static discharge can cause serious damage to sensitive semiconductor devices. Avoid handling the switcher circuit boards in high static environments such as carpeted areas and when synthetic fiber clothing is worn. Touch the frame to dissipate static charge before removing boards from the frame and exercise proper grounding precautions when working on circuit boards. |
- Power off the switcher and remove the Frame CPU board.
-
Locate the drive on the Frame CPU board.
Figure 1. Drive Location on Fame CPU (4800AR-001) .png)
- Release the ribbon cable from the connector by pressing down and out on the ejector tabs at either end of the connector.
-
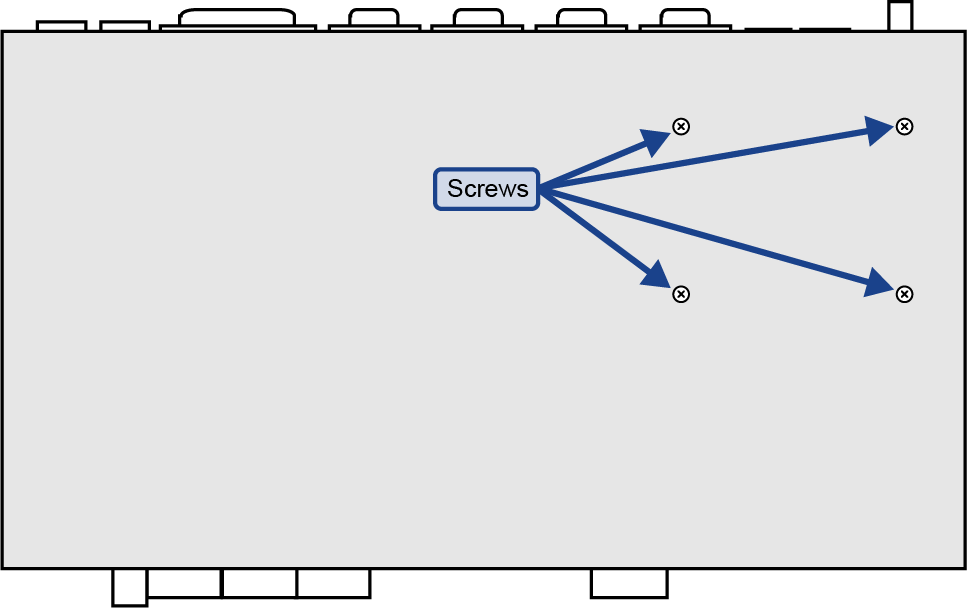
On the back of the board, remove the four (4) screws holding the drive to the board and remove the drive.
Note: There is a rubber spacer on each screw to isolate the drive from the board. You need to keep these spacers and screws for when you are installing the new drive.
Figure 2. Screws on CPU Board 
-
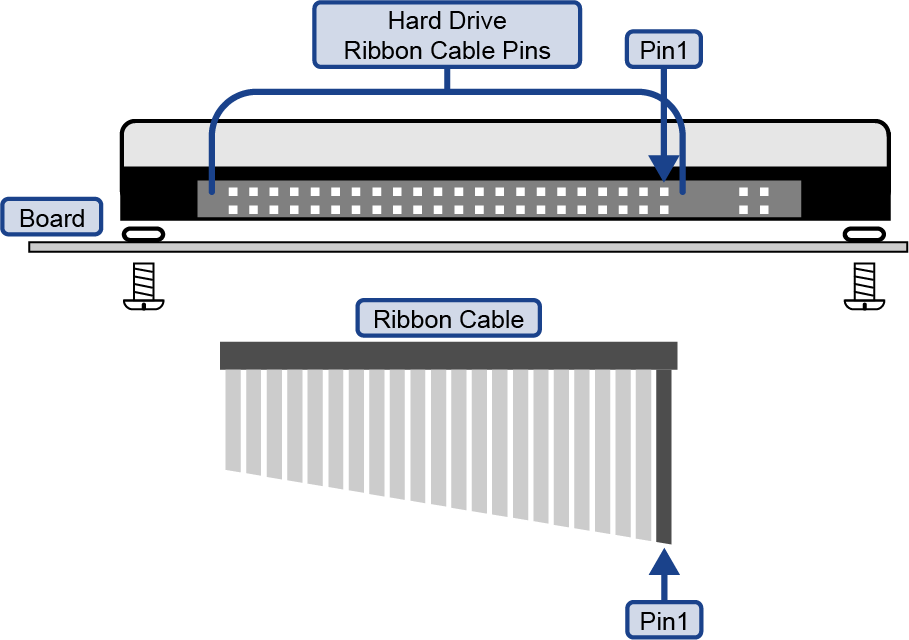
Remove the ribbon cable from the old drive and install it onto the new drive. Ensure that the stripe on the ribbon cable is aligned towards the
four unused pins.
Figure 3. Ribbon Cable Alignment 
-
Install the new drive onto the board using the screws and rubber spacers from the old drive.
Figure 4. Screws and Rubber Spacers .png)
- Push the ribbon cable into the cable connector until the ejector tabs at either end of the connector close together, securing the ribbon cable into the connector.
To Replace the Hard Drive (4800AR-002)
The replacement drive must be a blank/unformatted 2.5" laptop SATA drive, non-ADF (supporting 512Byte sectors).
| Warning Hazardous Voltages: Hazardous voltages are present in this device as long as any of the power supplies are connected to the AC power. |
| ESD Susceptibility: Static discharge can cause serious damage to sensitive semiconductor devices. Avoid handling the switcher circuit boards in high static environments such as carpeted areas and when synthetic fiber clothing is worn. Touch the frame to dissipate static charge before removing boards from the frame and exercise proper grounding precautions when working on circuit boards. |
- Power off the switcher and remove the Frame CPU board.
-
Locate the drive on the Frame CPU board.
Figure 5. Drive Location on Fame CPU (4800AR-002) .png)
-
On the back of the board, remove the four (4) screws holding the drive to the board and remove the drive.
Note: There is a rubber spacer on each screw to isolate the drive from the board. You need to keep these spacers and screws for when you are installing the new drive.
Figure 6. Screws on CPU Board 
-
Install the new drive onto the board by angling is slightly down towards the Hard Drive Connector and pushing it firmly into the
connector.
Figure 7. Screws and Rubber Spacers .png)
- Use the screws and rubber spacers from when you removed the old drive to secure the new drive to the board.
To Replace the Hard Drive (4810AR-002)
The replacement drive must be a blank/unformatted 2.5" laptop SATA SSD (240GB or larger).
| Warning Hazardous Voltages: Hazardous voltages are present in this device as long as any of the power supplies are connected to the AC power. |
| ESD Susceptibility: Static discharge can cause serious damage to sensitive semiconductor devices. Avoid handling the switcher circuit boards in high static environments such as carpeted areas and when synthetic fiber clothing is worn. Touch the frame to dissipate static charge before removing boards from the frame and exercise proper grounding precautions when working on circuit boards. |
- Power off the switcher and remove the Frame CPU board.
-
Locate the drive on the Frame CPU board.
Figure 8. Drive Location on Fame CPU (4800AR-002) .png)
-
On the back of the board, remove the four (4) screws holding the drive to the board and remove the drive.
Note: There is a rubber spacer on each screw to isolate the drive from the board. You need to keep these spacers and screws for when you are installing the new drive.
Figure 9. Screws on CPU Board 
-
Install the new drive onto the board by angling is slightly down towards the Hard Drive Connector and pushing it firmly into the
connector.
Figure 10. Screws and Rubber Spacers .png)
- Use the screws and rubber spacers from when you removed the old drive to secure the new drive to the board.
If the hard drive has not been previously formatted, the switcher will format the drive when it first boots up.
Formatting a Hard Drive
With a new hard drive installed, the web interface to the frame is used to format the drive for use by the switcher. All existing data on the drive will be lost.
To Format a Hard Drive (4800AR-001/002)
-
Open a web browser and navigate to the IP address of the frame.
Tip: The default name and password are user and password.
-
Click System Info.
The table entry for the hard drive is highlighted and states Hard disk not formatted. Select this link to Format Drive.
- Click Format Drive.
-
Enter the password abracadabra at the prompt and click
Proceed.
DONE! is shown when the formatting is complete.
To Format a Hard Drive (4810AR-002)
-
Open a web browser and navigate to the IP address of the frame followed by
/cgi-bin/format_hdd.
Tip: The default name and password are user and password.
-
Enter abracadabra at the magic word prompt and click
Proceed.
The switcher will restart and format the hard drive. The System Status page is shown when the formatting is complete.
