
To Record a New Clip
Use a channel transport to record the video signal coming into the server.
- Select the channel transport that you want to record a clip to. This is the channel for the BNC on the back of the server that the audio/video you want to record is coming in on. Not all channels will have an associated input BNC, depending on the model and configuration of your server.
- Eject any clip that may already be loaded into the channel transport.
-
Click the record button (
 ).
).
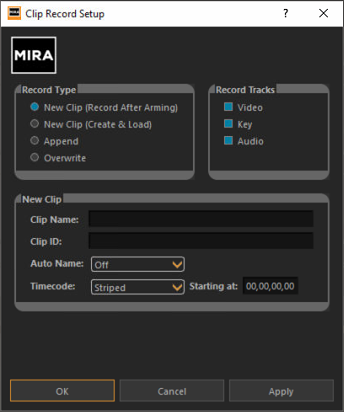
The Clip Record Setup dialog box is shown.
-
In the Record Type area, select the type of recording you want to do.
- New Clip (Record After Arming) — arms the channel transport for recording a new clip.
-
In the Record Tracks area, select which tracks you want to record.
Note: Audio is recorded depending on how the Audio Input Source is set in Mira Config.
- Video — record the video and any embedded audio coming into the Video In BNC, depending on the audio source.
- Audio — record the digital audio coming into the AES ports orthe embedded audio on the Video In BNC, depending on the audio source.
-
In the New Clip area, enter a name for the clip in the Clip Name field.
Tip: If you want to record the clip into a sub-folder on the media drive you must include the folder path with the new. For example, 1080p Clips\Downtown-Fire records the clip Downtown-Fire in the 1080p Clips folder. The folder must already exist in the Clip Library to be able to record to it.
-
Enter an 8-charater id for the clip in the Clip ID field.
If you are controlling the server from an external device, the clip id is used on the external device to load a clip. If you do not assign a clip id to the clip, the first 8 characters of the clip name can be used.
-
Turn Auto Name on if you want to create a series of clips with the same name plus an identifier.
- Off — overwrite any existing clip of the same name.
- Numeric Append — add a numeric digit to the end of the new clip name and increment it by one with each new clip of the same name.
- Time of Day — add the current date and time to the end of the clip name.
- LTC In — add a timecode stamp from the embedded timecode in the video signal being recorded.
-
Select a Timecode source for the new clip.
- Striped — use the internally generated timecode data. The starting point for the timecode is set in the Starting at field.
- External TC — use the timecode data embedded in the video signal being recorded.
-
Click OK.
The channel transport is now armed to record. The video window shows live video coming into the channel, the EE button is on, and the record button (
) is flashing. -
Click the flashing record button (
) when you are ready to record.
The server starts recording, the EE button goes off, and name of the new clip is shown at the top of the channel transport area, and the RECORDING indicator appears.
-
Click the stop (
 ) button to stop recording.