
Clip Control Area
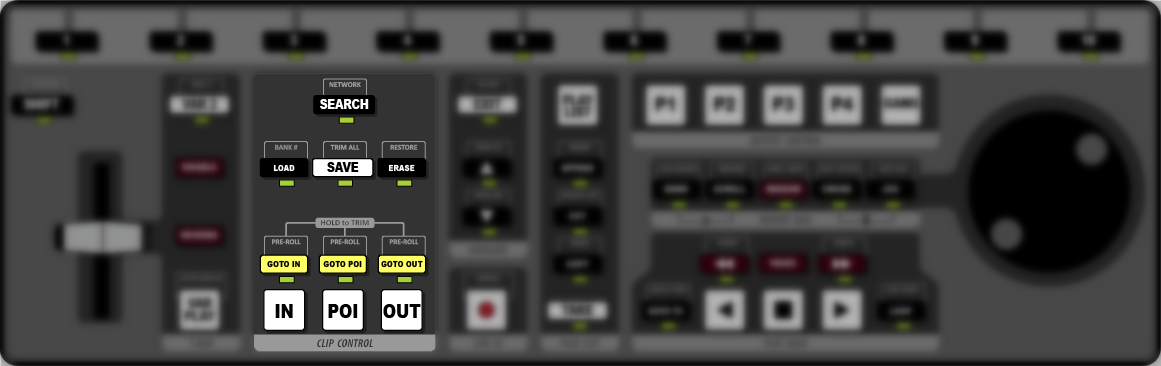
- SEARCH – use the keyboard to enter the name of a clip you want to find and press SEARCH. Press EXIT to return to normal operation.
- NETWORK – press SHIFT > SEARCH to open the Select Event menu. This list shows all the replay events on the server.
- LOAD – press LOAD to load the selected clip in the Clip Register. The selected playout channel goes into Clip Play mode.
- BANK # – use the keyboard to enter the number of the Clip Register bank you want to use and press SHIFT > LOAD.
- SAVE – store the current live recording to a clip or save the new in-point, out-point, and point of interest (POI) to the clip for the current camera.
- TRIM ALL – press SHIFT > SAVE to save the new in-point, out-point, and point of interest (POI) to the clip for all the cameras.
- ERASE – press ERASE to erase the current clip.
- RESTORE – press SHIFT > ERASE to undo the last erase.
- GOTO IN – press GOTO IN to jump to the in-point of the clip.Tip: press GOTO IN during LIVE EE mode to mark a point of interest and rewind by the Auto-mark In-point offset
- GOTO POI – press GOTO POI to jump to the point of interest of the clip.
- GOTO OUT – press GOTO OUT to jump to the out-point of the clip.
- PRE-ROLL – press SHIFT > GOTO IN, GOTO POI, GOTO OUT to jump to the start of the pre-roll interval for the selected point.
- IN – press IN to set a new in-point for the clip. The button glows red when the clip is at the in-point.
- POI – press POI to set a new point of interest for the clip. The button glows red when the clip is at the point of interest.
- OUT – press OUT to set a new out-point for the clip. The button glows red when the clip is at the out-point.