 Upload icon.
Uploading Media Through the Upload Panel
Use the Upload panel to upload one or multiple media files from a local file system to your Streamline Server. Some web browsers enable you to upload all the media files contained in a folder. When you upload media files through the Upload panel the assets that Streamline creates from the media files are stored in the Local folder of the Folders tree view.
To upload an asset through the Upload panel
1.In the main toolbar, click the Upload icon.
The Upload panel opens.
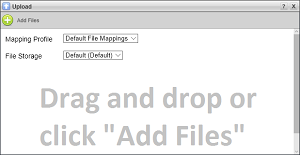
2.Use the Mapping Profile list to select the mapping profile to use to import media file metadata into the Streamline asset created by uploading a media file:
•Default File Mappings — refer to the section Default File Mappings to view mappings.
•Dublin Core — refer to the section Dublin Core to view mappings.
Your Streamline Server may contain additional mapping profiles.
3.Use the File Storage list to select the file storage to ingest the media file into your Streamline System.
A file storage sets the physical location to store the ingested media file along with setting the lifecycle, naming, folder path, validation, and triggers for the media file. Streamline contains a default file storage that you can use to ingest media files and store them in the default file system on your Streamline Server. Your Streamline System may also have custom file storages to ingested media files into the various file systems on your Streamline Server.
You cannot directly upload assets to an offline file storage, a file storage associated with Amazon S3 Glacier file system, but you send an asset to an offline file storage after uploading it to a regular Streamline file storage.
4.To select the media files to upload, perform one of the following actions:
•Drag and drop one or multiple media file from a local file system to the Upload panel. Some web browsers enable you to drag and drop folders from a local file system to the Upload panel to upload all the media files contained in the selected folder.
•Click the  Add Files icon in the Upload panel toolbar to open the Open dialog box. In the Open dialog box, select the media files to upload, and then click Open.
The Upload panel displays a preview for each media file selected for upload.
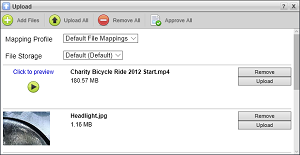
5.To remove a specific media file from the Upload panel that you do not want to upload, click the Remove button associated with the media file preview. Click the  Remove All icon in the Upload panel toolbar to remove all the media files from the Upload panel.
You can choose to remove a file from the Upload panel to avoid uploading it to the Streamline system. Removing a file from your selection is useful when you realize that some files are not required in the selection or you notice that you have selected the wrong file for upload.
6.To upload a specific media file, click the Upload button associated with the media file preview. Click the  Upload All icon in the Upload panel toolbar to upload all the media files listed in the Upload panel
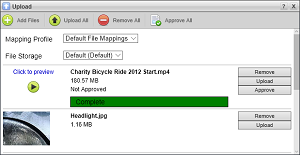
After successfully uploading a media file, Streamline updates the media file preview to show the upload as Complete but Not Approved. Streamline also adds a Approve button to the media file preview to enable you to approve the asset associated with the uploaded media file.
Streamline creates an asset for each successfully uploaded media file. You can open the Assets panel to view the assets contained in your Streamline Server. The assets that Streamline creates from media files uploaded through the Upload panel are stored in the Local folder of the Folders tree view.
For More Information on...
•the Folders tree view, refer the section Organizing Assets in Folders.
•approving assets, refer to the section Approving Assets on Ingest.