
After completing your custom attribute plan, you are ready to start the process of adding custom attributes to your Inception system. The following diagram illustrates the different phases of the custom attribute creation workflow.
Figure 1.1 Custom Attribute Creation Workflow
To create a custom attribute for an Inception entity
1.In the Configured Entities table, select the Inception entity to add a custom attribute.
2.Click Manage Attributes.
The Attributes page opens for the selected entity.
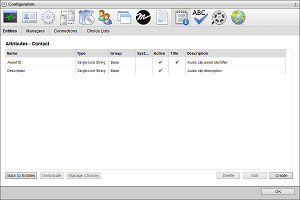
3.Click Create.
The Create Attribute page opens.
4.In the Name box, enter the column name to display for the custom attribute in the Inception grid associated with the entity.
5.In the Key Name box, enter the name to use as the identifier for the custom attribute. When you click in this box, Inception enters a suggested key name that you can edit.
You cannot change the Key Name of a custom attribute after you save the custom attribute.
Key Names also identify the custom attribute values in MOS messages and RSS feeds sent out from your Inception Server.
6.Use the Type list to select the type of data that users can enter in the custom attribute.
You cannot change the Type of a custom attribute after you save the custom attribute.
The available data types are as follows:
•Single-Line String — character string on a single line.
•Multi-Line String — character string on multiple lines, press Enter to start a new line.
•Integer — whole number without a fractional part.
•Decimal — decimal number that may contain a fractional part.
•Date — calendar date (year, month, day).
•Duration — duration time (hh:mm:ss).
•Date & Time — calendar date (year, month, day) and time of day (hh:mm:ss).
•Boolean — logical Boolean (true or false).
•User — a single Inception user.
•Multiple User — one or more Inception users.
•Choice — a single selection from a choice list.
•Multiple Choice — one or more selections from a choice list.
7.Depending on the selected Type for the custom attribute, continue creating your custom attribute with the following steps or procedures:
•Single-Line String — continue with step 8 in this procedure.
•Multi-Line String — continue with step 8 in this procedure.
•Integer — continue with step 8 in this procedure.
•Decimal — continue with step 8 in this procedure.
•Date — continue with step 8 in this procedure.
•Duration — continue with step 8 in this procedure.
•Date & Time — continue with step 8 in this procedure.
•Boolean — refer to the section Boolean Type Configuration.
•User — refer to the section User Type Configuration.
•Multiple User — refer to the section Multiple User Type Configuration.
•Choice — refer to the section Choice Type Configuration.
•Multiple Choice — refer to the section Multiple Choice Type Configuration.
8.Depending on the selected Type for the custom attribute, enter one of the following values to set the Minimum for the custom attribute:
|
Type |
Minimum Value |
|---|---|
|
Single-Line String |
Enter the minimum number of characters that the entered text must contain. |
|
Multi-Line String |
Enter the minimum number of characters that the entered text must contain. |
|
Integer |
Enter the minimum value for the entered whole number. |
|
Decimal |
Enter the minimum value for the entered decimal number. |
|
Date |
Use the Calendar tool to select the start date of the valid date range for the custom attribute. |
|
Time |
Enter the minimum duration for the entered time (hh:mm:ss). |
|
Date & Time |
Use the Calendar tool to select the start date and time of the valid date and time range for the custom attribute. |
9.Depending on the selected Type for the custom attribute, enter one of the following values to set the Maximum for the custom attribute:
|
Type |
Value |
|---|---|
|
Single-Line String |
Enter the maximum number of characters that the entered text must contain. |
|
Multi-Line String |
Enter the maximum number of characters that the entered text must contain. |
|
Integer |
Enter the maximum value for the entered whole number. |
|
Decimal |
Enter the maximum value for the entered decimal number. |
|
Date |
Use the Calendar tool to select the end date of the valid date range for the custom attribute. |
|
Time |
Enter the maximum duration for the entered time (hh:mm:ss). |
|
Date & Time |
Use the Calendar tool to select the end date and time of the valid date and time range for the custom attribute. |
10.Depending on the selected Type for the custom attribute, enter one of the following values to set the Default for the custom attribute:
|
Type |
Value |
|---|---|
|
Single-Line String |
Enter the default text for the custom attribute. |
|
Multi-Line String |
Enter the default text for the custom attribute. |
|
Integer |
Enter the default whole number value for the custom attribute. |
|
Decimal |
Enter the default decimal number value for the custom attribute. |
|
Date |
Use the Calendar tool to select the default date for the custom attribute. |
|
Time |
Enter the default time (hh:mm:ss) for the custom attribute. |
|
Date & Time |
Use the Calendar tool to select the default date and time for the custom attribute. |
Default Values must fall within the Minimum and Maximum values set for the custom attribute.
11.Click the Empty Cell Color color square.
The Color Picker opens.
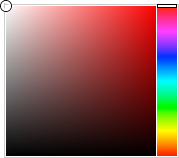
12.Use the Color Picker to select the background color that Inception uses to display custom attribute cells that do not contain data.
Drag the slider on the right side of the Color Picker to select a color, and then click in the area to the left to select the color shade. As you use the Color Picker, the color square displays the selected color and a box to the right displays the HTML color code of the selected color. You can also enter an HTML color code in the box to select a color. As you enter an HTML color code, the color square displays the color of the entered code.
13.For the Populated Cell Color setting, click the Back color square to use the Color Picker to select the background color that Inception uses to display custom attribute cells that contain data.
14.Click the Fore color square to use the Color Picker to select the text color that Inception uses to display custom attribute cells that contain data.
15.In the Description box, enter a description of the custom attribute.
Only the Create Attribute and Edit Attribute pages display the description of a custom attribute.
16.Click Save.
Inception adds the new custom attribute to the Attributes page of the selected entity.
17.To view the new custom attribute, open the Inception grid associated with the entity to which you added the custom attribute.