 Asset icon.
Streamline contains a default file storage that you can use to ingest media files and store them in the default file system on your Streamline Server. You can also create custom file storages to store ingested media files into the file systems on your Streamline Server. Before you create a file storage, use the File Systems tab to add a file system to store the media files that you ingest.
For More Information on...
•adding Streamline file systems, refer to the section Add a File System.
1.On the Configuration window toolbar, click the Asset icon.
The Asset panel opens.
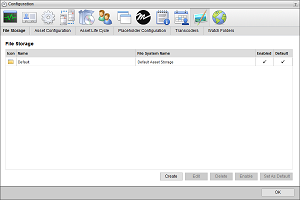
2.Click the File Storage tab.
The File Storage tab opens.
3.Click Create.
The Preset page opens.
4.Use the Type list to select the preset file storage definition with which to create a file storage. The selected Type automatically sets the required Naming Rules, Pathing Rules, Push Triggers, and/or Auto-Purge Rules properties for the new file storage. The properties set by the selected preset display below the Type list.
Select No Preset from the Type list to leave all file storage properties blank
5.Click Next.
The Setup page opens. The Steps list displays your progress through the new file storage creation procedure. You can also use the Steps list to revisit completed steps in the procedure.
An asterisk (*) identifies the required settings for which you must enter a value before continuing with the next step in creating a new file storage.
6.In the Name box, enter a name for the file storage.
7.In the Key Name box, enter the name to use as the identifier for the file storage. When you click in this box, Streamline enters a suggested Key Name that you can edit.
You cannot change the Key Name of a file storage after you save the file storage.
8.Use the File System list to select the Streamline file system in which to save media files that Streamline users ingest using the file storage.
You cannot change the file system associated with a file storage after you save the file storage.
The File System list only contains the file systems available on your Streamline Server. You can use the File Systems tab to view, add, and manage the file systems on your Streamline Server.
File systems that use Amazon S3 Glacier to archive assets on the Amazon Simple Storage Service must be associated with an offline file storage. To create an offline file storage for an Amazon S3 Glacier based file system, follow the procedure To create an offline file storage.
9.Select the Indexed check box to use the file storage to automatically ingest media files from in the associated file system associated that your Streamline Server does not contain. Streamline runs an indexing process in the background to find media files that your Streamline Server does not contain.
Clear this check box to not use the file storage to automatically ingest media files that your Streamline Server does not contain.
10.In the Indexed File Extensions box, enter the file extension that a media file must have for Streamline to ingest the file with the file storage from the associated file system. Clear this box to ingest media files that have any file extension. This box is only available when you select the Indexed check box.
Do not include the initial period with the file extensions that you enter.
When entering more than one file extension, use a comma (,) to separate the file extensions. For example, enter the following to ingest .avi, .m4a, and .mp4 media files:
avi, m4a, mp4
Inception will not ingest media files that have file extensions that differ from the indexed file extensions.
11.Select the Allow XMP Metadata Write for Supported Files check box to write XMP Metadata to supported files when ingesting media files into the file storage.
12.Use the Icon list to select an icon to identify the file storage.
If the icons in the list are not appropriate for the file storage, do the following:
a.Use the Icon list to select Upload an Icon.
Streamline displays a Browse button.
b.Click Browse.
The File Upload dialog box opens.
c.Use the File Upload dialog box to select the image file to use as the icon for the file storage.
d.Click Open.
Streamline adds the image contained in the selected image file to the Icon list as the Uploaded Icon option, and automatically selects the uploaded image as the icon for the file storage. You can only upload one image to the Icon list at a time. Uploading another image to the Icon list replaces the current uploaded image with the new image.
13.Click Next.
The Naming Rules page opens.
14.Use the Ingest Naming Rules box to define rules that set the case, length, and space character for the file names of the media files ingested using the file storage.
To add naming rules to the Ingest Naming Rules box, do the following:
a.Click Add.
Streamline adds a new blank naming rule to the Ingest Naming Rules box.
![]()
b.Use the Type list to select the type of naming rule to add to the file storage. The available naming rule types are as follows:
•Casing — select the capitalization for the media file name. Select the Uppercase option change all letters in a media file name to uppercase (SPORTS INTRO). Select the Lowercase option change all letters in a media file name to lowercase (sports intro).
•Max Length — set the maximum length of a media file name. In the Max Length box, enter the maximum number of characters (1 to 64) for a media file name. Streamline truncates media file name characters beyond the set Max Length. When this rule follows the Attach File Relation or the Add Unique Suffix rules the characters added to a file name by the rules are included in the set Max Length for the file name.
•Replace Spaces — replace the spaces in a media file name with underscore (_) characters. For example: the media file name Sports Intro would change to Sports_Intro.
•Attach File Relation — for non-essence files add the name of the relationship with the asset to the media file name, for example: thumbnail or proxy. Select one of the following options to set the location of the relationship name in the media file name:
›Append — add the relationship name to the end of the media file name.
›Prepend — add the relationship name to the start of the media file name.
•Add Unique Suffix — add a Streamline generated unique suffix to the end of the media file name. A suffix consists of an underscore ( _ ) character followed a unique ID number.
c.Click Add to add additional ingest naming rules as required. The Ingest Naming Rules box displays the ingest naming rules in the order that the file storage applies the rules to the file names of ingested media files. You can manage the ingest naming rules associated with a file storage as follows:
•Reposition — click and drag the  icon at the left side of an ingest naming rule to reposition the selected rule in the order that Streamline applies the rules to the file names of ingested media files.
•Delete — click the  icon in the upper right corner of an ingest naming rule to delete the selected rule from the list of rules that Streamline applies to the file names of ingested media files.
15.Click Next.
The Pathing Rules page opens.
16.Use the Ingest Pathing Rules box to define rules that set the directory storage path within a Streamline file system for the media files ingested using the file storage.
To add pathing rules to the Ingest Pathing Rules box, do the following:
a.Click Add.
Streamline adds a new blank pathing rule to the Ingest Pathing Rules box.
![]()
b.Use the Type list to select the type of pathing rule to add to the file storage. The available pathing rule types are as follows:
•Preserve File Path — append the directory path of the media file to the virtual path of the asset created for the ingested media file.
•Unique Folder — append a new and unique folder to the current directory path.
•Static Path — append a defined path to the current directory path. In the Path box, enter the path to append to the current directory path. The Path can contain forward slashes (/) to separate directories but cannot start or end with a forward slash.
•Asset Guid — append a new folder to the current directory path with the guid of the asset associated with the media file.
•File Guid — append a new folder to the current directory path with the guid of the media file.
c.Click Add to add additional ingest pathing rules as required. The Ingest Pathing Rules box displays the ingest pathing rules in the order that the file storage applies the rules to the storage path of ingested media files. You can manage the ingest pathing rules associated with a file storage as follows:
•Reposition — click and drag the  icon at the left side of an ingest pathing rule to reposition the selected rule in the order that Streamline applies the rules to the storage path of ingested media files.
•Delete — click the  icon in the upper right corner of an ingest pathing rule to delete the selected rule from the list of rules that Streamline applies to the storage path of ingested media files.
17.Click Next.
The Ingest Validations page opens.
18.Use the Ingest Validation Rules box to define the rules that validate the media files pushed to Streamline through a file storage.
To add validation rules to the Ingest Validation Rules box, do the following:
a.Click Add.
Streamline adds a new blank validation rule to the Ingest Validation Rules box.
![]()
b.Use the Type list to select the type of validation rule to add to the file storage. The available validation rule types are as follows:
•Require Asset Approval — only ingest media files associated with approved assets.
•Source Transcoder — only ingest media files with formats generated from selected transcoders. Use the Source Transcoders list to select one or more transcoders that generate media files with the appropriate formats to ingest.
›In the Transcoder list, select the check box to the left of each transcoder that generate media files with the appropriate formats to ingest.
›Clear the check box to the left of the transcoders that you do not want to select.
›Click or tap the  Close icon.
•Supported Files Filter — only ingest media files that match the filter defined in the Search Editor. Click Edit Filter to open the Search Editor dialog box to define a media file ingest filter.
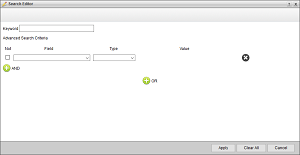
For more information about using the Search Editor, refer to the Using the Search Editor section in the Streamline User Guide.
c.Click Add to add additional ingest validation rules as required. The Ingest Validation Rules box displays the ingest validation rules in the order that the file storage applies the rules to validate a media file for ingestion. You can manage the ingest validation rules associated with a file storage as follows:
•Reposition — click and drag the  icon at the left side of an ingest validation rule to reposition the selected rule in the order that Streamline applies the rules to validate a media file for ingestion.
•Delete — click the  icon in the upper right corner of an ingest validation rule to delete the selected rule from the list of rules that Streamline applies to validate a media file for ingestion.
19.Click Next.
The Ingest Triggers page opens.
20.Use the Ingest Triggers box to define additional tasks to run for the media files ingested into the file storage.
To add ingestion triggers to the Ingest Triggers box, do the following:
a.Click Add.
Streamline adds a new blank trigger task to the Ingest Triggers box.
![]()
b.Use the Type list to select the type of trigger task to add to the file storage. The available trigger task types are as follows:
•Mirror — select one or more file storages to mirror to the current file storage. When one of the selected file storages ingests a media file, the current file storage also ingests the same media file. Use the File Storages list to select the file storages from which to mirror ingested media files.
•Rundown Studios — set the Inception Studio IDs from which to ingest media files when Inception monitors a rundown with a set Studio ID. When Inceptions monitors a rundown with one of the set Studio IDs, Streamline uses this file storage to ingest the media files from the rundown that are not contained in your Streamline Server. In the Studio IDs box, enter the associated studio IDs to trigger this task. Use a comma (,) to separate studio IDs.
c.Click Add to add additional trigger tasks as required. The Ingest Triggers box displays the ingest trigger tasks in the order that they run when the file storage ingests a media file. You can manage the ingest trigger tasks associated with a file storage as follows:
•Reposition — click and drag the  icon at the left side of an ingest trigger task to reposition the selected trigger in the order that Streamline runs the triggers when the file storage ingests a media file.
•Delete — click the  icon in the upper right corner of an ingest trigger task to delete the selected trigger from the list of triggers that Streamline runs when the file storage ingests a media file.
21.Click Next.
The Auto-Purge Rules page opens.
22.Use the Auto-Purge Rules box to define rules to automatically delete assets from a file storage.
To add auto-purge rules to the Auto-Purge Rules box, do the following:
a.Click Add.
Streamline adds a new blank auto-purge rule to the Auto-Purge Rules box.
![]()
b.Use the Type list to select the type of auto-purge rule to add to the file storage. The available auto-purge rule types are as follows:
•Pushed via MOS — select this rule type to delete assets pushed via MOS to a rundown after a set amount of time.
›In the Expiry box, enter the amount of time to wait after an asset is last reference by a rundown before deleting the asset from the file storage.
›Use the list the right of the Expiry box to select the time unit for the time amount entered in the Expiry box.
c.Click Add to add additional auto-purge rules as required. The Auto-Purge Rules box displays the auto-purge rules in the order that they run when Streamline pushes an asset from the file storage to a rundown via MOS. You can manage the auto-purge rules associated with a file storage as follows:
•Reposition — click and drag the  icon at the left side of an auto-purge rule to reposition the selected rule in the order that Streamline runs the rules when Streamline pushes an asset from the file storage to a rundown via MOS.
•Delete — click the  icon in the upper right corner of an auto-purge rule to delete the selected rule from the list of rules that Streamline runs when Streamline pushes an asset from the file storage to a rundown via MOS.
23.Click Finish.
The Auto-Purge Rules page closes and Streamline adds the new file storage to the File Storage table in the File Storage tab.