 System Monitor icon.
Streamline enables to add your own monitors to monitor the remaining storage space on a disk or the connectivity between your Streamline Server and a web site. The Monitors tab of the System Monitor panels enables you to add, edit, and delete user defined monitors.
To add a user defined monitor to the System Health tab
1.On the Configuration window toolbar, click the System Monitor icon.
The System Monitor panel opens.
2.Click the Monitors tab.
The Monitors tab opens.
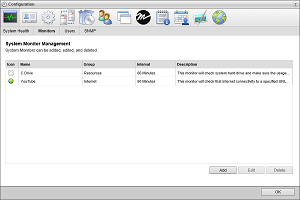
3.Click Add.
The Create New System Monitor page opens.
4.Use the Monitor list to select the type of monitor to add. The available monitor types are as follows:
•Disk Usage Monitor — check a selected hard drive to make sure that the available storage does not fall below a set level.
•Internet Connectivity Monitor — check that there is connectivity between the Streamline Server and a selected web site.
5.Click Next.
Depending on the type of monitor you are adding, the Add a Disk Usage Monitor or Add an Internet Connectivity Monitor page opens.
6.Define the selected monitor as follows:
Disk Usage Monitor
a.In the Name box, enter a name for the monitor.
b.In the Interval box, enter the amount of time to wait between checks of available hard disk space.
c.Use the list to the right of the Interval box to select Minute(s) or Second(s) as the time unit for the time entered in the Interval box.
d.Use the Drive list to select the Streamline Server computer hard drive to monitor.
e.In the Minimum Free Space box, enter the minimum amount of disk space that the selected Drive must contain. The monitor reports an Error when the available space on a Drive drops below the set minimum disk space.
f.Use the list to the right of the Minimum Free Space box to select Gigabyte(s) or Megabyte(s) as the disk space unit for the amount entered in the Minimum Free Space After box.
Internet Connectivity Monitor
a.In the Name box, enter a name for the monitor.
b.In the Interval box, enter the amount of time to wait between connectivity checks for a web site.
c.Use the list to the right of the Interval box to select Minute(s) or Second(s) as the time unit for the time entered in the Interval box.
d.In the URL box, enter the web address (for example: http://www.rossvideo.com) of the web site that you want to check connectivity with the Streamline Server.
7.Click Save.
Streamline adds the new monitor to the System Monitor Management list.
To edit a user defined monitor
1.In the System Monitor Management list, select the monitor to edit.
2.Click Edit.
Depending on the type of monitor you are editing, the Edit Disk Usage Monitor or Edit Internet Connectivity Monitor page opens.
3.Edit production monitor settings as required.
4.After completing the required monitor setting edits, click Save.
To delete a user defined monitor
1.In the System Monitor Management list, select the monitor to delete.
2.Click Edit.
A confirmation message opens, asking whether you want to delete the selected monitor. To keep the monitor, click Cancel.
3.In the confirmation message, click OK.
Streamline deletes the selected monitor from the System Monitor Management list and the System Monitors tree view on the System Health tab.