The graphics controlled from the Quorum user interface Graphics panel are run by XPression graphics system that is part of your Quorum system. The XPression graphics that you configure in the Graphics panel are added to the Quorum user interface Graphics panel.
To add XPression graphics to the Quorum user interface Graphics panel
Quorum opens.
2.On the main toolbar, click the ![]() System Configuration icon.
System Configuration icon.
The System Configuration window opens.
3.In the Devices section of the side navigation, click Graphics.
The Graphics panel opens.
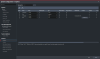
4.Use the DataLinq Port box to enter or select the port number that the XPression graphics system uses for DataLinq connections.
XPression uses the DataLinq connection to populate graphics with data entered in Quorum.
This is the output for Preview graphics.
5.In the Graphics panel toolbar, click ![]() Add.
Add.
Quorum adds a new graphic to the Graphics panel.
6.In the Name column, enter a name for the graphic.
The Quorum user interface Graphics panel will display this name to identify the graphic.
7.Use the list in the Group column to select the graphics group for the graphic.
8.In the DataLinq Index column, enter the index to pass to DataLinq when the graphic is turned on or off.
9.Use the list in the Type column to select the type of data entry control to display in the Quorum user interface Graphics panel for the graphic. The available controls are as follows:
•AUTO — use the fields that are automatically updated by Quorum. For example: who is on program and who is on preview.
•LIST — use the list of items entered in the List Items column.
•ATTENDEE_LIST — use a list of the attendees.
•TEXT — use a text entry box.
•NODATA — do not use a data control for the graphic.
•CONTACT_LIST — use a list of all the contacts from Contact Manager.
10.In the Preview Take ID box, enter the XPression TakeID of the graphic to run when this graphic is turned on in Preview.
11.In the Program Take ID box, enter the XPression TakeID of the graphic run when this graphic is turned on in Program.
12.In the Default Value box, enter the default text to display in text entry boxes.
13.Use the List column to create an item list that operators can select data to include with a graphic. To create an item list, complete the following steps:
a.In the Type column, select LIST.
b.In the List Items column, click Edit List.
The Edit List Items dialog box opens.
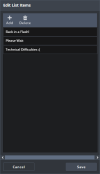
c.In the Edit List Items dialog box toolbar, click ![]() Add.
Add.
Quorum adds an list item labeled New Option.
d.Edit the New Option label text to enter text for your list item.
e.Add additional list items as required.
f.To delete a list item, select it and then click ![]() Delete in the toolbar.
Delete in the toolbar.
g.After adding the required list items, click Save.
Quorum saves list and closes the Edit List Items dialog box.
14.In the On Bank column, enter the number of the custom control bank that contains the custom control to run when the graphic turns on.
15.In the On CC column, enter the number of the custom control in the selected bank to run when the graphic turns on.
16.In the Off Bank column, enter the number of the custom control bank that contains the custom control to run when the graphic turns off.
17.In the Off CC column, enter the number of the custom control in the selected bank to run when the graphic turns off.
18.Click Save.
Quorum saves the XPression graphics added to the Quorum user interface Graphics panel.
19.Click Done when you want to close the System Configuration window.
When the System Configuration window contains unsaved changes, the Unsaved Changes alert opens to enable you to save your changes before closing the window.
Change the Display Order of Graphics in the Graphics Panel
The display order of graphics in the System Configuration Graphics panel is also the order that the Graphics panel lists graphics. You can use the Order column to change the display order of graphics in the Graphics panel.
To change the display order of graphics in the Graphics panel
1.In the Graphics panel list, place the mouse pointer over the  icon in Order column of the graphic to reposition.
2.Click and hold the on the icon.
3.Drag the selected graphic to a new position in the Graphics panel list.
4.With the graphic at desired new position, release the mouse button.
The Graphics panel list updates to show the selected graphic at the selected position.
Edit a Graphic
You can edit the properties of a graphic at any time.
1.In the Graphics panel, locate the graphic to edit.
2.Edit the graphic as required.
3.Click Save.
Quorum saves the updated graphic.
Delete a Graphic
When you no longer require a graphic on the Quorum user interface Graphics panel, you can delete the graphic from the Graphics panel.
1.In the Graphics panel, select the graphic to delete.
Quorum highlights the selected graphic.
2.In the Graphics panel toolbar, click ![]() Delete.
Delete.
Quorum deletes the selected graphic from the Graphics panel.
3.Click Save.
Quorum saves your graphics updates.