 SOURCE CONTROL icon.
Controlling Camera Position, Focus, and Iris
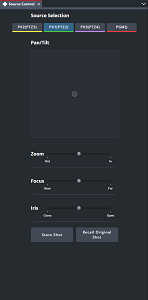
The Source Control panel enables you to control the camera used by the selected source. You can select a source for camera control from the Multiviewer panel or the Source Control panel. You can control a camera in the following ways using the Source Control panel controls, keyboard shortcuts, or a joystick:
•Pan — horizontally rotate the camera right or left.
•Tilt — vertically rotate the camera up or down.
•Zoom — change the focal length of the lens to make the image larger or smaller.
•Focus — adjust the camera lens to produce a clear image.
•Iris — control the amount of light passing through the lens.
For More Information on...
•configuring keyboard shortcuts, refer to the section Creating Shortcut Groups.
•selecting a joystick for source control, refer to the section Selecting a Joystick for Source Control.
To control the camera used by the a selected source
1.In the side navigation, click the SOURCE CONTROL icon.
The Source Control panel opens.
After opening the Source Control panel, you can position it to best suit your workflow.
2.In the Multiviewer panel, select the Preview pane that is using the camera that you want to control. You can also use the Source buttons in the Source Selection section of the Source Control panel to select the camera to control.
Quorum adds the  Source Control icon to the selected Preview pane to indicate the camera under your control.
3.Pan the camera right or left in the horizontal axis using one of the following methods:
•Source Control panel — in the Pan/Tilt section, click and drag the crosshair handle to the right to horizontally rotate the camera to the right. Drag the crosshair handle to the left to horizontally rotate the camera to the left. The farther you drag the crosshair handle from the center of the Pan/Tilt section, the faster the camera moves.
At the required camera position, release the mouse button. The crosshair handle returns to the center of the Pan/Tilt section.
•Keyboard Shortcut — press the key assigned to the Pan right command to horizontally rotate the camera to the right. Press the key assigned to the Pan left command to horizontally rotate the camera to the left.
•Joystick — use the axis assigned to the Pan right command to horizontally rotate the camera to the right. Press the axis assigned to the Pan left command to horizontally rotate the camera to the left.
4.Tilt the camera up or down in the vertical axis using one of the following methods:
•Source Control panel — in the Pan/Tilt section, click and drag the crosshair handle upwards to vertically rotate the camera up. Drag the crosshair handle downwards to vertically rotate the camera down. The farther you drag the crosshair handle from the center of the Pan/Tilt section, the faster the camera moves.
At the required camera position, release the mouse button. The crosshair handle returns to the center of the Pan/Tilt section.
•Keyboard Shortcut — press the key assigned to the Tilt up command to vertically rotate the camera upwards. Press the key assigned to the Tilt down command to vertically rotate the camera downwards.
•Joystick — use the axis assigned to the Tilt up command to vertically rotate the camera upwards. Use the axis assigned to the Tilt down command to vertically rotate the camera downwards.
5.Zoom in or out on the mark using one of the following methods:
•Source Control panel — in the Zoom section, click and drag the slider to the right to zoom in on the mark. Drag the slider to the left to zoom out from the mark. The farther you drag the slider from the center of the Zoom section, the faster the camera zooms.
At the required zoom level, release the mouse button. The slider returns to the center of the Zoom section.
•Keyboard Shortcut — press the key assigned to the Zoom in command to zoom in on the mark. Press the key assigned to the Zoom out command to zoom out from the mark.
•Joystick — press the button assigned to the Zoom in command to zoom in on the mark. Press the button assigned to the Zoom out command to zoom out from the mark.
6.Focus on a mark using one of the following methods:
•Source Control panel — in the Focus section, click and drag the slider to the right to focus on marks that are far from the camera. Drag the slider to the left to focus on marks that are near to the camera. The farther you drag the slider from the center of the Focus section, the faster the camera focuses.
At the required focus distance, release the mouse button. The slider returns to the center of the Focus section.
•Keyboard Shortcut — press the key assigned to the Focus far command to focus on marks that are far from the camera. Press the key assigned to the Focus near command to focus on marks that are near to the camera.
•Joystick — press the button assigned to the Focus far command to focus on marks that are far from the camera. Press the button assigned to the Focus near command to focus on marks that are near to the camera.
7.Control the amount of light passing through the camera lens using one of the following methods:
•Source Control panel — in the Iris section, click and drag the slider to the right to open up the camera iris and increase the amount of light that passes through the camera lens. Drag the slider to the left to close down the camera iris and reduce the amount of light that passes through the camera lens. The farther you drag the slider from the center of the Iris section, the faster the camera lens iris changes.
At the required iris setting, release the mouse button. The slider returns to the center of the Iris section.
•Keyboard Shortcut — press the key assigned to the Iris open command to open up the camera iris and increase the amount of light that passes through the camera lens. Press the key assigned to the Iris close command o close down the camera iris and reduce the amount of light that passes through the camera lens.
•Joystick — press the button assigned to the Iris open command to open up the camera iris and increase the amount of light that passes through the camera lens. Press the button assigned to the Iris close command o close down the camera iris and reduce the amount of light that passes through the camera lens.
8.To return the camera position to the Shot # selected for the source you are controlling, click Recall Original Shot.
9.To update the Shot # selected for the source you are controlling with the current camera position, click Store Shot.
An Alert opens to inform you of the shot change.
![]()