 Story Browser icon.
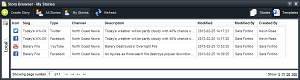
The Story Browser panel displays the stories that you or other Inception users created or modified on the Inception Server.
To open the Story Browser panel
1.From the main toolbar, click or tap the Story Browser icon.
The Story Browser panel opens.
2.In the Story Browser panel toolbar, click or tap the  Stories icon.
The Stories tab opens, listing the stories that you created or modified on the Inception Server.
When the Story Browser panel cannot display all the available stories on a single page, use the following controls in the bottom toolbar of the Story Browser panel to view all the available stories:
•Showing page number — enter in this box the page number of stories to view in the Stories table, then click or tap a blank area of the Story Browser panel to display the selected page.
• — click or tap this button to view the first page of stories in the Stories table.
• — click or tap this button to view the previous page of stories in the Stories table.
• — click or tap this button to view the next page of stories in the Stories table.
• — click or tap this button to view the last page of stories in the Stories table.
•Show — click or tap the following links to set the number of stories to display in the Stories table:
›5 — display 5 stories in the Stories table.
›25 — display 25 stories in the Stories table.
›50 — display 50 stories in the Stories table.
›100 — display 100 stories in the Stories table.
3.To view all the stories on an Inception Server, click or tap the  All Stories icon in the Story Browser toolbar.
The Story Browser panel updates and displays all the stories created or modified on the Inception Server by any Inception user.
4.To filter the stories displayed in the Story Browser panel, click or tap the following icons in the toolbar:
• Created By Me — stories created by the currently logged in Inception user.
• Assigned To Me — stories assigned to the currently logged in Inception user.
• Modified By Me — stories modified by the currently logged in Inception user.
The Story Browser panel updates and displays only the selected stories.
5.To filter the Story Browser panel, complete the following steps:
a.Click or tap the  Filter icon in the Story Browser toolbar.
The Filter box opens below the toolbar.
b.In the Filter box, enter a portion of the following attributes associated with the story you are looking for:
•Slug
•Segment
•Type
•Running Order
You do not need to enter the start of an attribute, just any portion of an attribute filters the Story Browser panel. The Story Browser panel automatically updates to display only the stories with attributes that contain the text entered in the Filter box.
c.To close the Filters box, click or tap the  Filter icon in the Story Browser toolbar.
Closing the Filters box clears the entered filter and displays all the available stories in the Story Browser panel.
6.To change the columns displayed in the Story Browser panel, complete the following steps:
a.In the Story Browser panel, right-click the title of any table column.
The Columns list opens.
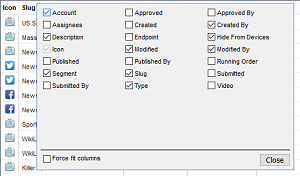
b.Select Story Browser columns as follows:
•To include a column, select the check box to the left of the column name.
•To remove a column, clear the check box to the left of the column name.
c.Select the Force fit columns check box to automatically resize column widths to the table content.
d.Click Close.
e.Click and drag columns to reposition columns in the Stories table.
f.Click and drag column dividers to manually resize the width of individual columns.
7.To review additional story properties, double-click or double-tap the story to open it in the Story Editor.
For More Information on...
•using folders to organize stories in the Story Browser panel, refer to the chapter Organizing Content in Folders.