 Playlists icon.
A playlist contains Inception created content items, content items gathered from feeds, or both. Taking a playlist online makes all approved items in the playlist available to external systems.
1.From the main toolbar, click or tap the Playlists icon.
The Playlist Manager panel opens.
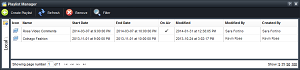
When the Playlist Manager panel cannot display all the available playlists on a single page, use the following controls in the bottom toolbar of the Playlist Manager panel to view all the available playlists:
•Showing page number — enter in this box the page number of playlists to view in the Playlists table, then click or tap a blank area of the Playlist Manager panel to display the selected page.
• — click or tap this button to view the first page of playlists in the Playlists table.
• — click or tap this button to view the previous page of playlists in the Playlists table.
• — click or tap this button to view the next page of playlists in the Playlists table.
• — click or tap this button to view the last page of playlists in the Playlists table.
•Show — click or tap the following links to set the number of playlists to display in the Playlists table:
›5 — display 5 playlists in the Playlists table.
›25 — display 25 playlists in the Playlists table.
›50 — display 50 playlists in the Playlists table.
›100 — display 100 playlists in the Playlists table.
2.From the Playlist Manager toolbar, click or tap the  Create Playlist icon.
The New Playlist dialog box opens.
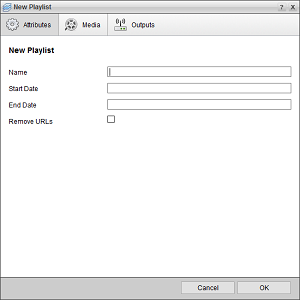
3.In the Name box of the Attributes tab, enter a name for the playlist.
4.Select a Start Date for the playlist as follows:
a.Click or tap the Start Date box to open the Calendar tool.
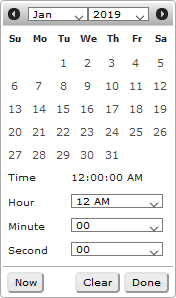
b.In the Date selector, click or tap the start date.
The Date selector shows the current month. To view the calendar for a different month, click or tap the Arrows on either side of the month name.
c.Use the Hour, Minute, and Second lists to specify the start time.
Alternatively, you can click or tap Now to select the current date and time.
d.Click Done.
5.Select an End Date for the playlist as follows:
a.Click or tap the End Date box to open the Calendar tool.

b.In the Date selector, click or tap the end date.
The Date selector shows the current month. To view the calendar for a different month, click or tap the Arrows on either side of the month name.
c.Use the Hour, Minute, and Second lists to specify the end time.
Alternatively, you can click or tap Now to select the current date and time.
d.Click or tap Done.
6.Select the Remove URLs check box to remove URLs from the description of playlist items created by adding content items to the playlist.
7.To configure video and image conversion settings that Inception uses to convert videos and images added to the playlist, click the Media tab.
The Media tab opens.
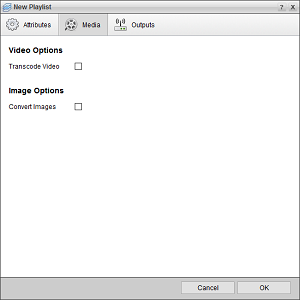
8.In the Video Options section, select the Transcode Video check box to transcode videos added to the playlist to the codec selected from the Video Codec list.
9.Use the Video Codec list to select the video codec to which to transcode videos added to the playlist. The available codecs are as follows:
•H.264/MPEG-4 — high definition digital video
•XPression — Ross Video XPression real-time motion graphics system playout
This list is only available when you select the Transcode Video check box.
10.Select the Adjust Frame Rate check box change the frame rate of the videos added to the playlist to the frame rate selected from the Video Frame Rate list. This check box is only available when you select the Transcode Video check box.
11.Use the Video Frame Rate list to select the video frame rate to which to change videos added to the playlist. The available frame rates are as follows:
•24
•25
•29.97
•30
•50
•59.94
•60
This list is only available when you select the Adjust Frame Rate check box.
12.In the Image Options section, select the Convert Images check box to convert the image format of images added to the playlist to the image format selected from the Image Format list.
13.Use the Image Format — list to select the image format to which to change images added to the playlist. The available image formats are as follows:
•JPEG — Joint Photographic Experts Group
•PNG — Portable Network Graphic
•Targa — Truevision TGA
This list is only available when you select the Convert Images check box.
14.Select the Resize Images check box to change the size of the images added to the playlist at a size no larger than the size set in the Maximum Width and Maximum Height boxes. This check box is only available when you select the Convert Images check box.
15.Enter in the Maximum Width box the maximum width in pixels to which to resize images added to the playlist. This box is only available when you select the Resize Images check box.
16.Enter in the Maximum Height box the maximum height in pixels to which to resize images added to the playlist. This box is only available when you select the Resize Images check box.
17.To define a changeable virtual ID for the new playlist, click the Outputs tab. A virtual ID enables you to use the playlist with different external applications or systems without having to change the playlist RSS feed URL in the external application or on the external system used to access playlist content.
The Outputs tab opens.

18.Select the Use Virtual ID check box to use a virtual ID to output playlist content through a Virtual RSS Feed URL along with the Direct RSS Feed URL.
19.Use the Existing IDs list to select an existing virtual ID from which to create the Virtual RSS Feed URL for the new playlist.
Selecting an existing virtual ID that is currently assigned to a playlist removes the virtual ID from the playlist and assigns it to the new playlist. The existing playlist no longer outputs content through a Virtual RSS Feed URL, but it continues to output content through its Direct RSS Feed URL.
20.If the Existing IDs list does not contain a virtual ID that you want to assign to the new play list, enter in the Virtual ID box the virtual ID from which to create the Virtual RSS Feed URL for the new playlist.
21.Click or tap OK.
A new and empty playlist opens in the Playlist panel ready for you to add items to it.
For More Information on...
•creating items, refer to the section Create Content Items in a Playlist.
•adding items from a Feed Viewer, refer to the section Add Content Items to a Playlist.
•deleting items, refer to the section Remove Selected Playlist Items from a Playlist.
•using folders to organize playlists in the Playlist Manager panel, refer to the chapter Organizing Content in Folders.