 Assignment Manager icon.
The story development process starts when you create a story assignment. After creating a story you can use the Assignment Editor to add the following information to an assignment:
•Content — enter research information gathered for a story.
•Stories — Broadcast and social media stories created from an assignment.
•MOS Objects — MOS objects related to a story.
•Attachments — attach text, audio, image, or video files related to a story.
•x.news — use the x.news information aggregation tool to gather content across multiple platforms.
1.From the main toolbar, click the Assignment Manager icon.
The Assignment Manager panel opens, showing a list of current assignments for the date or date range displayed in the title bar of the panel.

2.In the Assignment Manager panel, click the  Create Assignment icon.
The New Assignment dialog box opens.
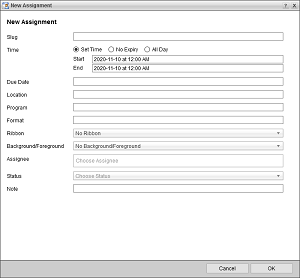
3.In the Slug box, enter a brief description of the assignment for internal use.
When you create a story from within an assignment, Inception uses the assignment Slug to set the Slug for the new story. If required, you can edit the story Slug.
4.Use the Time setting as follows to set the time duration for an assignment:
To set no expiry time for an assignment
a.In the Time setting, select the No Expiry option.
b. Skip to step 5. .
To set the start and end time for an assignment
a.In the Time setting, select the Set Time option.
b.Click in the Start box to open the Calendar tool.
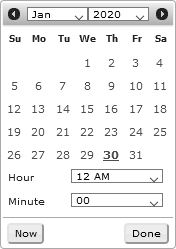
c.In the Date selector, click the start date.
To view a different month or year, use the Month and Year lists to select a month and year to view.
d.Use the Hour and Minute lists to specify the start time.
Alternatively, you can click or tap Now to select the current date and time.
e.Click Done.
a.Click in the End box to open the Calendar tool.
b.In the Date selector, click the end date.
To view a different month or year, use the Month and Year lists to select a month and year to view.
c.Use the Hour and Minute lists to specify the end time.
Alternatively, you can click or tap Now to select the current date and time.
d.Click Done.
e. Skip to step 5. .
To set the start and end date for an assignment
a.In the Time setting, select the All Day option.
a.Click in the Start box to open the Calendar tool.
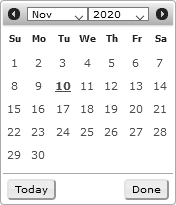
b.In the Date selector, click the start date.
To view a different month or year, use the Month and Year lists to select a month and year to view.
c.Click Done.
a.Click in the End box to open the Calendar tool.
b.In the Date selector, click the end date.
To view a different month or year, use the Month and Year lists to select a month and year to view.
c.Click Done.
5.Select the Due Date for the assignment as follows:
a.For assignments that do not require a due date, leave the Due Date box empty.
b.Click the Due Date box to open the Calendar tool.
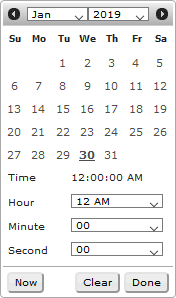
c.In the Date selector, click the due date.
The Date selector shows the current month. To view the calendar for a different month, click the Arrows on either side of the month name.
d.Use the Hour, Minute, and Second lists to specify the start time.
Alternatively, you can click or tap Now to select the current date and time.
e.If you do not want set a due date for the assignment, click Clear.
f.Click Done.
6.In the Location box, enter a location for the assignment.
7.In the Program box, enter the name of the program associated with the assignment.
8.In the Format box, enter the format (SOT, VO, PKG) for the assignment.
9.Use the Ribbon list to select the color to display for the assignment in the Ribbon column of the Assignment Manager panel.
To search for a ribbon color, start typing the name of the ribbon color in the Ribbon box. The Ribbon list automatically updates to display only the ribbon colors that match the text entered in the Ribbon box.
10.Use the Foreground/Background list to select the foreground (text) and background color scheme with which to display the assignment in the Assignment Manager panel.
To search for a color scheme, start typing the name of the color scheme in the Foreground/Background box. The Foreground/Background list automatically updates to display only the color schemes that match the text entered in the Foreground/Background box.
11.Click in the Assignee box to use the list that opens to select the Inception users for the assignment. Click on a user to add the user to the Assignee box. To select multiple users for an assignment, Ctrl-click each user to add to the Assignee box. To remove a user from the Assignee box, click the x to the right to the user to remove.
To search for an assignee, start typing the name of the assignee in the Assignee box. The Assignee list automatically updates to display only the assignees that match the text entered in the Assignee box.
12.Use the Status list to select the current status of the assignment.
To search for a status, start typing the name of the status in the Status box. The Status list automatically updates to display only the statuses that match the text entered in the Status box.
13.In the Note box, enter any additional information that Inception users may require to complete the assignment.
14.Click OK.
Inception adds the new assignment to the Assignment Manager. You may need to change the current date or date range for the Assignment Manager to view your new assignment. When enabled, Inception also sends an assignment notification e-mail to each of the users assigned to an assignment.
The new assignment also opens in the Assignment Editor.

For More Information on...
•enabling assignment notification e-mails, refer to the Inception Configuration Guide.