
Clip Player Interface
The clip player interface (Click Navigation Menu > Live Assist > Media > Clip Player) provides basic transport controls and clip management.
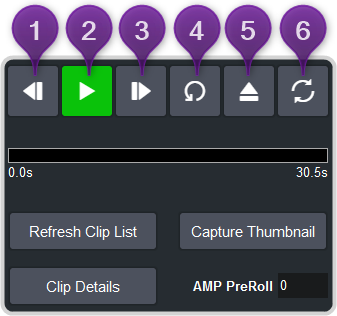
Transport Controls
- Step Back — Step backwards by 1/10 second.
- Play/Pause — Play the current clip forward at 1-times normal speed.
- Step Forward — Step forward by 1/10 second.
- Re-cue — Re-cue the current clip to the first frame.
- Eject — Eject the current clip from the clip player channel. The thumbnail preview shows no clip selected and the output is black.
- Loop — Toggle loop mode on where the clip starts playing again from the start after it reaches the end.
The progress bar below the transport control buttons shows the progress of the playout of the clip. The number at the left of the progress bar is clip timecode, and the number at the right is the time remaining. You can click on any point on the progress bar to jump to that point in the clip.
Clip Control
Below the transport controls are a number of buttons for managing clip lists and setting the pre-roll time.
- Refresh Clip List — Refreshes the list of clips found on the USB. If you add a clip directly to the USB via FTP, you must refresh the list for the new clip(s) to appear in the list.
- Capture Thumbnail — Captures the current frame of the clip for use as a thumbnail of the clip. You can use the progress bar to jump to the frame you want to use.
- Clip Details — Displays a popup with details on the video and audio properties of the clip that is currently loaded.
- AMP PreRoll — Enter the pre-delay (pre-roll) interval (in frames) that the switcher waits after the clip player starts playing and before taking the input source on-air. Depending on the clip you are playing, you may have to increase this value to ensure that your clip is playing just as it is transitioned on-air. This value is used with the Roll Clip transition functionality.
Panel Control
When you select the clip player on a bus on the control panel, the menu follows and allows you to select and cue a clip. Press NEXT to access the additional commands.
- Use the Clips knob to select the clip you want to load into the clip player.Tip: Press the Clips knob to refresh the clip list and jump to the first clip in the list. This is useful when you add or delete a clip from the directory.
- Press the Cue knob to cue the selected clip.
- Press the Play knob to play the cued clip.
- Press the Stop knob to stop the clip.
- Press the Lp On knob to turn looping on.
- Press the Lp Off knob to turn looping off.
Custom Control
The Video Server custom controls can be used to control the clip player. When you are creating the custom control, select the ClipPlyr video server as the target device.