
To Set Up an Input FSFC (SD or HD Only)
In SD or HD, configure the FSFC that has been assigned to the input. The conversion that is available depends on the format the switcher is operating in and the input that is being converted.
Note: If you do not have the CUF-ADD-I/OPLUS option activated, an I/O Processor must be assigned to the input first.
- Click Navigation Menu > Configuration > Inputs > External.
-
Click the Configure button for the input you want to assign an FSFC to.
-
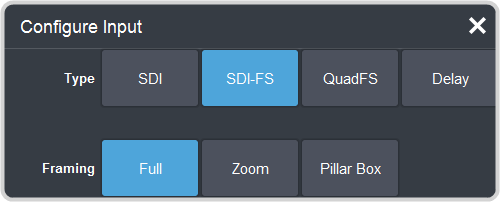
Click a Type button to turn on the FSFC.
- SDI — no FSFC is applied to the input.
- SDI-FS — an FSFC is applied to the input.
- QuadFS — a timed FSFC is applied to the input. Each QuadFS is timed to the first SDI-FS in the group of four (1-4, 5-8, 9-12). The SDI-FS
must be applied to the first input and QuadFS to the rest of the inputs in the group.Tip: Use this if you are taking the quad-split output from an untimed UHD camera that you need to frame-sync. The frame syncs applied to each input are locked together for timing so that all four inputs are in sync.
-
If required, select the aspect ratio conversion mode you want to use.
The options that are available depend on the video format that the switcher is converting from and to.
- Full — The video signal is scaled disproportionately to fill the display of the new aspect ratio. Aspect distortion occurs as the image is stretched/compressed to fit in the new aspect ratio.
- Zoom — The central portion of the video signal is zoomed to fill the display of the new video format. No aspect distortion is introduced but the edges of the video signal may be cropped.
- Letter Box — Black bars are added to the top and bottom of a 16:9 image to display correctly in a 4:3 video format.
- Pillar Box — Black bars are added to the right and left of a 4:3 image to display correctly in a 16:9 video format.