
Audio Mixer Interface
The audio mixer interface allows you to control the mix levels for all the incoming channels to a mix layer, as well as the main level for the output of that layer. The Main layer also has a monitor output and level.
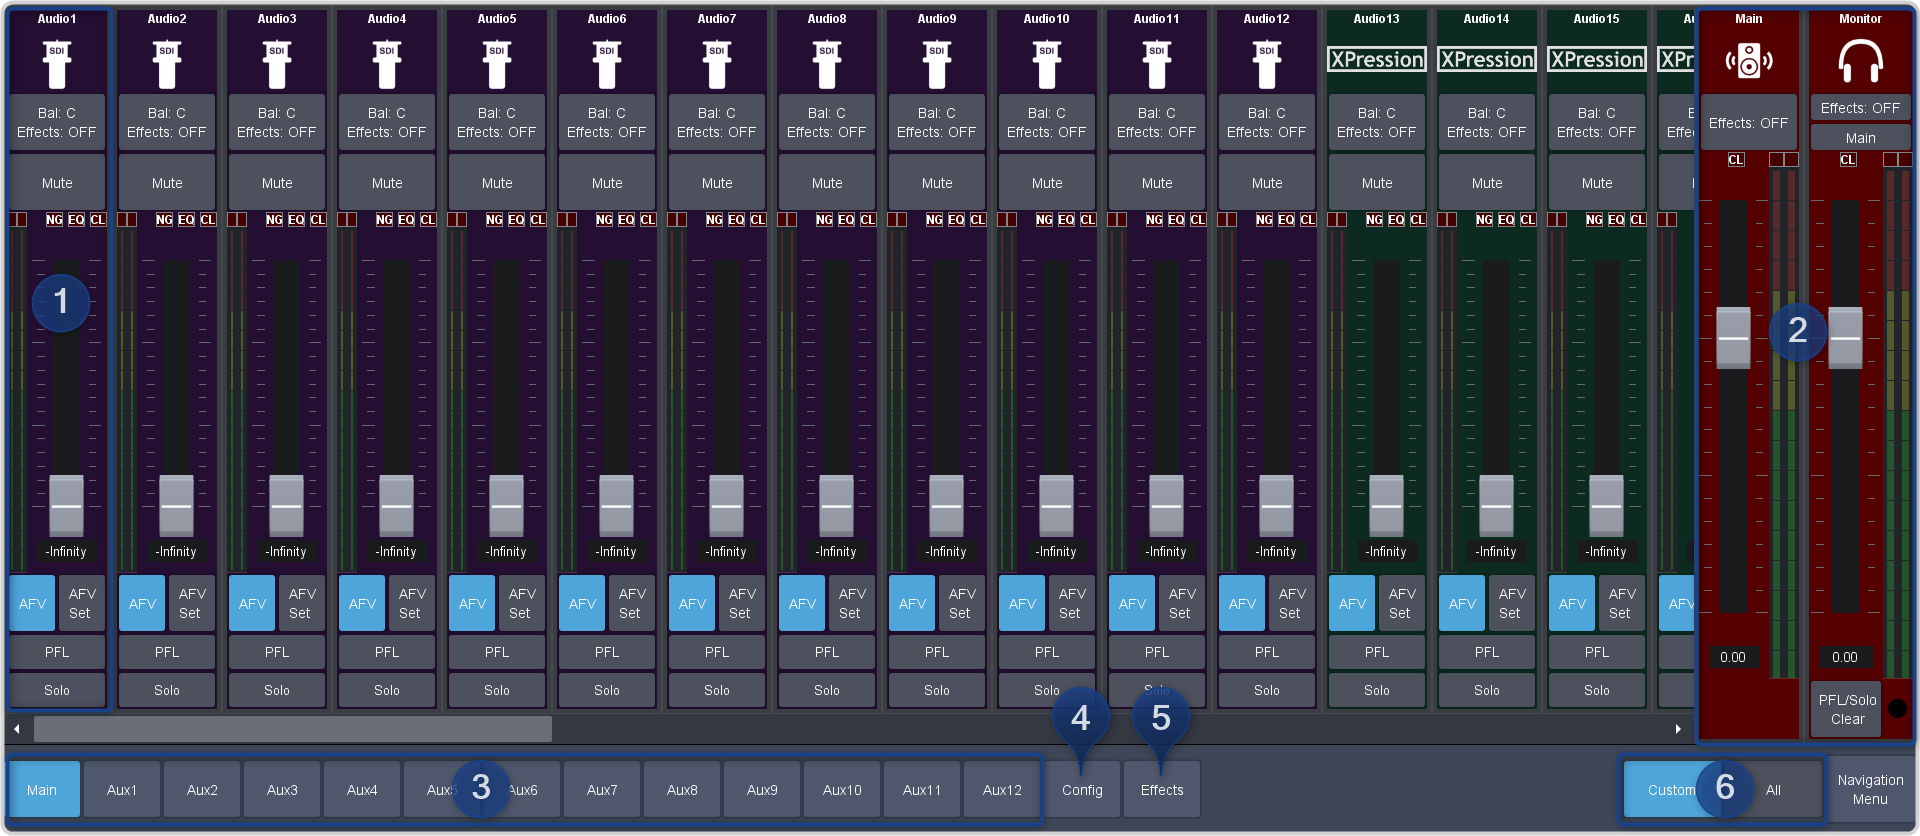
- Audio Channel Strips — Each strip controls the input from that audio channel. Strips are color coded for where the audio comes from. The controls available on each strip depend on
how the audio fader is configured.
- Bal/Pan: — adjust the balance or pan of the audio source. Whether Balance or Pan is applied to the audio source is determined automatically based on the audio
source assigned to the fader.
- Balance — the volume of the left and right stereo channel. For example, as you move the slider to the right the volume of the right channel is increased and the volume of the left channel is decreased.
- Pan — the amount of the left or right input channel that is part of each channel before the mixer. For example, as you move the slider to the right you get more of the left channel in the right channel and the volume of the left channel decreases.
- Tone — plays out a tone on the channel. This can help identify that a channel is being routed correctly in the mixer. The frequency of the test tone is set from the Audio Mixer Configuration page.
Tip: Shortcut buttons are also provided on the Balance window for NG/Ducking, EQ, Compression Limiter, and Config. These buttons jump directly to the corresponding setup pages for the channel you are on. - Mute — turn off the audio from this source. This does not change the level.
- Pre/Post (Aux only) — select whether the audio source on an Aux layer is taken before the fader (Pre) or after (Post) the source fader. If an audio source is taken before the fader, the source fader has no impact on the level of the audio going out the aux layer.
- Fader — adjust the level of the audio from the source. You can either move the fader manually or enter a value in the text field at the bottom of the
slider.Tip: At the top of the fader are three Clip indicators to warn you if clipping is occurring in the Equalizer stage (EQ), Compressor/Limiter stage (CL), or Noise Gate (NG).
- AFV (Main only) — turn Audio Follow Video (AFV) on or off for this audio source. AFV is only available for audio that is associated with a video source, such as embedded audio on input BNCs and from the Media-Store. When AFV is on, the audio level is taken to the AFV Set level when the associated video source is taken on-air. The audio level is taken to -infinity when the video source is taken off-air.
- AFV Set (Main only) — the maximum level that you want the audio to rise to when the associated video source is taken on-air. To set the AFV level, move the slider to the level you want the audio to be at and click AFV Set. The AFV Set button turns on when the slider is at the AFV set level.
- PFL — turn Pre Fader Listen (PFL) on or off for this audio source. This is similar to solo in that it mutes all other sources, but the audio source is taken before the fader where solo takes the audio after the fader. PFL hears the raw audio level coming into the mixer and solo hears the audio at the level the fader is set to. When PFL is turned on for a source a warning light flashes red on the monitor strip.
- Solo — mute all other audio sources but the one(s) you turn solo on for. This allows you to quickly isolate a source without having to mute all the other sources. When Solo is turned on for a source a warning light flashes red on the main strip.
Tip: You can move a fader at any time to bring up an audio source even if the associated audio source is not on-air. This audio source will remain at the selected level until it is brought down again manually or is included in a transition with AFV turned on. - Bal/Pan: — adjust the balance or pan of the audio source. Whether Balance or Pan is applied to the audio source is determined automatically based on the audio
source assigned to the fader.
- Main Level Controls — The Main and Monitor strips control the levels of the output audio for the mixer. If you select an Aux output this strip changes to control the level for that
output.
- Effects — click the Compressor Limiter button to jump directly to the corresponding setup pages for the effect you are applying to the output.
- Monitor Source (Monitor only) — select the audio source for the monitor output.
- Fader — adjust the level of the audio output. You can either move the fader manually or enter a value in the text field at the bottom of the slider.
- PFL/Solo Clear (Monitor only) — turn solo off for all sources on this audio layer.
- Layer Controls — select the audio layer that you want to control. Each layer is assigned to an audio output.
- Configuration — open the audio mixer configuration page.
- Effects — open the effects page where you can apply a noise gate, equalizer, and compressor to the audio.
- Included Channels — select whether only the audio sources that have been assigned to each layer are shown (Custom), or whether all audio sources are shown (All).